Author: sofis
Prep Time: 20 minutes
Cook Time: 10 minutes
Total Time: 1 hour
Yield: 24 snowballs
Category: Dessert
Method: No Bake
Cuisine: American
Diet: Vegetarian
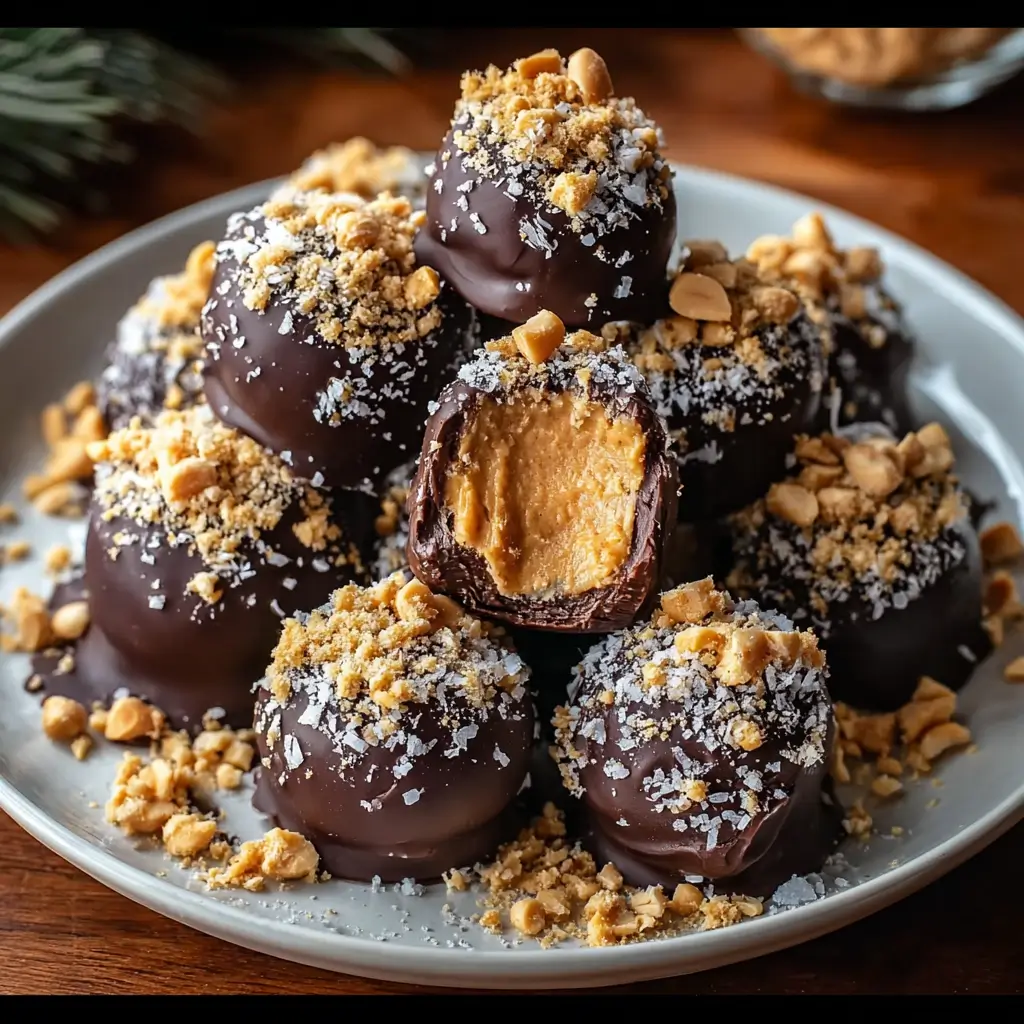
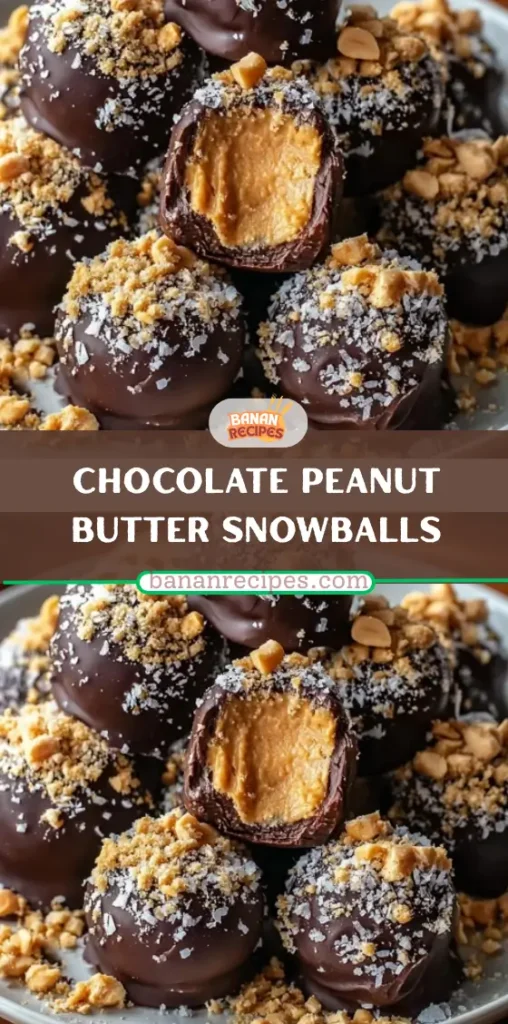
Chocolate Peanut Butter Snowballs are a timeless no-bake dessert that combines creamy peanut butter, rich chocolate, and customizable toppings into a bite-sized indulgence. These elegant little treats are as visually appealing as they are delicious, making them ideal for holidays, special occasions, dessert tables, and gift boxes. With their smooth peanut butter centers and glossy chocolate coating, snowballs strike the perfect balance between sweetness, richness, and texture.
One of the greatest strengths of this recipe lies in its versatility. While the base flavor pairing of peanut butter and chocolate is universally loved, the addition of caramel drizzle, sea salt flakes, crushed peanuts, or festive sprinkles allows you to tailor these snowballs to any season or celebration. They require no baking, minimal equipment, and simple techniques, making them approachable for beginners while still impressive enough for experienced home cooks.
In this detailed guide, you will learn not only how to prepare Chocolate Peanut Butter Snowballs step by step, but also how to adjust texture, improve coating consistency, decorate professionally, and store them properly. This article provides the knowledge needed to produce consistent, bakery-quality results every time.
Ingredients
Gathering all ingredients in advance ensures a smooth preparation process. Each component plays an important role in flavor, texture, or structure.
Peanut Butter Centers
- 1 cup creamy peanut butter
The foundation of the recipe, providing richness, structure, and classic flavor. - 2 tablespoons unsalted butter, melted
Adds smoothness and helps bind the dough. - 1½ to 2 cups powdered sugar, sifted
Sweetens and firms the dough. The amount can be adjusted for texture. - ¼ teaspoon vanilla extract
Enhances overall flavor and balances sweetness. - Pinch of fine salt (optional)
Helps balance the sweetness and deepen flavor. - ½ cup finely crushed graham crackers (optional)
Adds subtle texture and structure to the dough. - ½ cup crushed vanilla wafers (optional)
Provides sweetness and a slightly firmer bite. - ¼ cup powdered milk (optional)
Enhances creaminess and improves dough consistency.
Chocolate Coating
- 12 ounces semi-sweet or milk chocolate melting wafers or chips
Creates a smooth, rich outer shell. - 1 teaspoon vegetable or coconut oil (optional)
Thins the chocolate for easier dipping and a shinier finish.
Caramel and Decorations
- ¼ cup soft caramel candies or caramel sauce
Adds a buttery, sweet contrast to the chocolate. - 1 teaspoon heavy cream or milk
Helps melt caramel to a smooth drizzle consistency. - Sea salt flakes (decoration)
Adds contrast and enhances flavor. - Crushed peanuts (decoration)
Provides crunch and visual appeal. - Sprinkles (decoration)
Ideal for festive or holiday versions. - White chocolate drizzle (decoration)
Adds elegance and visual contrast.
Preparation Method
Chocolate Peanut Butter Snowballs come together in stages, each designed to ensure perfect texture and a professional finish.
Step 1: Prepare the Peanut Butter Dough
In a medium mixing bowl, combine creamy peanut butter, melted butter, vanilla extract, and a pinch of salt if using. Mix until smooth and fully blended.
Gradually add the sifted powdered sugar, mixing thoroughly after each addition. Begin with 1½ cups and increase as needed until a thick, pliable dough forms. The ideal texture should be firm enough to roll without sticking to your hands.
If desired, incorporate crushed graham crackers, vanilla wafers, or powdered milk. These additions improve structure and add depth of flavor without overpowering the peanut butter.
Step 2: Shape the Snowballs
Line a baking sheet with parchment paper.
Using a teaspoon or small scoop, portion the dough evenly. Roll each portion between your palms to form smooth balls approximately 1 inch in diameter. Place them evenly spaced on the prepared tray.
Step 3: Chill the Centers
Place the tray in the refrigerator for at least 25 minutes, or in the freezer for 10 to 15 minutes. Chilling is essential, as firm centers prevent melting and deformation during chocolate coating.
Step 4: Melt the Chocolate
In a microwave-safe bowl, melt the chocolate wafers or chips in 20 to 30 second intervals, stirring between each interval until smooth. If a thinner coating is desired, stir in the vegetable or coconut oil.
The chocolate should be glossy and fluid but not hot.
Step 5: Coat the Snowballs
Remove the chilled peanut butter balls from refrigeration. Using a fork or dipping tool, submerge each ball into the melted chocolate, allowing excess to drip off before returning it to the parchment-lined tray.
Work efficiently to prevent the centers from warming.
Step 6: Prepare and Add Caramel Drizzle
In a microwave-safe bowl, combine the caramel candies or caramel sauce with heavy cream or milk. Heat in 10 to 15 second intervals, stirring frequently, until smooth and pourable.
Drizzle the caramel over the chocolate-coated snowballs using a spoon or piping tool.
Step 7: Decorate
Before the coatings set, add your desired decorations:
- Sprinkle with sea salt flakes
- Add crushed peanuts
- Apply sprinkles
- Finish with white chocolate drizzle
Step 8: Final Chill and Storage
Return the tray to the refrigerator for 15 to 20 minutes until fully set. Once firm, transfer the snowballs to an airtight container for storage.
Texture, Flavor, and Customization
Chocolate Peanut Butter Snowballs offer a luxurious contrast of textures. The creamy center melts softly, while the chocolate shell provides a clean snap. Caramel drizzle adds buttery richness, and toppings introduce crunch or visual interest.
The recipe is intentionally flexible. By adjusting powdered sugar, optional dry ingredients, or decoration choices, you can create snowballs that are softer, firmer, sweeter, or more balanced according to preference.
Storage and Shelf Life
- Refrigerator: Store in an airtight container for up to 7 days
- Freezer: Freeze for up to 2 months; thaw briefly before serving
- Serving Tip: Let snowballs sit at room temperature for 5 minutes before serving for optimal texture
Frequently Asked Questions (FAQ)
Can I make these snowballs ahead of time?
Yes. They are ideal for advance preparation and store well in both the refrigerator and freezer.
Why is my dough too sticky?
Add more sifted powdered sugar gradually until the dough becomes firm and rollable.
Why did my chocolate coating crack?
Rapid temperature changes can cause cracking. Allow snowballs to temper slightly before coating.
Can I skip the caramel drizzle?
Yes. The snowballs are delicious with just chocolate and toppings.
How do I get a smooth chocolate finish?
Ensure the chocolate is fully melted, stirred well, and thinned with oil if needed.
Are these suitable for gifting?
Absolutely. They travel well when chilled and look beautiful in decorative boxes or tins.
Conclusion
Chocolate Peanut Butter Snowballs are a classic no-bake dessert that delivers indulgence, elegance, and versatility in every bite. With a creamy peanut butter center, smooth chocolate coating, and customizable toppings, they are perfect for holidays, parties, or anytime you want a reliable crowd-pleaser.
This recipe’s simplicity makes it accessible, while its presentation and flavor make it feel special. By following the detailed steps and tips in this guide, you can consistently produce snowballs that look professional, taste exceptional, and store beautifully.
Whether you’re preparing a festive dessert spread or a small homemade gift, Chocolate Peanut Butter Snowballs are a timeless treat worth adding to your recipe collection.
Print
Chocolate Peanut Butter Snowballs: Rich, Creamy, and Perfect for Any Celebration
- Total Time: 1 hour
- Yield: 24 snowballs
- Diet: Vegetarian
Description
Chocolate Peanut Butter Snowballs are rich, creamy, and holiday-perfect treats that combine smooth peanut butter with chocolate and customizable toppings for a festive dessert.
Ingredients
- 1 cup creamy peanut butter
- 2 tablespoons unsalted butter, melted
- 1½ to 2 cups powdered sugar, sifted
- ¼ teaspoon vanilla extract
- Pinch fine salt (optional)
- ½ cup finely crushed graham crackers (optional)
- ½ cup crushed vanilla wafers (optional)
- ¼ cup powdered milk (optional)
- 12 ounces semi-sweet or milk chocolate melting wafers or chips
- 1 teaspoon vegetable or coconut oil (optional)
- ¼ cup soft caramel candies or caramel sauce
- 1 teaspoon heavy cream or milk
- Sea salt flakes (decoration)
- Crushed peanuts (decoration)
- Sprinkles (decoration)
- White chocolate drizzle (decoration)
Instructions
- In a medium mixing bowl, blend peanut butter, melted butter, vanilla extract, and a pinch of salt until smooth.
- Gradually incorporate sifted powdered sugar until a thick, pliable dough forms, adjusting as needed for a firm, non-sticky texture.
- If desired, mix in crushed graham crackers, vanilla wafers, or powdered milk for added structure and flavor.
- Line a baking sheet with parchment paper.
- Portion dough and roll into 1-inch balls. Arrange on prepared tray.
- Refrigerate for at least 25 minutes or freeze for 10–15 minutes until firm.
- Melt chocolate in 20–30 second intervals, stirring until smooth. Add oil if desired.
- Dip chilled balls in melted chocolate, allowing excess to drip off. Return to tray.
- Melt caramel with cream or milk, then drizzle over coated balls.
- Add toppings immediately before chocolate sets.
- Refrigerate for 15–20 minutes until fully firm.
- Store snowballs in an airtight container.
Notes
- Adjust powdered sugar for desired dough consistency.
- Chilling is essential for clean chocolate coating.
- Customize toppings to suit your preference.
- Prep Time: 20 minutes
- Cook Time: 10 minutes
- Category: Dessert
- Method: No bake
- Cuisine: American