
Chex Mix is a classic snack that’s perfect for parties, movie nights, or simply as a crunchy treat to satisfy your snack cravings. While there are many ways to prepare this savory mix, making it in a roasting pan is one of the easiest and most efficient methods. Using a roasting pan allows you to evenly coat all your ingredients in delicious seasonings and ensures that each bite is perfectly crispy. Whether you’re new to making Chex Mix or you’re looking for a simple and tasty way to prepare it in larger batches, this guide will show you step-by-step how to make Chex Mix in a roasting pan. From choosing the right ingredients to roasting to perfection, you’ll have a homemade snack that’s sure to impress.
What You Need to Make Chex Mix in a Roasting Pan

Key Ingredients for Chex Mix
When making Chex Mix, the key to a delicious, flavorful batch lies in the combination of classic ingredients and seasonings. Here’s a breakdown of the essential ingredients you’ll need to create the perfect Chex Mix:
- Chex Cereal (Corn, Rice, and Wheat)
- The foundation of any Chex Mix recipe, Chex cereal offers the signature crunch and texture that makes this snack so irresistible. A mixture of corn, rice, and wheat Chex provides a variety of flavors and textures, giving your Chex Mix a well-rounded crunch. You can use one type or mix them all together for a diverse snack experience.
- Pretzels
- Pretzels add a salty, crunchy element that complements the Chex cereal perfectly. Mini pretzels are commonly used in Chex Mix because they’re easy to grab and pop into your mouth, but you can also try pretzel sticks or pretzel twists for added variety.
- Nuts (Peanuts, Cashews, or Almonds)
- Nuts are an essential ingredient in many Chex Mix recipes, providing extra crunch and a boost of protein. Peanuts are the most common choice, but you can also use cashews, almonds, or a mix of your favorites. Roasting the nuts alongside the other ingredients ensures they soak up the savory seasonings.
- Butter
- Butter is the key ingredient that binds all the ingredients together and ensures your Chex Mix has a rich, savory flavor. It also helps the seasonings adhere to the cereal, pretzels, and nuts, giving every piece that irresistible buttery taste. Be sure to melt the butter before mixing it with the other ingredients.
a
- Seasoning Sauce (Worcestershire Sauce)
- Worcestershire sauce adds a tangy and savory depth of flavor that’s key to Chex Mix. Its rich umami taste helps to bring all the ingredients together. For a well-balanced flavor, you’ll typically use about 1/4 cup of Worcestershire sauce for a large batch of Chex Mix.
- Seasoning Blends (Garlic Powder, Onion Powder, and Celery Salt)
- The blend of garlic powder, onion powder, and celery salt is what gives Chex Mix its savory, addictive taste. Garlic powder brings warmth, while onion powder adds depth. Celery salt gives it that extra bit of flavor that makes the snack unique. You can adjust the quantities of these seasonings to suit your preferences, making your Chex Mix as bold or mild as you like.
- Optional Ingredients
- Cheese – Some recipes add a sprinkle of grated Parmesan or a packet of cheese seasoning for an extra cheesy flavor.
- Spices – If you prefer a spicier Chex Mix, consider adding red pepper flakes, cayenne pepper, or even a dash of hot sauce to kick up the heat.
- Sweet additions – For a sweet-and-savory version, consider adding a handful of chocolate chips, M&Ms, or even caramel for a twist on the classic recipe.
With these key ingredients, you’ll create a Chex Mix that’s bursting with flavor, texture, and crunch. You can always customize the mix to suit your taste preferences, but these ingredients are the foundation for the perfect batch of Chex Mix in a roasting pan.
Essential Seasonings for Chex Mix
The seasoning blend is what transforms your Chex Mix from a simple mix of cereal and snacks into a flavorful, crave-worthy treat. While the core ingredients provide crunch and texture, the right combination of seasonings brings your Chex Mix to life. Here’s a closer look at the essential seasonings you’ll need to create the perfect balance of savory, spicy, and aromatic flavors:
- Worcestershire Sauce
- Role: Worcestershire sauce is the secret ingredient that infuses your Chex Mix with a deep, umami-packed flavor. This sauce adds a tangy and savory base to the mix, making the other seasonings pop. It has a complex flavor profile with notes of vinegar, molasses, anchovies, and spices, which are absorbed by the Chex cereal, pretzels, and nuts, giving every bite that signature savory taste.
- How Much to Use: Typically, 1/4 to 1/3 cup of Worcestershire sauce is used for a large batch, but you can adjust based on personal taste. It’s important not to overdo it, as too much Worcestershire sauce can make the mix soggy.
Garlic Powder
-
- Role: Garlic powder is a key ingredient that gives your Chex Mix its warm, aromatic flavor. It provides a savory, slightly pungent taste without the sharpness of fresh garlic. Garlic powder is essential for balancing the richness of the butter and enhancing the savory notes of the seasoning blend.
- How Much to Use: About 1-2 teaspoons of garlic powder is enough to create that aromatic punch without overpowering the mix. You can always add a bit more for an extra garlic kick if you prefer.
- Onion Powder
- Role: Onion powder adds depth and complexity to your Chex Mix. It has a milder flavor than fresh onions, offering a sweet, savory undertone that complements the garlic powder and enhances the overall seasoning. The combination of garlic and onion is what gives Chex Mix its signature taste that keeps people coming back for more.
- How Much to Use: Typically, 1 teaspoon of onion powder is the perfect amount. Adjust it to taste, depending on how much you enjoy onion flavor.
Celery Salt
-
- Role: Celery salt is an often-overlooked seasoning, but it plays a crucial role in giving Chex Mix its unique flavor. It has a mild, savory, and slightly peppery taste that adds subtle depth to the overall seasoning blend. Celery salt also enhances the saltiness of the snack mix, ensuring that every bite is perfectly seasoned.
- How Much to Use: A teaspoon of celery salt is usually enough for a standard batch. If you prefer a slightly stronger flavor, you can use up to 1 1/2 teaspoons, but be careful not to overdo it, as celery salt can be quite salty.
- Salt
- Role: Salt is a fundamental seasoning in Chex Mix, bringing out all the flavors in the mix. It enhances the natural flavors of the Chex cereal, nuts, and pretzels, while balancing the richness of the butter and the tang of Worcestershire sauce.
- How Much to Use: A pinch of salt is often added to the seasoning mix, and you can adjust it based on your taste preferences. Remember, the pretzels and Chex cereal themselves are often already salted, so you don’t want to over-salt the entire batch.
- Black Pepper
- Role: Black pepper adds a bit of heat and sharpness to your Chex Mix, complementing the other seasonings while balancing the richness of the butter. It brings out the savory flavors without overpowering them, creating a well-rounded snack mix.
- How Much to Use: A few cracks of fresh black pepper (about 1/4 to 1/2 teaspoon) are typically enough to give your Chex Mix a nice hint of spice. Adjust based on your personal preference for heat.
Optional Spices for Extra Flavor
-
- Cayenne Pepper or Red Pepper Flakes: If you like a spicy kick, cayenne pepper or red pepper flakes are the perfect addition. A pinch of cayenne pepper or a small sprinkle of red pepper flakes will give your Chex Mix a bold, spicy flavor.
- Paprika: Adding paprika can give your Chex Mix a smoky, mildly spicy flavor. It’s a great way to enhance the savory taste of the mix, and you can use sweet or smoked paprika, depending on your flavor preference.
- Seasoning Mixes (Ranch, Italian, or Taco Seasoning): For a creative twist, consider incorporating a packet of ranch seasoning, Italian seasoning, or taco seasoning. These pre-made mixes offer a convenient way to change up the flavor profile, and they pair wonderfully with the crunchy elements of Chex Mix.
Balancing the Seasonings
The key to a great Chex Mix is balance. The Worcestershire sauce provides a savory, tangy foundation, while the garlic, onion, and celery salt add depth and complexity. Salt and pepper enhance the flavor, while optional spices like cayenne or paprika allow you to customize the heat level. When making Chex Mix, it’s important to taste and adjust the seasoning mixture before roasting to ensure that every bite is perfectly seasoned.
Choosing the Right Roasting Pan for Chex Mix
The roasting pan you use can make a significant difference in the outcome of your Chex Mix, especially when it comes to even cooking and achieving that perfect crispy texture. While it might seem like any pan will do, selecting the right roasting pan ensures that your snack mix cooks evenly, is easy to toss, and doesn’t burn or stick. Here’s a detailed guide on how to choose the best roasting pan for making Chex Mix:
Size of the Roasting Pan
-
- Importance: One of the most important factors to consider when choosing a roasting pan is its size. You want a pan large enough to hold all your Chex Mix ingredients without overcrowding them. Overcrowding can lead to uneven roasting, with some parts of the mix undercooked and others overcooked.
- Recommendation: Opt for a roasting pan that provides ample space for your ingredients to spread out in a single, even layer. A 15×10-inch roasting pan or a similar size works well for a typical batch of Chex Mix. If you’re making a larger batch, consider using a bigger pan (like a 16×12-inch or larger) to give the ingredients plenty of room to move and crisp up.
Material of the Roasting Pan
-
- Importance: The material of the roasting pan affects how heat is distributed, which is critical for achieving that perfect, crispy Chex Mix. Different materials conduct heat at different rates and can impact the texture and crispiness of your mix.
- Aluminum: Aluminum roasting pans are a popular choice because they conduct heat efficiently and evenly, which is important for roasting Chex Mix without hot spots. They also tend to be lightweight and affordable.
- Stainless Steel: Stainless steel roasting pans are durable and highly resistant to warping. While they don’t conduct heat as quickly as aluminum, they provide consistent, even heat when used with the right oven temperature. If you’re looking for a pan that lasts and can withstand high temperatures, stainless steel is a great option.
- Enamel-Coated Steel: Enamel-coated roasting pans are another solid choice. They combine the heat conductivity of steel with the non-stick properties of enamel, making them easy to clean and resistant to sticking. However, enamel-coated pans can be more expensive, so they might be better suited for those who plan to use their roasting pans frequently.
- Importance: The material of the roasting pan affects how heat is distributed, which is critical for achieving that perfect, crispy Chex Mix. Different materials conduct heat at different rates and can impact the texture and crispiness of your mix.
Non-Stick vs. Regular Roasting Pans
-
- Non-Stick Coating: Non-stick roasting pans are convenient for making Chex Mix because they prevent the ingredients from sticking to the pan, making cleanup easier. The non-stick surface ensures that your Chex Mix doesn’t cling to the pan or burn in the corners, giving you evenly roasted snacks.
- Pros: Easy to clean, less likelihood of the Chex Mix sticking, especially for those who like to toss the mix during roasting.
- Cons: Non-stick pans can wear out over time, especially if you use metal utensils or scrub them too harshly. Some non-stick coatings can also release harmful chemicals at high temperatures, so it’s important to choose a high-quality, heat-resistant non-stick pan.
- Regular Roasting Pan: If you opt for a regular roasting pan (one without a non-stick coating), make sure to line it with parchment paper or aluminum foil. This prevents the Chex Mix from sticking and helps with easy cleanup. These pans may require a little more effort to clean, but they are often more durable and can withstand higher temperatures.
- Pros: More durable, often less expensive than non-stick pans, and can handle higher oven temperatures.
- Cons: May require additional cleaning effort and parchment paper or foil for easy cleanup.
- Non-Stick Coating: Non-stick roasting pans are convenient for making Chex Mix because they prevent the ingredients from sticking to the pan, making cleanup easier. The non-stick surface ensures that your Chex Mix doesn’t cling to the pan or burn in the corners, giving you evenly roasted snacks.
Depth of the Roasting Pan
-
- Importance: The depth of the pan plays a role in how well the ingredients can spread out and cook evenly. A deeper pan means the ingredients will be more stacked on top of one another, which can lead to uneven roasting if not stirred regularly. Shallow pans allow for a more even spread, ensuring the Chex Mix cooks uniformly.
- Recommendation: Choose a pan that’s not too deep—about 2 to 3 inches deep should suffice. This depth allows the Chex Mix to roast evenly without too much stacking, and it provides enough space for stirring and tossing the ingredients throughout the cooking process.
- Ease of Stirring and Tossing
- Importance: Stirring your Chex Mix while it’s roasting is essential for even cooking. You’ll want a pan that makes it easy to toss the mix without spilling it out. A higher-sided pan or one with wide edges can help prevent messes when you’re stirring or flipping the mix.
- Recommendation: Look for a roasting pan with low or medium sides—this will allow you to easily toss and stir the mix without worrying about it spilling out. Additionally, a roasting pan with sturdy handles on each side can make it easier to move the pan in and out of the oven.
Durability and Longevity
-
- Importance: Chex Mix can take some time to roast (usually around an hour), so it’s important that your pan is durable enough to withstand long oven times at high heat. Investing in a quality roasting pan will pay off in the long run, especially if you plan to make Chex Mix regularly or use the pan for other cooking purposes.
- Recommendation: Go for a roasting pan with solid construction, whether it’s aluminum, stainless steel, or enamel-coated steel. Ensure that the handles are secure, as some cheaper pans may have flimsy or loosely attached handles that can be a safety hazard.
- Cleaning and Maintenance
- Importance: After making Chex Mix, you’ll want a pan that’s easy to clean, especially since the mix can sometimes leave behind sticky butter or seasoning. Some roasting pans are dishwasher safe, while others may require hand washing. Consider the time and effort you’re willing to put into cleaning when choosing your pan.
- Recommendation: Non-stick and enamel-coated roasting pans are often easier to clean because food tends to slide off the surface. However, if you’re using a regular metal roasting pan, be sure to line it with parchment paper or foil to make cleanup simpler.
Step-by-Step Instructions for Making Chex Mix in a Roasting Pan

Preheat Your Oven for Perfectly Roasted Chex Mix
Preheating your oven is a crucial step when making Chex Mix. It ensures that your mix cooks evenly and crisps up to the perfect texture. Here’s why and how you should preheat your oven properly to achieve the best results:
- Why Preheating Is Essential
- Even Cooking: Preheating the oven helps ensure that the heat is evenly distributed from the moment you place your pan inside. If you skip this step, the Chex Mix might cook unevenly, with some parts becoming overcooked and others undercooked. Preheating sets the stage for a consistent roast, allowing each ingredient to crisp up at the same rate.
- Texture and Crispiness: One of the hallmarks of great Chex Mix is its crispy texture. If your oven isn’t preheated, it can take longer for the ingredients to reach the optimal temperature, and the Chex Mix might become soggy or lose its crunch. Preheating helps seal in the seasoning and moisture, creating a golden, crispy exterior that’s characteristic of the perfect snack mix.
- Baking Time Accuracy: Many Chex Mix recipes call for a specific baking time, often around 45 to 60 minutes. If your oven isn’t preheated, it can affect the baking time, making the mix cook too quickly or too slowly. Preheating ensures that your recipe’s time is accurate, giving you predictable and reliable results each time.
Setting the Right Temperature
-
- Temperature Range: For most Chex Mix recipes, you’ll want to preheat your oven to a temperature between 250°F (120°C) and 350°F (175°C). The lower end of the range is often recommended for slower, more even cooking, while the higher end is used for a quicker roast with a crispier finish. Choosing the right temperature is essential for the flavor and texture of your mix, so check your recipe’s guidelines carefully.
- Why Lower Temperatures Work Best: Lower temperatures (around 250°F) are generally preferred for roasting Chex Mix because they allow the ingredients to crisp up without burning. The goal is to cook the ingredients evenly, so a slower bake gives the cereal, nuts, and pretzels time to absorb the seasonings and roast to the perfect golden color.
- Adjusting for Crispy Texture: If you want your Chex Mix to have a particularly crunchy finish, you can adjust the temperature slightly higher (closer to 350°F), but be sure to keep an eye on it to avoid burning. If you prefer a more tender result, sticking to a lower temperature and allowing more time in the oven is the best route.
How to Preheat the Oven Properly
-
- Turn the Oven On: Begin by turning on your oven and setting it to the desired temperature. If your recipe specifies a temperature range, aim for the middle of that range. For instance, if your recipe calls for a range of 275°F to 300°F, you can set your oven to 285°F as a good compromise.
- Wait for the Oven to Reach Temperature: Don’t rush this step. Many ovens will beep or display a light once they’ve reached the desired temperature. If you’re using an older oven, consider using an oven thermometer to double-check that the temperature is accurate, as some ovens can run hot or cold.
- Use the Right Rack Position: When preheating, consider placing your oven rack in the center or slightly above the center. This positioning ensures the Chex Mix is roasted evenly from all sides. Avoid placing it too close to the top or bottom elements, as this can cause parts of your mix to burn or cook unevenly.
What Happens If You Skip Preheating?
-
- Uneven Cooking: If you place your Chex Mix into a cold oven and then start it, the cooking process will be less consistent. The heat won’t reach all parts of the pan at the same time, leading to some ingredients being undercooked while others are overdone. This can result in a mix that’s either soggy or overly crispy in some spots.
- Longer Cooking Time: Without preheating, your Chex Mix may take longer to cook. This could lead to burnt edges or uneven seasoning distribution since some parts of the mix will have been exposed to heat for longer periods.
- Lack of Crunch: One of the main goals in making Chex Mix is achieving a perfectly crispy texture. Starting with a cold oven makes it more difficult for the mix to crisp up properly, and it may end up soft or soggy.
Preheating and Safety
-
- Ensure Safety When Handling the Pan: Preheating the oven to the proper temperature helps prevent issues with burning and uneven cooking, which can be important for safety. Be cautious when handling a hot roasting pan, and use oven mitts to avoid burns. Make sure the pan is placed securely in the center of the oven so it doesn’t tip or cause spills.
- Time Consideration
- Waiting Time: Preheating typically takes 10–15 minutes depending on your oven and the desired temperature. Make sure you give it enough time to reach the correct heat before you put your Chex Mix in the oven. While it’s heating up, you can prepare your Chex Mix, ensuring that the ingredients are fully coated and ready for roasting once the oven reaches temperature.
Mixing the Chex Mix Ingredients in a Large Bowl
Mixing your Chex Mix ingredients properly is a key step in ensuring that each piece is evenly coated with the delicious seasonings and butter, which results in a well-balanced and flavorful snack. Here’s why this step is so important and how you can do it effectively:
- Why Mixing in a Large Bowl Is Essential
- Even Distribution of Ingredients: Using a large bowl allows you to mix the ingredients more thoroughly, ensuring that every piece of Chex, pretzels, nuts, and other additions get coated with the seasonings and butter evenly. If you use a small bowl, the ingredients will be packed too tightly, and it can be difficult to toss everything together without breaking or crushing the delicate Chex pieces.
- Prevents Spills: A large bowl provides enough space for you to gently toss the ingredients without worrying about spilling. When mixing a large batch of Chex Mix, this is especially important, as you don’t want to lose any of your flavorful snacks or make a mess. The bigger the bowl, the more room you have to work with.
- Easier to Incorporate Flavor: When you have enough space, it’s easier to ensure that all the ingredients are evenly coated with the seasonings, melted butter, and any other flavorings you may add (such as Worcestershire sauce, hot sauce, or other spices). The larger surface area of the bowl allows you to toss the mix gently without overworking or damaging the delicate ingredients.
Choosing the Right Bowl
-
- Size Matters: It’s important to choose a bowl that’s large enough to accommodate all of your ingredients without overcrowding. A bowl that holds 4 to 6 quarts is ideal for most standard Chex Mix recipes. If you’re making a double batch, you may need to use an even larger bowl. The goal is to ensure that there’s enough room for all the ingredients to move freely when you toss them together.
- Material Considerations: While any large bowl will do, using a stainless steel or glass bowl is ideal because they are sturdy, non-reactive, and won’t absorb odors or colors from the ingredients. A plastic bowl can work, but it’s important to use one that’s big enough to avoid splashing when tossing the mix.
- Deep Enough for Tossing: Choose a bowl with enough depth so that when you toss the ingredients, they don’t fly out of the bowl. A shallow bowl might not allow for gentle mixing, which can lead to uneven coating and even broken pieces of Chex or nuts. A deep, wide bowl will give you more control over the mix and allow the ingredients to coat evenly.
The Mixing Process
-
- Layering the Ingredients: Before you start mixing, it’s a good idea to layer your ingredients in the bowl, starting with the Chex cereal, followed by the pretzels, nuts, and any other ingredients like bagel chips or crackers. This way, when you start tossing, each ingredient will be evenly mixed and coated. You can always adjust the ratio if you prefer more of one ingredient (e.g., extra pretzels or nuts), but start with an even base.
- Gentle Tossing: To mix the ingredients, use a gentle folding motion rather than stirring vigorously. Stirring too aggressively can break the delicate Chex pieces, resulting in crumbs in your Chex Mix. Gently lift the mix from the bottom and fold it over, repeating this motion until everything is evenly coated with the seasoning mixture. Be sure to scrape the bottom of the bowl to ensure that no ingredients are left unseasoned.
- Add Seasonings Gradually: If you’re using a liquid seasoning mix (like melted butter with Worcestershire sauce, hot sauce, or other spices), pour it gradually over the ingredients while tossing to ensure that each piece gets coated without clumping. You can also use a spoon to drizzle the seasoning mix over the top, but the key is to distribute the liquid evenly to prevent soggy spots.
- Check for Even Coating: Once you think the ingredients are evenly coated, take a few moments to inspect. If you see any areas where the seasoning hasn’t reached, continue gently mixing until the coating appears consistent across the mix.
Adding Extra Ingredients
-
- Nuts, Cheeses, and Dried Fruits: After mixing the main ingredients, you might want to add extras like roasted nuts, cheese crackers, or even dried fruits. These add more flavor and texture to your Chex Mix. Mix these extras in gently at the end to avoid crushing them, especially if they’re delicate like dried cranberries or cashews.
- Spices and Heat: If you plan to add heat or extra spices to your Chex Mix (such as chili powder, garlic powder, or cayenne pepper), it’s a good idea to mix them into the melted butter and liquid seasonings first. This allows the spices to be evenly distributed throughout the mix. For extra crunch, you can also sprinkle some spices directly over the mix while tossing.
Tossing Tips for Maximum Flavor
-
- Use Clean Hands or a Spatula: If you prefer not to get your hands dirty, you can use a spatula or spoon to toss the ingredients in the bowl. However, some people prefer using their hands to get a feel for the mix and ensure everything is coated. Just be sure to wash your hands before starting to avoid transferring unwanted flavors.
- Taste Testing: Before transferring the Chex Mix to the roasting pan, it’s always a good idea to taste a small sample to check the seasoning. If you feel it needs more salt, spice, or butter, now is the time to add it. Just remember to mix it in evenly to maintain the balance of flavors.
- Avoid Overcrowding the Bowl
- Don’t Overload: It might be tempting to fill your large bowl to the brim with all the ingredients at once, but avoid overcrowding the bowl. This can make it harder to mix the ingredients properly, resulting in an uneven distribution of the seasonings. If needed, divide the ingredients into two batches and mix them separately, then combine them before roasting.
Roasting the Chex Mix in the Oven
Roasting your Chex Mix in the oven is the crucial step that transforms the raw ingredients and seasonings into a crunchy, golden snack with deep, flavorful notes. Proper roasting ensures that every piece of Chex, pretzel, nut, and seasoning crisps up just right, creating that signature texture and taste we all love. Here’s a step-by-step breakdown of how to roast Chex Mix in the oven:
- Preheat the Oven:
- Before you even think about placing your Chex Mix in the oven, preheat it to the correct temperature. Typically, the ideal temperature for roasting Chex Mix is 250°F (121°C). This low and slow method ensures that the Chex Mix crisps evenly without burning or overcooking.
- Why Low and Slow? Roasting at a low temperature allows the flavors to meld together while ensuring the mix crisps evenly. If you roast at a higher temperature, there’s a risk that the butter and seasonings will burn before the Chex Mix achieves the perfect crunch.
- Prepare the Roasting Pan:
- Choosing the Right Pan: As mentioned earlier, choosing the right roasting pan is essential. A large, rimmed baking sheet or roasting pan with high sides is ideal because it allows for even distribution of the Chex Mix and prevents any of the mix from spilling over. Avoid using a shallow pan or one that’s too small, as it can result in uneven roasting and overcrowding.
- Line the Pan: Although not strictly necessary, it’s a good idea to line your roasting pan with parchment paper or a silicone baking mat. This ensures easy cleanup and prevents any of the mix from sticking to the pan. It also helps avoid burning, especially for the more delicate ingredients like Chex or nuts.
and
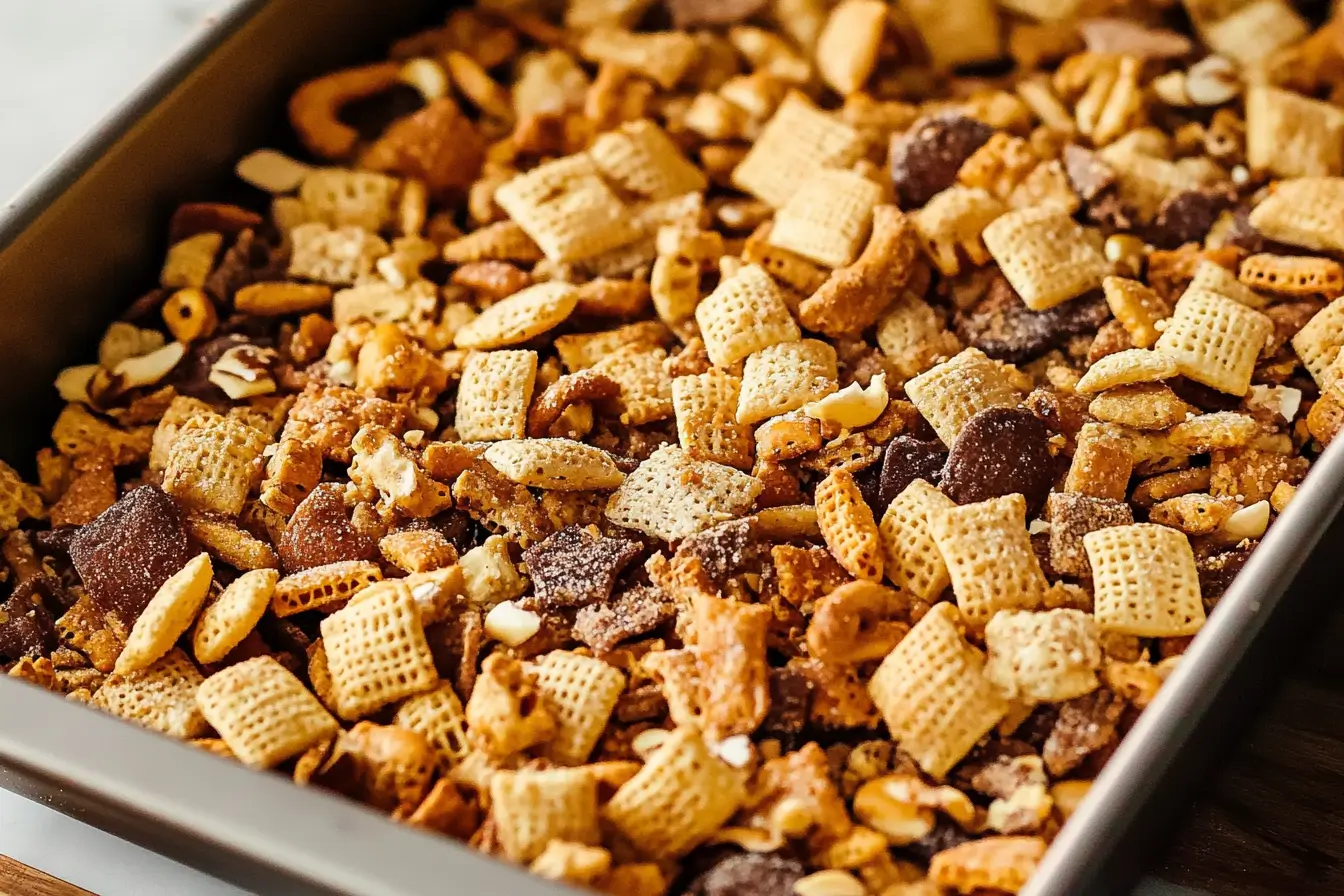
- Spread the Chex Mix Evenly:
- Even Distribution: Pour the mixed Chex Mix onto your prepared roasting pan. Spread the mixture into an even layer to ensure that each piece roasts uniformly. If you have too many ingredients piled in one area, some of the mix may stay soggy or not crisp up properly. Gently use a spoon or spatula to level everything out. It’s crucial that each piece is exposed to heat for the perfect roasting process.
- Avoid Overcrowding: As tempting as it may be, do not overcrowd the pan. Overcrowding can lead to uneven roasting, as the heat will have trouble circulating properly. If you’re making a large batch, it’s better to roast the Chex Mix in two separate batches rather than trying to fit it all on one pan.
a
- Roasting Time and Tossing:
- Initial Roasting Time: Place the pan in the preheated oven and bake the Chex Mix for 15 minutes to start. Keep a close eye on it during this time to avoid burning the mix. This first stage will start to crisp the mix and bring out the flavor of the butter and seasonings.
- Tossing for Even Roasting: Every 15 minutes, toss the Chex Mix gently with a spatula or spoon. This is an important step to ensure even roasting. Tossing helps all sides of the Chex Mix come in contact with the heat and guarantees that every ingredient crisps up evenly. If you skip this step, the mix may brown too much on one side while remaining soggy on the other.
- How Long to Roast? Overall, the Chex Mix should be roasted for around 45 minutes to 1 hour. The exact time depends on the quantity and your oven’s performance. Be sure to check the mix frequently, especially toward the end, to prevent over-roasting or burning. The goal is to achieve a golden-brown, crispy texture throughout.
&
- Check for Doneness:
- Crispiness Test: After the recommended roasting time, take the Chex Mix out of the oven and do a quick crunch test. Pick out a few pieces of Chex, nuts, and pretzels and let them cool down for a minute or two. Once they’ve cooled, check for a crunchy, crispy texture. If the mix is still soft or chewy, return it to the oven for an additional 5 to 10 minutes, checking every few minutes to prevent burning.
- Color and Aroma: Visually, the Chex Mix should be golden brown and have a lightly toasted appearance. The aroma should be nutty and slightly buttery, with the spices you used wafting through the air. If your Chex Mix has these signs, it’s likely ready to come out of the oven.
- Cool the Chex Mix:
- Let It Cool: After roasting, it’s important to let the Chex Mix cool completely before storing it. Cooling helps the flavors settle and the mix crisps up further as it cools down. Leave it on the pan for about 10-15 minutes or until it reaches room temperature.
- Avoid Storing While Hot: Never store your Chex Mix while it’s still hot, as the residual moisture can make the mix soggy. Once cooled, transfer the Chex Mix to an airtight container to keep it fresh and crunchy.
a
- Optional: Extra Flavor Boost After Roasting:
- Post-Roast Seasoning: If you feel like the Chex Mix could use an extra flavor kick after roasting, you can sprinkle a little more seasoning over the mix as it cools. A dash of extra salt, garlic powder, or freshly ground black pepper can be sprinkled on top for a final burst of flavor. Toss gently to distribute the seasoning before the mix has fully cooled.
- Serving and Storing the Chex Mix:
- Once fully cooled, your Chex Mix is ready to be served. It’s perfect for parties, snacks, or as a simple appetizer for guests.
- Storage Tips: To keep your Chex Mix crispy for as long as possible, store it in an airtight container, preferably a plastic or glass jar with a tight-fitting lid. If you’re planning to keep it for an extended period, consider using Ziploc bags to remove as much air as possible before sealing.
Tips for Perfecting Your Roasted Chex Mix
Adjusting the Seasoning
The seasoning is what gives Chex Mix its signature bold, savory, and slightly addictive flavor. Adjusting the seasoning properly ensures that every bite is perfectly seasoned without being too bland or overwhelmingly salty. Here’s how you can fine-tune the seasoning to your preference:
1. Taste Testing Before Baking
Before you pop your Chex Mix into the oven, it’s crucial to taste-test the seasoning. Since raw ingredients like Chex cereal, pretzels, and nuts don’t absorb seasoning instantly, you’ll want to sample a small portion of the mixture to get an idea of the flavor balance.
- Take a small handful of the seasoned mix before roasting and taste it.
- Keep in mind that the flavors will intensify slightly during baking, so avoid overseasoning at this stage.
- If needed, adjust the seasoning before it goes into the oven.
2. Balancing the Flavor Profile
Seasonings play different roles in achieving the perfect taste, so knowing how to balance them can help you customize your Chex Mix to your liking.
a) Adding More Saltiness:
If your Chex Mix tastes bland or lacks that savory kick, you may need to enhance the saltiness.
- Add a pinch more salt or a little extra seasoned salt (such as Lawry’s).
- Sprinkle in a small amount of garlic salt or onion salt for a layered, flavorful touch.
- Be careful not to add too much salt upfront; you can always add more after baking if needed.
b) Enhancing the Umami Flavor:
To boost the rich, savory depth of your Chex Mix, consider adjusting ingredients that provide umami, the savory taste that makes food deeply satisfying.
- Add a touch more Worcestershire sauce, which adds complexity and richness.
- A sprinkle of nutritional yeast or parmesan cheese powder can add a cheesy, umami-packed flavor.
- If you like a bolder taste, try a dash of soy sauce instead of Worcestershire sauce for a slightly different flavor.
c) Increasing the Buttery Goodness:
If your mix lacks richness, you might need to enhance the buttery taste.
- Melt a little more butter and drizzle it over the mix before baking.
- If you want a stronger butter flavor, consider using clarified butter or ghee, which has a more concentrated taste.
d) Adjusting the Sweetness (If Desired):
While classic Chex Mix is savory, some people enjoy a hint of sweetness to balance out the flavors.
- Sprinkle in a little brown sugar or honey powder for a sweet-savory mix.
- A touch of maple syrup or honey (mixed with melted butter) can create a unique caramelized effect when baked.
3. Customizing the Spice Level
If you like a bit of heat in your Chex Mix, adjusting the spice level is a great way to add an extra kick.
- Increase cayenne pepper for more heat. Start with ¼ teaspoon and add more to taste.
- Add a little paprika or smoked paprika for warmth without overwhelming spiciness.
- Mix in a dash of hot sauce into the melted butter before coating the ingredients.
- Use chili powder or red pepper flakes for a spicier punch.
If your mix ends up too spicy, balance it out by adding a bit more butter or a neutral ingredient like extra Chex cereal to tone down the heat.
4. Adjusting Seasoning After Roasting
Sometimes, even after roasting, you may find that the flavor needs a bit of tweaking. Luckily, you can still adjust the seasoning post-baking.
- If the flavor is too mild: While the mix is still warm, lightly sprinkle additional seasoned salt, garlic powder, or onion powder over the mix and toss well.
- If it’s too salty: Add more unseasoned Chex cereal, nuts, or pretzels to balance out the saltiness. You can also toss in a little extra melted unsalted butter to dilute the strong flavors.
- For an extra fresh burst of flavor: Sprinkle a bit of grated Parmesan cheese, freshly cracked black pepper, or a pinch of herbs like dried rosemary or thyme before serving.
Final Tip: Keep Notes for Next Time
Since taste preferences vary, keeping track of how much seasoning you use will help you perfect your recipe over time. Write down any adjustments you make so that you can recreate your ideal Chex Mix flavor in the future.
By fine-tuning the seasoning before and after baking, you’ll ensure that your homemade Chex Mix is packed with bold, delicious flavors in every bite!
Avoiding Overcooking – Knowing When to Take the Chex Mix Out
Cooking Chex Mix in a roasting pan requires careful attention to ensure that it turns out perfectly crispy and flavorful without burning. Since the mix is baked at a low temperature for an extended period, it’s easy to overcook if you’re not watching closely. Here’s how to avoid overcooking and know exactly when to take your Chex Mix out of the oven.
1. Understanding the Ideal Baking Time
Chex Mix is typically baked at 250°F (120°C) for about 1 hour, with stirring every 15 minutes. However, the exact timing can vary depending on factors like:
- The type of roasting pan you use – Metal pans conduct heat differently than glass or ceramic.
- Your oven’s heating accuracy – Some ovens run hotter or cooler than the set temperature.
- Ingredient moisture levels – If you’ve added extra butter or sauce, the mix might take a little longer to crisp up.
A general rule of thumb is to start checking your mix around the 45-minute mark to prevent over-baking.
2. Visual Cues to Look For
To ensure you don’t overcook your Chex Mix, pay close attention to these visual signs:
✔ Golden Brown Color: The mix should turn a rich golden brown, but not dark brown or burnt. If you notice the edges browning too quickly, it’s time to stir more frequently.
✔ Even Crispness: When properly baked, the Chex cereal, pretzels, and nuts should all feel dry and crisp to the touch. If they still seem slightly soft or damp, they need more time.
✔ No Burnt Spots: Dark spots on the cereal or nuts indicate overcooking. If you see this happening, reduce the oven temperature slightly or remove the mix sooner.
3. Smell as an Indicator
A properly baked Chex Mix has a warm, toasty, and buttery aroma. However, if you start to smell:
❌ A burnt or acrid scent – It’s a sign that the mix is overcooked and should be taken out immediately.
❌ A sharp, bitter smell – This could indicate that the Worcestershire sauce or seasonings are burning.
The moment you detect a shift from a pleasant roasted smell to something harsher, check the mix right away.
4. The Stirring Test
When you stir the mix at 15-minute intervals, pay attention to how it feels:
- If it still feels slightly wet, it needs more time.
- If it starts to feel crunchy and dry, it may be done even before the full hour.
- If you hear a slight crackling sound when stirring, it’s a good indication that it’s crisping up nicely.
Remember: The mix will continue to crisp up as it cools, so don’t wait for it to feel completely crunchy while in the oven.
5. Letting It Cool to Prevent Overbaking
One of the biggest mistakes people make is assuming the Chex Mix needs to be fully crunchy straight out of the oven. In reality, it will firm up as it cools.
Steps to cool it properly:
Remove the roasting pan from the oven once the mix is golden brown and fragrant.
Let it sit for 5–10 minutes in the pan to allow carryover cooking.
Transfer to a cooling rack or spread it out on parchment paper to cool completely. This prevents steaming, which can make it soggy.
If the mix still seems a little soft after cooling, you can always return it to the oven for an extra 5–10 minutes, but be cautious not to dry it out too much.
6. How to Fix Slightly Overcooked Chex Mix
If you accidentally overbake your mix and it turns out too dry or burnt, here are a few tricks to salvage it:
- For slightly overcooked but not burnt mix: Toss it with an extra drizzle of melted butter and a pinch of salt to restore some moisture and flavor.
- For mildly burnt pieces: Remove any charred bits and mix in some fresh, unbaked Chex cereal or nuts to balance the texture.
- For extreme overcooking: Unfortunately, if it’s completely burnt, it’s best to start over. Next time, reduce the oven temperature slightly and check on it more frequently.
Final Tip: Use a Timer and Rotate the Pan
To avoid overcooking altogether, always:
Set a timer for every 15 minutes to remind yourself to stir and check on it.
Rotate the pan halfway through baking if your oven has hot spots to ensure even cooking.
Trust your senses – If it looks, smells, and feels done before the full hour, don’t be afraid to take it out early.
By following these tips, you’ll achieve a perfectly toasted, flavorful Chex Mix every time without the risk of overcooking!
Storage Tips for Keeping Your Chex Mix Fresh (Airtight Containers, Shelf Life)
Once you’ve made a delicious batch of homemade Chex Mix, proper storage is essential to keep it fresh, crispy, and full of flavor. Storing it the right way prevents it from becoming stale or soggy. Here’s everything you need to know about the best storage methods, shelf life, and tips to maintain its crunchy texture.
1. Use an Airtight Container for Maximum Freshness
To keep your Chex Mix fresh, airtight containers are the best storage option. Exposure to air can cause the mix to lose its crispiness and absorb unwanted moisture.
Here are some container options:
✔ Plastic or Glass Food Storage Containers with Tight-Fitting Lids – These prevent air from getting in and help maintain freshness.
Mason Jars or Glass Jars with Sealed Lids – A great option for keeping the mix crunchy while Ziplock Bags or Resealable Plastic Bags – Ideal for portioning and taking Chex Mix on the go. Be sure to press out as much air as possible before sealing.
Vacuum-Sealed Bags – If you want to extend shelf life even further, vacuum sealing removes excess air and keeps the mix fresh for weeks.
Tip: Avoid storing Chex Mix in its original roasting pan or an open bowl for long-term storage, as it will become stale quickly.
2. Room Temperature Storage – How Long Does Chex Mix Last?
If stored properly in an airtight container, Chex Mix can stay fresh at room temperature for up to 2 weeks.
To maximize shelf life:
- Keep the container in a cool, dry place like a pantry or cupboard, away from direct sunlight.
- Avoid storing it near the stove, dishwasher, or any humid areas that could introduce moisture.
- If you live in a humid climate, consider adding a small silica gel packet (like the ones found in snack bags) to absorb moisture and keep it crisp.
3. Storing Chex Mix in the Refrigerator – Is It Necessary?
Refrigerating Chex Mix is not recommended because the cold environment can cause the mix to absorb moisture, leading to a stale or soggy texture. If you do choose to refrigerate it (for example, if your mix contains perishable ingredients like real cheese or fresh herbs), be sure to:
- Store it in an airtight container to minimize moisture absorption.
- Let it come to room temperature before serving, as chilled Chex Mix can taste dull and less crunchy.
4. Can You Freeze Chex Mix for Long-Term Storage?
Yes! If you want to make a big batch of Chex Mix and store it for later, freezing is a great option. Properly stored, frozen Chex Mix can last up to 3 months without losing its crunch.
Here’s how to freeze it properly:
✔ Let the Chex Mix cool completely before storing it. Any trapped heat can create condensation, making the mix soggy.
✔ Divide it into portion-sized Ziplock bags or freezer-safe containers. Removing as much air as possible helps preserve freshness.
✔ Label the bags with the date so you know how long it’s been stored.
To thaw frozen Chex Mix, simply take it out of the freezer and let it sit at room temperature for 15–20 minutes. If it has softened slightly, you can re-crisp it by baking it in the oven at 250°F (120°C) for 5–10 minutes.
5. How to Refresh Stale Chex Mix
If your Chex Mix has gone slightly stale but hasn’t expired, you can revive its crunch with a quick oven refresh:
1️⃣ Preheat the oven to 250°F (120°C).
2️⃣ Spread the stale Chex Mix in a single layer on a baking sheet.
3️⃣ Bake for 5–10 minutes, stirring halfway through.
4️⃣ Let it cool completely before storing again.
This simple trick helps remove any excess moisture and restores the crisp texture.
6. Signs That Your Chex Mix Has Gone Bad
To ensure food safety, check for these signs before eating stored Chex Mix:
Stale or soft texture – If it’s no longer crunchy, it has likely absorbed too much moisture.
❌ Off smell or rancid aroma – A musty or sour smell could indicate spoilage, especially if nuts or butter were used.
Visible mold or discoloration – If you notice any unusual spots or changes in color, discard the mix immediately.
Unpleasant taste – If the mix tastes bitter or off, some ingredients (like nuts or butter) may have gone rancid.
If you store your Chex Mix properly using the tips above, you shouldn’t have to worry about spoilage before finishing the batch!
Final Storage Tips for the Best Chex Mix Experience
Always use airtight containers to keep your Chex Mix fresh for up to 2 weeks at room temperature.
Avoid the fridge, as it can make the mix soggy.
Freeze in portioned bags for up to 3 months, and reheat if needed to restore crispness.
If your mix becomes stale, refresh it in the oven at 250°F (120°C) for 5–10 minutes.
Store in a cool, dry place, away from humidity and direct heat.
By following these simple storage tips, you can enjoy your homemade Chex Mix long after it comes out of the oven—fresh, crispy, and just as delicious as the day you made it!
Variations of Chex Mix You Can Try
Chex Mix with Additional Ingredients (M&Ms, Dried Fruits, or Chocolate)
Classic Chex Mix is already a delicious, crunchy snack, but adding extra ingredients like M&Ms, dried fruits, or chocolate can take it to the next level! These additions create a sweet and salty balance that enhances the overall flavor and texture. Whether you want a more indulgent treat, a festive twist, or just some variety, here’s how to customize your Chex Mix with these tasty extras.
1. Adding M&Ms for a Sweet & Crunchy Twist
M&Ms are a popular choice for Chex Mix because they add chocolatey sweetness and a satisfying crunch. The candy coating prevents them from melting easily, making them a great mix-in option.
✅ Best M&Ms to Use in Chex Mix:
- Classic M&Ms – A simple and colorful addition that pairs well with the salty mix.
- Peanut M&Ms – Adds crunch and a nutty flavor for extra texture.
- Peanut Butter M&Ms – Complements the savory seasoning and enhances the sweet-salty contrast.
- Mini M&Ms – Perfect for evenly distributing the chocolatey flavor in every bite.
📌 Pro Tip: Always add M&Ms after baking and once the Chex Mix has cooled completely. If added too soon, the chocolate inside may melt and create a sticky mess.
2. Mixing in Dried Fruits for a Chewy Contrast
If you want to balance out the crunchiness of Chex Mix with some chewiness, dried fruits are a fantastic option. They bring natural sweetness and a slight tartness that enhances the flavors of the mix.
✅ Best Dried Fruits to Add:
- Cranberries – Slightly tart and chewy, they pair well with salty nuts and pretzels.
- Raisins or Golden Raisins – Classic and mildly sweet, they blend easily with all flavors.
- Dried Cherries – A tangy, flavorful addition that complements nutty and chocolatey elements.
- Banana Chips – Adds crunch and a light, tropical sweetness.
- Dried Apricots (chopped) – Soft, slightly tangy, and a unique twist to the mix.
📌 Pro Tip: Like M&Ms, dried fruits should be added after baking to avoid drying them out too much or making them tough.
3. Incorporating Chocolate for Extra Indulgence
Chocolate lovers can take their Chex Mix to the next level by adding chocolate chunks, drizzled chocolate, or flavored chocolate chips. The contrast of creamy chocolate with the salty crunch of Chex Mix makes for an irresistible treat.
✅ Ways to Add Chocolate to Chex Mix:
✔ Chocolate Chips (Milk, Dark, or White Chocolate): Small and easy to mix in, they provide a touch of chocolate in every bite.
Chocolate Chunks: Slightly larger than chips, these give a richer chocolate experience.
Chocolate Drizzle: Melted chocolate (white, milk, or dark) can be drizzled over cooled Chex Mix for a gourmet touch.
Chocolate-Covered Pretzels or Nuts: These add an extra indulgent bite without needing additional melting.
📌 Pro Tip: If adding chocolate chips or chunks, make sure the Chex Mix is completely cool before mixing them in. If drizzling with melted chocolate, let it set at room temperature before storing.
4. Creating Festive or Themed Chex Mix with These Additions
Adding M&Ms, dried fruits, or chocolate allows you to customize Chex Mix for different occasions and holidays.
🎄 Holiday-Themed Ideas:
- Christmas Chex Mix: Use red and green M&Ms, white chocolate drizzle, and dried cranberries.
- Halloween Chex Mix: Mix in orange and black M&Ms with candy corn and mini peanut butter cups.
- Valentine’s Day Chex Mix: Add pink and red M&Ms with freeze-dried strawberries and white chocolate.
- Easter Chex Mix: Use pastel-colored M&Ms with yogurt-covered raisins.
5. Balancing Flavors and Textures with Add-Ins
Adding sweet ingredients to a traditionally salty and savory snack is all about balance. Here’s how to ensure your Chex Mix doesn’t become too sweet or overwhelming:
✔ Keep the Base Savory: If adding sweet ingredients, make sure the base (Chex cereals, pretzels, nuts) remains lightly salted to maintain contrast.
Control the Chocolate: If using both M&Ms and a chocolate drizzle, reduce one so the mix doesn’t become overly sweet.
Portion the Extras Wisely: Stick to about 1 cup of extra ingredients per 6 cups of Chex Mix to maintain a good mix of flavors without overpowering the original taste.
6. Storing Sweetened Chex Mix Properly
Since additional ingredients like chocolate and dried fruits can change the texture over time, follow these tips for proper storage:
✔ Store in an airtight container to prevent moisture from making the mix sticky.
Keep in a cool, dry place to prevent the chocolate from melting.
If using a chocolate drizzle, allow it to set completely before storing.
For extended storage, refrigerate in an airtight container for up to 3 weeks (especially for versions with chocolate drizzle).
Final Thoughts
Adding M&Ms, dried fruits, or chocolate to Chex Mix makes it even more exciting, whether you’re making it for a special occasion or just to satisfy a sweet-and-salty craving. By carefully selecting and balancing your mix-ins, you can customize your Chex Mix exactly the way you like it—crispy, chewy, sweet, salty, or a perfect blend of all four!
Gluten-Free or Vegan Chex Mix Options
Traditional Chex Mix contains ingredients like wheat-based cereals, butter, and Worcestershire sauce, which may not be suitable for those following a gluten-free or vegan diet. However, with a few simple substitutions, you can enjoy a flavorful and satisfying snack without compromising your dietary needs. Below, we explore how to make a delicious gluten-free or vegan Chex Mix with the right ingredient swaps.
1. Making Gluten-Free Chex Mix
If you’re avoiding gluten, the biggest concern is wheat-based cereals and pretzels. Luckily, several gluten-free alternatives can help you recreate the classic taste and texture of Chex Mix without any issues.
✅ Gluten-Free Ingredient Swaps:
- Chex Cereal Choices: Use Rice Chex, Corn Chex, or Honey Nut Chex, which are naturally gluten-free. Avoid Wheat Chex, as it contains gluten.
- Gluten-Free Pretzels: Many brands now offer gluten-free pretzels made from rice flour, potato starch, or cassava flour. They provide the same crunch without gluten.
- Gluten-Free Bagel Chips or Crackers: Substitute traditional bagel chips with gluten-free bagel chips, rice crackers, or gluten-free pita chips.
- Gluten-Free Worcestershire Sauce: Standard Worcestershire sauce contains malt vinegar, which has gluten. Look for brands that explicitly state gluten-free Worcestershire sauce or use tamari (gluten-free soy sauce) as an alternative.
- Gluten-Free Seasoning Blends: Always check labels for hidden gluten in spice mixes. Stick to pure garlic powder, onion powder, and paprika without additives.
📌 Pro Tip: Double-check all packaged ingredients, as some cereals and sauces may contain traces of gluten due to cross-contamination.
2. Making Vegan Chex Mix
For a fully plant-based version of Chex Mix, the main ingredients to swap include butter and Worcestershire sauce, as both contain animal-derived ingredients.
✅ Vegan Ingredient Substitutions:
✔ Butter Alternative: Replace regular butter with vegan butter, olive oil, or coconut oil. Vegan butter brands like Earth Balance or Miyoko’s offer a great buttery flavor.
Worcestershire Sauce Substitute: Worcestershire sauce contains anchovies, so use a vegan Worcestershire sauce or swap it with coconut aminos or tamari for a similar umami taste.
Vegan-Friendly Cereals: Most Chex cereals (Rice Chex, Corn Chex, Chocolate Chex) are vegan-friendly, but check the labels for honey or dairy ingredients.
Plant-Based Seasonings: The seasoning mix (garlic powder, onion powder, smoked paprika) is naturally vegan, so no changes are needed.
📌 Pro Tip: If you like a cheesy flavor, sprinkle nutritional yeast on the mix instead of Parmesan cheese for a plant-based, umami-rich taste.
3. Gluten-Free & Vegan-Friendly Mix-Ins
Customizing your Chex Mix with add-ins can make it even more enjoyable. Here are some gluten-free and vegan mix-ins to try:
✔ Nuts & Seeds: Almonds, cashews, pecans, sunflower seeds, or pumpkin seeds add crunch and healthy fats.
Popcorn: A fun, airy addition that makes the mix even more snackable.
Dried Fruits: Raisins, cranberries, banana chips, or dried cherries add a natural sweetness.
Coconut Flakes: Unsweetened coconut adds a light, tropical twist.
Spicy Kick: Add cayenne pepper or chili flakes for an extra kick.
Sweet & Salty Combo: Mix in vegan dark chocolate chips or dairy-free M&Ms after cooling the mix.
📌 Pro Tip: Always check labels on packaged items like nuts, pretzels, and dried fruits to ensure they’re truly gluten-free and vegan.
4. Baking Instructions for Gluten-Free or Vegan Chex Mix
The baking process remains the same whether you’re making a gluten-free or vegan version of Chex Mix.
1️⃣ Preheat the oven to 250°F (120°C).
2️⃣ In a large bowl, combine gluten-free Chex cereal, pretzels, nuts, and any other mix-ins.
3️⃣ In a separate bowl, melt vegan butter or oil and whisk in seasonings (garlic powder, onion powder, paprika) along with vegan Worcestershire sauce or tamari.
4️⃣ Pour the seasoning mixture over the dry ingredients, stirring to coat evenly.
5️⃣ Spread the mixture evenly onto a parchment-lined baking sheet or roasting pan.
6️⃣ Bake for 45 minutes, stirring every 15 minutes, until the mix is golden and crispy.
7️⃣ Let it cool completely before adding any chocolate or dried fruit.
5. Storing Your Gluten-Free or Vegan Chex Mix
Once your mix has cooled, store it properly to maintain maximum freshness:
✔ Airtight Containers: Keep in a sealed container to prevent sogginess.
Cool, Dry Place: Store at room temperature for up to 2 weeks.
Refrigeration (Optional): If your mix contains chocolate or coconut oil, store in the fridge to prevent melting.
Freezing: For longer storage, freeze in an airtight bag for up to 2 months.
Final Thoughts
Making gluten-free or vegan Chex Mix is easy with the right substitutions! Whether you’re avoiding gluten, dairy, or animal products, you can still enjoy a crunchy, flavorful snack. Customize it with your favorite seasonings, nuts, and dried fruits for a mix that fits your dietary needs while staying absolutely delicious!
Sweet Chex Mix (Add Caramel, Chocolate, or Marshmallows for a Dessert Twist)
If you’re a fan of sweet and salty snacks, then a Sweet Chex Mix is the perfect treat! By adding caramel, chocolate, or marshmallows, you can transform the classic savory Chex Mix into a dessert-worthy indulgence. Whether you’re making it for a party, a movie night, or just to satisfy a craving, this sweet version of Chex Mix is easy to prepare and incredibly delicious. Below, we’ll explore some creative ways to make Sweet Chex Mix with different flavors and mix-ins.
1. Making a Classic Caramel Chex Mix
Caramel Chex Mix is a crunchy, buttery, and sweet treat that tastes like homemade caramel popcorn but with extra texture and depth. The combination of Chex cereal with rich caramel coating creates an irresistible balance of crispy and chewy.
✅ Ingredients for Caramel Chex Mix:
- 6 cups Rice Chex or Corn Chex cereal
- 1 cup unsalted butter
- 1 cup brown sugar (light or dark)
- ¼ cup light corn syrup (for smooth caramel texture)
- ½ teaspoon baking soda (for caramel aeration)
- 1 teaspoon vanilla extract
- ½ teaspoon salt (balances the sweetness)
- 1 cup chopped pecans or almonds (optional)
📝 How to Make It:
1️⃣ Preheat oven to 250°F (120°C) and line a baking sheet or roasting pan with parchment paper.
2️⃣ In a saucepan over medium heat, melt the butter, then stir in brown sugar and corn syrup. Bring to a gentle boil, stirring constantly.
3️⃣ Reduce heat and let the mixture simmer for 4-5 minutes, then remove from heat.
4️⃣ Stir in baking soda, vanilla extract, and salt, then immediately pour the caramel over the Chex cereal and nuts in a large mixing bowl.
5️⃣ Toss gently to coat evenly, then spread the mix onto the baking sheet.
6️⃣ Bake for 45 minutes, stirring every 15 minutes.
7️⃣ Let it cool completely before breaking into bite-sized pieces.
📌 Pro Tip: For extra flavor, sprinkle sea salt over the caramel-coated Chex Mix before baking for a salted caramel version!
2. Chocolate Lover’s Chex Mix
Chocolate lovers will enjoy this decadent twist on the classic snack mix. The combination of crispy cereal, melted chocolate, and fun mix-ins like pretzels and peanut butter cups makes for a dangerously delicious treat.
✅ Ingredients for Chocolate Chex Mix:
- 6 cups Rice Chex or Chocolate Chex cereal
- 1 cup dark or milk chocolate chips
- ½ cup peanut butter (optional, for a Reese’s-style mix)
- ½ cup mini marshmallows (for extra chewiness)
- 1 cup mini pretzels or graham crackers
- ½ cup powdered sugar (for coating)
📝 How to Make It:
1️⃣ Melt chocolate chips and peanut butter together in a microwave-safe bowl, stirring every 30 seconds until smooth.
2️⃣ Pour the melted chocolate mixture over the Chex cereal and toss to coat.
3️⃣ Add mini pretzels, marshmallows, and any extra chocolate candies.
4️⃣ Spread the mixture onto a parchment-lined baking sheet and let it set for about 30 minutes.
5️⃣ Once hardened, toss the mix with powdered sugar to coat.
📌 Pro Tip: Use white chocolate instead of milk chocolate for a Cookies & Cream-style Chex Mix!
3. S’mores Chex Mix with Marshmallows
If you love s’mores, you can recreate the campfire experience in snack form by adding graham crackers, marshmallows, and chocolate to your Chex Mix!
✅ Ingredients for S’mores Chex Mix:
- 6 cups Rice Chex cereal
- 1 cup mini marshmallows
- 1 cup crushed graham crackers
- 1 cup chocolate chips or melted chocolate
- ½ cup caramel drizzle (optional)
📝 How to Make It:
1️⃣ Preheat oven to 250°F (120°C) and line a baking sheet with parchment paper.
2️⃣ Mix Chex cereal, graham cracker pieces, and marshmallows in a large bowl.
3️⃣ Melt the chocolate chips in the microwave and drizzle over the mix.
4️⃣ Toss gently, then spread onto the baking sheet and allow the chocolate to harden.
5️⃣ Optional: Drizzle caramel over the mix for extra sweetness.
📌 Pro Tip: For a crunchy texture, lightly toast the marshmallows in the oven for 5 minutes before mixing them in!
4. Customizing Your Sweet Chex Mix
One of the best parts about Sweet Chex Mix is how customizable it is! You can mix and match flavors, textures, and ingredients to create a unique treat every time.
✅ Fun Sweet Mix-In Ideas:
M&Ms or Reese’s Pieces – Add a pop of color and chocolatey goodness.
White chocolate chips – Sweet, creamy, and delicious.
Dried fruits (cranberries, raisins, banana chips) – Adds a natural sweetness.
Crushed Oreos or Biscoff cookies – For a cookie-inspired Chex Mix.
Cinnamon sugar coating – Toss the mix in cinnamon sugar for a snickerdoodle twist.
5. Storing Sweet Chex Mix Properly
To keep your Sweet Chex Mix fresh and crunchy, follow these storage tips:
✔ Airtight Containers: Store in a sealed container at room temperature for up to 1 week.
Refrigeration (if needed): If your mix contains melted chocolate, store in the fridge to prevent melting.
Freezing: Sweet Chex Mix can be frozen for up to 2 months. Simply thaw at room temperature before serving.
Frequently Asked Questions About Making Chex Mix in a Roasting Pan
Can You Make Chex Mix Without a Roasting Pan? (Suggestions for Alternatives Like Baking Sheets)
Absolutely! While a roasting pan is a popular choice for making Chex Mix due to its high sides and even heat distribution, it’s not the only option. If you don’t have a roasting pan, there are several great alternatives that will work just as well. Whether you’re using a baking sheet, casserole dish, Dutch oven, or even an air fryer, you can still achieve a perfectly crispy and flavorful Chex Mix. Below, we’ll explore some of the best substitutes and how to use them effectively.
1. Using a Baking Sheet
A baking sheet (cookie sheet) is one of the best alternatives to a roasting pan. It provides even heat exposure to the ingredients, allowing the Chex Mix to toast properly.
✅ How to Use a Baking Sheet for Chex Mix:
Choose a rimmed baking sheet to prevent ingredients from spilling over. A half-sheet pan (18×13 inches) works best.
Line the baking sheet with parchment paper or foil for easy cleanup.
Spread the Chex Mix in a single layer to ensure even roasting and crispiness.
Bake at 250°F (120°C) for about 1 hour, stirring every 15 minutes to ensure all pieces are toasted evenly.
📌 Pro Tip: If you’re making a large batch, you may need two baking sheets to avoid overcrowding, which can lead to uneven cooking.
2. Casserole Dish (Glass or Ceramic Bakeware)
If you have a large casserole dish (like a 9×13-inch Pyrex or ceramic dish), it can serve as a great alternative to a roasting pan.
✅ How to Use a Casserole Dish for Chex Mix:
Grease the dish lightly or line it with parchment paper to prevent sticking.
Stir the Chex Mix frequently since deeper dishes may cause uneven baking.
Bake at 250°F (120°C) for about 1 hour, stirring every 15-20 minutes.
📌 Pro Tip: Because casserole dishes retain heat differently than metal pans, you may need to extend the baking time by 5-10 extra minutes to get that perfect crispiness.
3. Dutch Oven or Large Oven-Safe Pot
A Dutch oven or any large oven-safe pot is another great choice, especially if you want to keep all your ingredients contained.
✅ How to Use a Dutch Oven for Chex Mix:
Preheat the Dutch oven in the oven for 5 minutes before adding the Chex Mix to promote even roasting.
Stir more frequently (every 10-15 minutes) since the deeper pot can trap heat differently than a flat pan.
Use the lid slightly ajar to allow moisture to escape and keep the mix crispy.
📌 Pro Tip: A Dutch oven is ideal for making seasoned Chex Mix because it helps distribute butter and seasonings more evenly.
4. Stovetop Method (Skillet or Large Saucepan)
If you don’t want to use the oven, you can make Chex Mix on the stovetop using a large skillet or saucepan.
✅ How to Make Stovetop Chex Mix:
Melt butter in a large pan over low heat.
Add seasonings and mix well.
Toss in the Chex cereal, nuts, and pretzels, stirring continuously to coat everything evenly.
Cook on low heat for about 10-15 minutes, stirring frequently to avoid burning.
📌 Pro Tip: This method works best for small batches (4-6 cups). If you’re making a larger amount, it’s better to use the oven.
5. Air Fryer Method (Quick and Crispy)
An air fryer is a fantastic modern alternative, especially if you need a small batch of Chex Mix quickly.
✅ How to Make Chex Mix in an Air Fryer:
Preheat your air fryer to 250°F (120°C).
Place the Chex Mix in the air fryer basket in a thin, even layer (do not overcrowd).
Air fry for 10-15 minutes, shaking the basket every 5 minutes to prevent burning.
📌 Pro Tip: Air frying makes Chex Mix extra crispy in less time, but you may need to cook in multiple batches due to space limitations.
6. Microwave Method (Fastest Option)
If you’re short on time, the microwave is the fastest way to make Chex Mix.
✅ How to Make Chex Mix in the Microwave:
Melt butter in a microwave-safe bowl, then stir in seasonings.
Mix the Chex cereal, pretzels, and nuts into the butter mixture.
Microwave on HIGH for 5-6 minutes, stirring every 1-2 minutes to prevent uneven cooking.
📌 Pro Tip: The microwave method works best for small batches (4-6 cups) and is perfect if you’re in a hurry!
Final Thoughts
You don’t need a roasting pan to make delicious homemade Chex Mix. Whether you use a baking sheet, casserole dish, Dutch oven, stovetop skillet, air fryer, or even a microwave, you can achieve the same crunchy, flavorful results. Just remember to stir frequently, avoid overcrowding, and adjust baking times based on your chosen method. Happy snacking!
How Do I Make Chex Mix Spicier?
If you love bold flavors and a bit of heat, making your Chex Mix spicier is a great way to add excitement to this classic snack. Whether you prefer a mild kick or an intense fiery bite, there are several ways to customize the spice level while maintaining the signature crunch and savory taste. Below are some of the best ways to turn up the heat on your Chex Mix.
1. Add More Cayenne Pepper or Crushed Red Pepper
One of the easiest ways to spice up your Chex Mix is to increase the amount of cayenne pepper or crushed red pepper flakes in the seasoning blend.
✅ How to Use:
✔ Start with ½ teaspoon of cayenne for a mild kick and increase gradually to 1 teaspoon or more for a spicier result.
If using crushed red pepper flakes, sprinkle ½ to 1 teaspoon evenly over the mixture before baking.
Combine these with the butter and Worcestershire sauce to help distribute the heat evenly.
📌 Pro Tip: If you want a slow-burning heat, mix both cayenne and crushed red pepper flakes for a layered spice effect.
2. Use Hot Sauce or Spicy Worcestershire Sauce
Hot sauce can add a tangy, spicy boost to your Chex Mix while helping the seasoning stick to the ingredients.
✅ How to Use:
✔ Add 1-2 tablespoons of hot sauce (like Tabasco, Sriracha, or Frank’s Red Hot) to your butter and Worcestershire sauce mixture before tossing it with the cereal.
Try using spicy Worcestershire sauce instead of the regular version for an extra kick.
If using Sriracha, mix it well with melted butter to distribute the heat evenly.
📌 Pro Tip: Be cautious with liquid hot sauce—adding too much can make the mix soggy instead of crispy.
3. Use Spicy Seasoning Blends
Incorporating spicy seasoning mixes can bring out a more complex heat profile. Here are some great options:
✔ Cajun Seasoning – Adds a smoky, spicy, and slightly garlicky taste.
Chili Powder – Provides a deep, earthy heat that works well with Chex Mix.
Smoked Paprika – A milder heat with a rich smoky flavor.
Chipotle Powder – Gives a slightly sweet and smoky spiciness.
Taco or Fajita Seasoning – Delivers a well-balanced mix of chili powder, cumin, and garlic.
📌 Pro Tip: Start with 1-2 teaspoons of any of these seasonings and adjust according to your spice tolerance.
4. Incorporate Spicy Nuts or Crackers
Enhance the spiciness by swapping out some of the standard Chex Mix ingredients with spicy alternatives.
✅ Great Spicy Additions:
Spicy peanuts or almonds – Look for varieties flavored with cayenne or chipotle.
Hot & Spicy Cheez-Its – These add both crunch and an extra cheesy heat.
Flamin’ Hot Cheetos or Takis – Mix these in after baking for a fiery crunch.
Spicy pretzel sticks – Some brands offer jalapeño or buffalo-flavored pretzels.
📌 Pro Tip: Add these spicy mix-ins after baking to avoid burning the seasoning.
5. Try a Buffalo Chex Mix Twist
If you love buffalo wings, why not give your Chex Mix a buffalo-style upgrade?
✅ How to Make Buffalo-Style Spicy Chex Mix:
Replace some or all of the butter with buffalo sauce.
Add ½ to 1 teaspoon of garlic powder for extra depth.
Stir in a dash of ranch seasoning to balance the heat with a tangy kick.
Use Buffalo-flavored pretzels or crackers to enhance the taste.
📌 Pro Tip: To keep the mix from becoming too wet, bake at a slightly lower temperature (225°F/110°C) for 10 minutes longer to allow extra moisture to evaporate.
6. Sprinkle Spicy Cheese Powder or Seasoned Salt
If you want to add heat without extra liquid, try using spicy cheese powder or a bold seasoned salt blend.
✅ Best Options:
Flamin’ Hot Cheetos dust – Crush Cheetos into a fine powder and sprinkle it over the mix.
Ghost Pepper or Habanero Seasoned Salt – Use sparingly for an intense kick.
Spicy Nacho Cheese Powder – Adds a hot, cheesy flavor to your mix.
📌 Pro Tip: Add these powders after baking while the mix is still warm so they stick better.
Final Thoughts
Making Chex Mix spicier is easy with the right combination of spicy seasonings, hot sauces, and bold mix-ins. Whether you prefer a mild warmth or a fiery explosion, you can customize the heat level to suit your taste. Just remember to start small and gradually increase the spice until you find the perfect balance. Enjoy your fiery Chex Mix!
Can I Use a Different Cereal in the Recipe?
Absolutely! While traditional Chex Mix uses corn, rice, and wheat Chex cereals, you can easily substitute or mix in other cereals to create a unique flavor and texture. Swapping out different cereals allows you to customize your Chex Mix to better match your taste preferences, dietary needs, or simply what you have in your pantry. Here’s a guide to selecting the best alternatives and how they impact your final snack mix.
1. Best Cereal Alternatives for Chex Mix
If you want to switch things up, consider using these cereals as a direct replacement or as an addition to the classic Chex varieties:
✔ Crispix – A great one-to-one substitute for Chex, Crispix features a combination of corn and rice in a hexagon shape, offering the same crispy texture but with a slightly different taste.
Golden Grahams – Adds a hint of honey and sweetness, which pairs well with both traditional savory Chex Mix and dessert-style variations.
Honey Nut Cheerios – A mildly sweet and nutty option that enhances the sweet-savory contrast in your mix.
Cheerios (Plain or Multi-Grain) – A neutral-flavored cereal that holds up well to seasoning and baking.
Mini Wheats (Unfrosted) – Provides a heartier crunch and works well if you enjoy a mix with more texture.
Corn Flakes or Special K – A lighter, crispier option for those who want a delicate crunch.
📌 Pro Tip: Avoid cereals that dissolve too quickly when mixed with butter and seasonings, like puffed rice or delicate flakes.
2. Healthier and Whole-Grain Cereal Options
If you’re looking for a healthier Chex Mix variation, consider these options:
✔ Bran Flakes – High in fiber and slightly nutty in flavor, making it a nutritious addition.
Grape-Nuts – Adds a dense, crunchy texture that holds up well in oven-baked snack mixes.
Kashi GOLEAN Crunch – A protein-packed cereal with a hearty texture that works well in savory and sweet Chex Mix variations.
Fiber One Cereal – If you want a fiber boost, this cereal can add texture without altering the flavor too much.
📌 Pro Tip: If using whole-grain cereals, check how they absorb butter—some may require slightly more liquid to prevent a dry mix.
3. Sweet Cereals for a Dessert-Style Chex Mix
If you’re making a sweet Chex Mix, consider using these cereals to complement chocolate, caramel, or marshmallow-based recipes:
✔ Cinnamon Toast Crunch – Adds a warm, cinnamon-sugar flavor that pairs well with caramel or white chocolate.
Reese’s Puffs – Enhances a peanut butter and chocolate-themed Chex Mix.
Fruity Pebbles – Provides a colorful, fruity twist when mixed with white chocolate or marshmallows.
Cocoa Puffs – Perfect for a chocolate-lover’s mix, adding a rich cocoa flavor.
Lucky Charms – The marshmallows add a fun, chewy contrast to the crispy ingredients.
📌 Pro Tip: If using sugary cereals, consider reducing the added butter and seasoning to prevent an overly sweet mix.
4. Gluten-Free Cereal Substitutions
For those who need a gluten-free Chex Mix, avoid wheat-based cereals and try these options instead:
✔ Rice Chex or Corn Chex – Both are naturally gluten-free and work as direct replacements.
Crispix – Made with corn and rice, this is another safe alternative.
Gluten-Free Cheerios – Maintains a mild flavor while being gluten-free.
Nature’s Path Gorilla Munch – A crunchy, corn-based cereal that works well in snack mixes.
📌 Pro Tip: Always check labels for hidden gluten ingredients when selecting cereals.
5. Mixing Different Cereals for the Best Texture
For a balanced Chex Mix, try combining multiple types of cereals to get a variety of flavors and crunch levels.
✅ Suggested Combinations:
✔ Savory & Crunchy: Mix Crispix, plain Cheerios, and bran flakes for a hearty, crunchy snack.
Light & Airy: Use Corn Flakes, Rice Chex, and Special K for a delicate texture.
Sweet & Salty: Combine Cinnamon Toast Crunch, Golden Grahams, and Rice Chex for a mix that pairs well with chocolate or caramel.
📌 Pro Tip: Use a combination of at least two or three different cereals to create an interesting flavor and texture contrast.
Final Thoughts
Yes, you can absolutely use a different cereal in Chex Mix! Whether you’re aiming for a healthier mix, a gluten-free version, or a sweet treat, there are plenty of great cereal substitutes to choose from. Just make sure that the cereal you select is sturdy enough to hold up to the butter and seasonings while maintaining a crunchy texture. Experiment with different combinations to create a Chex Mix that perfectly suits your taste!
Conclusion
Making Chex Mix in a roasting pan is a simple and rewarding process that results in a delicious, crunchy snack perfect for any occasion. By combining cereals, nuts, pretzels, and seasonings, then roasting everything to perfection, you can create a flavorful mix with minimal effort. Just follow these easy steps: preheat your oven, mix your ingredients, coat them with seasoning, roast while stirring occasionally, and let it cool before storing.
The best part? You can easily customize your Chex Mix! Whether you prefer it spicy, sweet, gluten-free, or packed with extra add-ins like M&Ms or dried fruit, there’s plenty of room to experiment. Don’t be afraid to get creative and make a version that suits your taste.
Have you tried making Chex Mix with a unique twist? Share your favorite variations in the comments! We’d love to hear how you make this classic snack your own. Happy snacking! 🎉