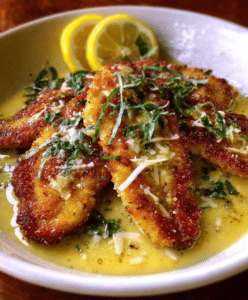
Chicken tenders are a beloved comfort food across households. Their golden, crispy coating combined with tender, juicy chicken inside makes them irresistible to both kids and adults. Traditionally, chicken tenders are deep-fried, which delivers the crunch everyone loves, but also adds extra calories and fat. If you’re looking for a healthier alternative without sacrificing flavor and texture, Crispy Baked Chicken Tenders are the ultimate solution. This recipe delivers the same crunch and taste as fried chicken tenders but is baked in the oven, making it lighter, easier to prepare, and perfect for weeknight dinners, meal prepping, or a family-friendly meal.
Whether you are serving them with a side of fries, a fresh salad, or your favorite dipping sauce, these baked chicken tenders are guaranteed to become a staple in your kitchen. In this guide, we’ll cover everything from ingredients and step-by-step preparation to tips, variations, and frequently asked questions to ensure you master this recipe.
Ingredients
The ingredients for this recipe are simple, accessible, and pantry-friendly. Each element is carefully chosen to maximize flavor, texture, and crunch. Here’s what you’ll need:
- 1 lb chicken breasts or chicken tenders, cut into strips (about 1-inch wide)
- 2 large eggs, beaten
- 1 cup panko breadcrumbs (or regular breadcrumbs)
- ½ cup grated Parmesan cheese (optional, for extra flavor)
- 1 tsp garlic powder
- 1 tsp paprika
- ½ tsp onion powder
- ½ tsp salt
- ¼ tsp black pepper
- Olive oil spray, for coating
These ingredients combine to create a perfectly seasoned, crispy coating while keeping the chicken moist and flavorful.
Step-by-Step Preparation
Baking chicken tenders may sound simple, but following these steps ensures a crunchy, golden exterior and juicy interior. Here’s the full preparation method:
1. Prep the Chicken
If using chicken breasts, slice them into strips approximately 1-inch wide. If you’re already using chicken tenders, you can skip this step. Make sure all pieces are uniform in size to ensure even cooking.
2. Prepare the Breading Stations
Set up a classic three-step breading station:
- Egg wash: Beat the eggs in a shallow bowl until smooth.
- Breadcrumb mixture: In another bowl, combine panko breadcrumbs, Parmesan cheese (if using), garlic powder, paprika, onion powder, salt, and black pepper.
Tip: Panko breadcrumbs give extra crunch compared to regular breadcrumbs, which helps mimic fried chicken texture.
3. Season the Chicken
Lightly season each chicken strip with a pinch of salt and pepper before breading. This enhances the flavor inside and complements the crispy coating.
4. Bread the Chicken
Coating the chicken properly is key for crunch:
- Dip in eggs: Coat each chicken strip in the beaten eggs, allowing any excess to drip off.
- Coat with breadcrumbs: Press each strip into the breadcrumb mixture, making sure every surface is covered.
Optional: For an extra-crispy crust, repeat the egg and breadcrumb dipping process (double coating).
5. Prepare the Baking Sheet
Line a baking sheet with parchment paper or a silicone baking mat for easy cleanup. If you have a wire rack, place it on top of the baking sheet. The wire rack allows hot air to circulate around the chicken tenders, helping them crisp evenly.
6. Arrange the Chicken
Place the breaded chicken tenders on the prepared sheet (or rack) with space between each piece to prevent steaming and ensure a golden crust.
7. Bake the Chicken
- Preheat the oven to 400°F (200°C).
- Lightly spray the chicken tenders with olive oil spray for a golden finish.
- Bake for 20–25 minutes, flipping halfway through. The tenders should be golden brown and crisp.
Check that the chicken reaches an internal temperature of 165°F (74°C) for safe consumption.
8. Serve and Enjoy
Once baked, let the chicken tenders rest for a few minutes to lock in the juices. Serve them hot with your favorite dipping sauces like honey mustard, BBQ sauce, or ranch. For a family-friendly touch, pair with fries, roasted vegetables, or a crisp salad.
Tips and Tricks for Perfect Baked Chicken Tenders
")
- Uniform pieces: Cutting chicken into even strips ensures even baking and prevents overcooked or undercooked pieces.
- Panko vs. regular breadcrumbs: Panko breadcrumbs are recommended for maximum crunch. If unavailable, regular breadcrumbs still work but will be less crispy.
- Double coating: For an extra-thick and crunchy exterior, repeat the egg and breadcrumb step.
- Wire rack for crispiness: Elevating the chicken prevents soggy bottoms.
- Season the chicken: Don’t forget salt and pepper on the raw chicken before breading; it enhances flavor from the inside out.
- Serve immediately: For the best texture, serve the tenders hot. If reheating, use the oven instead of a microwave to maintain crispiness.
Variations
You can easily customize this recipe to suit your tastes or dietary needs:
- Spicy chicken tenders: Add ½ teaspoon cayenne pepper or smoked paprika to the breadcrumb mixture.
- Herb-infused: Mix in dried herbs like oregano, thyme, or rosemary with the breadcrumbs.
- Gluten-free: Use gluten-free breadcrumbs or crushed cornflakes.
- Cheese lovers: Add more Parmesan or try shredded Asiago in the breadcrumb mixture.
- Air fryer method: Cook at 400°F (200°C) for 12–15 minutes, flipping halfway for a crisp finish.
Meal Prep and Storage
Crispy baked chicken tenders are perfect for meal prep:
- Refrigerator: Store cooked tenders in an airtight container for up to 4 days.
- Freezer: Freeze fully cooked tenders in a freezer-safe container or bag for up to 3 months. Reheat in the oven at 350°F (175°C) until warmed through to restore crispiness.
- Make-ahead: Bread chicken tenders and store uncooked in the fridge for up to 24 hours. Bake fresh when needed.
Serving Suggestions
Crispy baked chicken tenders are incredibly versatile:
- Dipping sauces: Honey mustard, ranch, BBQ, sriracha mayo, or ketchup.
- Sides: Oven-baked fries, mashed potatoes, roasted vegetables, or a fresh garden salad.
- Meal ideas: Make a chicken tender wrap with lettuce, tomato, and a drizzle of ranch. Serve over rice or in bowls for a hearty meal.
Frequently Asked Questions (FAQ)
1. Can I use chicken thighs instead of breasts?
Yes! Boneless, skinless chicken thighs work well and remain juicy. Adjust cooking time slightly as thighs may take a few extra minutes.
2. How can I make these chicken tenders extra crispy?
Use panko breadcrumbs, double-coat the chicken, and place them on a wire rack during baking. Spraying with olive oil before baking also helps achieve golden, crispy edges.
3. Can I prepare these ahead of time?
Yes. You can bread the chicken and store it in the fridge for up to 24 hours before baking. Cooked tenders can also be stored for 4 days in the fridge or frozen for up to 3 months.
4. Can I make this gluten-free?
Absolutely. Substitute regular or panko breadcrumbs with gluten-free breadcrumbs or crushed cornflakes. Make sure your seasonings are gluten-free as well.
5. What dipping sauces go best with baked chicken tenders?
Classic options include honey mustard, ranch, BBQ sauce, ketchup, or even spicy mayo. You can get creative and serve multiple sauces for variety.
6. Can I bake them at a lower temperature?
Yes, but keep in mind the crispiness may be reduced. Baking at 400°F ensures golden, crunchy tenders.
7. Can I air fry these chicken tenders?
Yes! Preheat the air fryer to 400°F (200°C) and cook for 12–15 minutes, flipping halfway through for even crisping.
Conclusion
Crispy Baked Chicken Tenders are the ultimate combination of convenience, flavor, and health-conscious cooking. With simple pantry ingredients, a few easy steps, and minimal mess, you can make a dish that rivals fried chicken tenders in taste and crunch. From weeknight dinners to family gatherings, these tenders are versatile, satisfying, and sure to become a favorite.
With tips for crispiness, make-ahead options, storage advice, and serving suggestions, this recipe is designed to make your cooking experience seamless and enjoyable. Whether you’re pairing them with a favorite sauce, serving alongside fresh vegetables, or turning them into a hearty wrap, these tenders are a crowd-pleaser every time.
Give this recipe a try, experiment with variations, and discover how effortless and delicious homemade baked chicken tenders can be.
Calories: 375 kcal | Protein: 28 g | Fat: 15 g | Carbs: 25 g
✅ Ready to try? Gather your ingredients, preheat your oven, and enjoy the best crispy baked chicken tenders you’ll ever make!
Print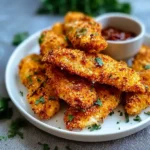
Crispy Baked Chicken Tenders: A Healthier Twist on a Classic Favorite
- Total Time: 30 minutes
- Yield: 4 servings
Description
Homemade baked chicken tenders are a delicious, healthier alternative to the deep-fried version. This easy recipe features tender, juicy chicken strips coated in a crispy, golden breadcrumb coating. Perfect for weeknight dinners, meal prepping, or a fun family meal.
Ingredients
- 1 lb chicken breasts or chicken tenders cut into strips
- 2 large eggs, beaten
- 1 cup panko breadcrumbs or regular breadcrumbs
- ½ cup grated Parmesan cheese (optional for extra flavor)
- 1 tsp garlic powder
- 1 tsp paprika
- ½ tsp onion powder
- ½ tsp salt
- ¼ tsp black pepper
- Olive oil spray for coating
Instructions
- Prep the chicken: If using chicken breasts, cut into 1-inch strips. Skip if using chicken tenders.
- Prepare the breading stations: Beat eggs in one bowl. In another, combine breadcrumbs, Parmesan, garlic powder, paprika, onion powder, salt, and black pepper.
- Season the chicken: Lightly season chicken strips with salt and pepper.
- Bread the chicken: Dip each strip in eggs, then coat with breadcrumb mixture. Double coat for extra crunch.
- Prepare baking sheet: Line with parchment or silicone mat. Optionally, use a wire rack for crispiness.
- Arrange chicken on sheet, leaving space between pieces.
- Bake at 400°F (200°C) for 20–25 minutes, flipping halfway. Ensure internal temperature reaches 165°F (74°C).
- Remove from oven, let rest, and serve with your favorite dipping sauces.
Notes
- For extra crispiness, double coat the chicken.
- Serve with honey mustard, BBQ sauce, or ranch for dipping.
- Meal prep friendly: store cooked tenders in an airtight container for up to 3 days.
- Prep Time: 10 minutes
- Cook Time: 20 minutes
- Category: Main Course
- Method: Bake
- Cuisine: American