Introduction
In the modern kitchen, the pursuit of meals that are simultaneously quick, healthy, and deeply satisfying can often feel like an impossible balancing act. Many of us crave the golden, crunchy exterior and tender, juicy interior of a classic fried chicken tender, but we hesitate at the thought of deep-frying: the lingering smell of oil, the messy cleanup, and the nutritional toll it takes. Enter the air fryer, a countertop appliance that has revolutionized home cooking by delivering the texture of deep-fried food with a fraction of the oil. However, not all air fryer recipes are created equal. The challenge lies in preventing the chicken from drying out while ensuring the coating becomes shatteringly crisp.
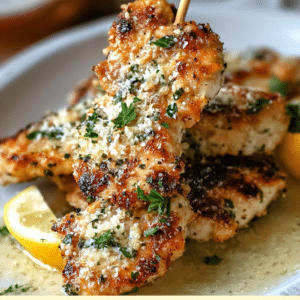
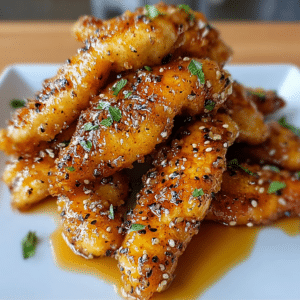
This article presents the definitive solution: Air Fryer Honey Butter Garlic Chicken Tenders. This recipe is a masterclass in contrast—sweet honey against savory garlic, rich butter against lean chicken, and a crunchy crust against a succulent interior. The honey butter garlic glaze serves two critical purposes: it acts as an adhesive for the breadcrumb coating, locking in moisture, and then a reserved portion becomes a final drizzle that elevates the tenders from simple chicken strips to a restaurant-quality dish. Throughout this guide, we will explore the science behind air frying, the role of each ingredient, and professional techniques to ensure your chicken tenders emerge perfectly cooked every time. Prepare to transform a humble pound of chicken into a memorable meal that will appeal to both busy weeknight cooks and culinary enthusiasts seeking precision and flavor.
Understanding the Ingredients: A Professional Breakdown
Before we begin the preparation, it is essential to understand why each component has been selected. This knowledge will not only improve your execution of this recipe but also empower you to make intelligent substitutions when necessary.
1. Chicken Tenders (1 lb)
Also known as chicken tenderloins, these are the thin strips of meat attached to the underside of the chicken breast. They are naturally more tender and cook faster than chicken breasts, making them ideal for air frying. Their uniform shape ensures even cooking. If you cannot find pre-cut tenders, you can slice two boneless, skinless chicken breasts diagonally into 1-inch thick strips.
2. Honey (¼ cup)
Honey is more than a sweetener. It is a humectant, meaning it attracts and retains moisture. When brushed onto chicken, honey prevents the proteins from tightening too aggressively during cooking, resulting in a juicier final product. Its high sugar content also accelerates browning and caramelization in the air fryer’s intense heat, creating those desirable golden-brown spots. For a less sweet, more floral note, consider using orange blossom or wildflower honey.
3. Unsalted Butter (2 tbsp), melted
Butter contributes richness, flavor, and a silky mouthfeel that honey alone cannot provide. Using unsalted butter is critical because it allows you to control the sodium level precisely with the added salt. The fat in butter helps carry the fat-soluble flavor compounds in the garlic and paprika, ensuring every bite is aromatic. When melted and combined with honey, it creates an emulsion that coats the chicken evenly without being too thick.
4. Fresh Garlic (3 cloves), minced
Garlic provides the pungent, savory backbone that balances the sweetness of the honey. Fresh garlic is non-negotiable here; jarred, pre-minced garlic often has a harsh, metallic taste and lacks the natural juices and allicin (the compound responsible for garlic’s aroma) that develop when fresh cloves are crushed. Mincing the garlic finely ensures it distributes evenly through the sauce and cooks quickly without burning.
5. Paprika (1 tsp)
Paprika serves two roles: color and subtle earthiness. It gives the chicken tenders a deeper, reddish-gold hue that looks appetizing. More importantly, it adds a mild, sweet pepper flavor that complements both the honey and garlic. For a smoky variation, you could substitute smoked paprika, which would introduce a barbecue-like depth. Avoid hot paprika unless you desire heat, as it will alter the flavor profile significantly.
6. Salt (1 tsp) and Black Pepper (½ tsp)
Salt is the single most important seasoning. It does not just make food taste salty; it amplifies all other flavors, suppresses bitterness, and helps the chicken retain moisture. One full teaspoon for one pound of chicken is appropriate for a well-seasoned dish. Black pepper adds a gentle warmth and mild pungency that cuts through the richness of the butter and honey. Always use freshly ground black pepper for the brightest flavor.
7. Breadcrumbs (1 cup), panko or regular
The coating is what separates a memorable chicken tender from a sad, soggy one. Panko breadcrumbs are the professional’s choice. These Japanese-style breadcrumbs are larger, flakier, and less dense than regular breadcrumbs. Their irregular shape creates more surface area, which translates to superior crispiness and crunch because hot air can circulate around the crumbs’ many edges. If you use regular breadcrumbs, the coating will be finer and more uniform, resulting in a texture closer to a traditional breaded cutlet. Both work, but panko is strongly recommended for maximum air fryer performance.
8. Cooking Spray
A light coating of cooking spray on both the air fryer basket and the breaded tenders is essential. It promotes even browning, prevents sticking, and helps the breadcrumbs crisp up by adding a thin layer of oil that conducts heat efficiently. Use an oil with a high smoke point, such as avocado, canola, or grapeseed oil spray. Avoid olive oil spray at 400°F (200°C) as it may smoke.
Step-by-Step Preparation Method
Now that we have dissected the ingredients, let us proceed to the preparation. Read through all steps before beginning. This technique is designed for efficiency and optimal texture.
Step 1: Preparation and Mise en Place
Professional cooking begins with organization. Clear your counter space and gather all ingredients. Preheat is not yet needed, but you should prepare your work area. Take two shallow bowls or wide dishes. In the first bowl, you will combine your wet coating. In the second, you will place your breadcrumbs. Have a baking sheet or large plate ready to hold the coated tenders before they go into the air fryer. This setup prevents cross-contamination and makes the breading process seamless.
Step 2: Make the Honey Butter Garlic Mixture
In a medium-sized mixing bowl, combine ¼ cup of honey and 2 tablespoons of melted unsalted butter. Whisk them together vigorously until they are fully emulsified. The mixture should appear homogeneous, not separated. Add 3 cloves of finely minced garlic, 1 teaspoon of paprika, 1 teaspoon of salt, and ½ teaspoon of black pepper. Whisk again until all spices are dissolved into the honey-butter base. Taste the mixture (it will be intensely flavorful) and adjust salt or pepper if desired.
Now, perform a critical step: reserve half of this mixture. Using a spoon or a small measuring cup, remove exactly half of the honey butter garlic sauce and set it aside in a separate small bowl. This reserved portion will not touch the raw chicken, making it safe to use as a final drizzle. The other half remaining in the original bowl will be used to coat the raw chicken tenders.
Step 3: Coat the Chicken Tenders
Pat your 1 lb of chicken tenders dry with paper towels. Removing excess surface moisture is crucial; if the chicken is wet, the honey butter mixture will slide off rather than adhere. One by one, take a chicken tender and dip it into the honey butter garlic mixture (the half that will touch raw chicken). Turn it with tongs or your fingers to ensure complete coverage on all sides. Let any excess drip off briefly.
Immediately transfer the coated tender to the bowl containing 1 cup of breadcrumbs. Press the chicken firmly into the breadcrumbs, turning it over and pressing again to create an even, thorough coating. The crumbs should stick to every surface. Place the breaded tender on your clean plate or baking sheet. Repeat with all remaining tenders. Do not stack them on top of each other at this stage, as the breadcrumbs may become dislodged.
Step 4: Preheat the Air Fryer
Set your air fryer to 400°F (200°C). Allow it to preheat for 3 to 5 minutes. Preheating is not optional. Air fryers work by circulating extremely hot air at high speed. If you place food into a cold basket, the initial cooking phase will be gentler, leading to a longer cook time and a less crispy exterior. A preheated basket ensures that the moment the chicken touches the surface, the Maillard reaction (the chemical process that creates browning and flavor) begins instantly. While the air fryer preheats, lightly spray the breaded chicken tenders with cooking spray on all sides. This light oil application is the final secret to achieving deep-fried-level crunch.
Step 5: Arrange and Cook
Open the preheated air fryer and lightly spray the basket with cooking spray, even if it has a non-stick coating. This extra precaution guarantees the tenders will release easily. Arrange the breaded chicken tenders in a single layer. Do not overcrowd. Overcrowding traps steam, which will make the breadcrumbs soggy. Depending on the size of your air fryer basket, you may need to cook in two batches. Leave a small gap of about ½ inch between each tender to allow hot air to circulate freely.
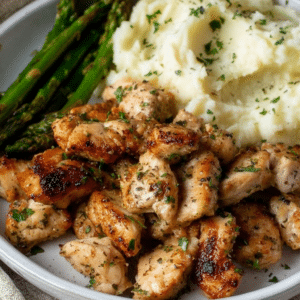
Air fry for 10 to 12 minutes total. At the 5 or 6 minute mark, open the air fryer and carefully flip each tender using tongs. The underside should be golden brown. If not, continue cooking for another minute before flipping. Flipping ensures both sides develop an equal crust. After flipping, close the air fryer and cook for the remaining time. Chicken tenders are fully cooked when they reach an internal temperature of 165°F (74°C) on an instant-read thermometer, or when the juices run clear and the coating is deep golden brown and visibly crunchy.
Step 6: Finish and Serve
Immediately after removing the chicken tenders from the air fryer, transfer them to a serving plate. Do not stack them, as this will trap steam and soften the bottom crust. Let them rest for just one minute—this brief rest allows the juices to redistribute within the meat. Take the reserved honey butter garlic sauce (the half that never touched raw chicken) and drizzle it generously over the hot tenders. The residual heat from the chicken will warm the sauce slightly, making it glossy and fragrant. Serve immediately. These tenders are best enjoyed within 10 to 15 minutes of cooking, while the crust remains at its peak crispness.
Conclusion
The Air Fryer Honey Butter Garlic Chicken Tender represents a triumph of modern home cooking. It delivers the sensory satisfaction of fried food—the audible crunch, the juicy interior, the bold flavors—without the downsides of a deep fryer. By harnessing the power of high-temperature convection, a smartly balanced glaze, and the textural superiority of panko breadcrumbs, this recipe transforms a simple pound of chicken into a dish that is both weeknight-practical and impressive enough for guests. The key lessons here are twofold: first, never skip reserving part of your sauce to avoid cross-contamination, and second, respect the air fryer’s need for preheating and space. When you honor these principles, the results are reliably spectacular. Whether served as a protein-packed appetizer, a main course with a side salad and roasted vegetables, or sliced over a bed of rice, these tenders will become a staple in your repertoire. Enjoy the perfect harmony of honey, butter, garlic, and crunch.
Frequently Asked Questions (FAQ)
Q1: Can I use frozen chicken tenders for this recipe?
A: It is strongly recommended to use fresh, thawed chicken tenders. Frozen tenders contain excess ice crystals and water. When they cook, this water releases and steams the breadcrumb coating, resulting in a soggy texture. If you only have frozen tenders, thaw them completely in the refrigerator overnight, then pat them very dry with paper towels before beginning Step 3. Do not attempt to air fry them from frozen with this wet batter and breadcrumb method.
Q2: My breadcrumbs fell off during cooking. What went wrong?
A: This is typically caused by one of three issues. First, the chicken may have been too wet before dipping. Always pat dry. Second, you may not have pressed the breadcrumbs firmly enough onto the chicken. Apply gentle but firm pressure. Third, you may have overcrowded the air fryer basket. When tenders touch, the air cannot circulate, and the steam dislodges the coating. Ensure a single layer with space between each tender. Additionally, lightly spraying the breaded tenders with oil before cooking helps the crumbs adhere and crisp rather than flaking off.
Q3: Can I make this recipe dairy-free?
A: Yes. Substitute the 2 tablespoons of unsalted butter with a high-quality dairy-free butter alternative made from coconut oil, avocado oil, or olive oil. Look for a block or stick form rather than a spreadable tub, as spreads contain more water. Alternatively, you can use 2 tablespoons of coconut oil (melted) or avocado oil. The flavor profile will change slightly—coconut oil will add a hint of tropical sweetness, while avocado oil will remain neutral. The texture will still be excellent.
Q4: How do I store and reheat leftovers?
A: Store any leftover chicken tenders in an airtight container in the refrigerator for up to 3 days. To reheat, avoid the microwave, which will make the coating chewy and sad. Instead, preheat your air fryer to 375°F (190°C) and reheat the tenders for 3 to 4 minutes, flipping once halfway. This restores most of the original crispiness. You can also reheat in a conventional oven at 400°F for 6 to 8 minutes. Do not reheat more than once.
Q5: Can I use this recipe with chicken breasts or thighs?
A: Absolutely. For chicken breasts, cut them into 1-inch wide strips to mimic the size of tenders. Cooking time will remain roughly the same, but check internal temperature at 10 minutes. For boneless, skinless chicken thighs, they are even more forgiving because of their higher fat content. Cut thighs into similar strips. Note that thighs may require 1 to 2 extra minutes of cooking time due to their density. Always rely on a meat thermometer rather than time alone.
Q6: Is there a gluten-free option for the breadcrumbs?
A: Yes. Substitute the regular or panko breadcrumbs with gluten-free panko (many brands now offer this) or crushed gluten-free cornflakes. You can also use finely crushed pork rinds for a low-carb, keto-friendly version. The cooking time and temperature remain unchanged. However, gluten-free breadcrumbs often brown faster, so check your tenders at the 8-minute mark to prevent burning.
Q7: Why is my honey butter garlic sauce burning in the air fryer?
A: Honey and butter both contain sugars and milk solids that can burn at high temperatures if exposed directly to the heating element. In this recipe, the sauce is used as a coating before breading, so the breadcrumbs act as a protective barrier. If you see burnt spots, it may be because the breadcrumb layer was too thin in some areas. Ensure an even, thorough coating of breadcrumbs. Also, do not add extra sauce on the tenders before cooking—save the reserved sauce for after cooking only.
Q8: Can I double this recipe for a crowd?
A: Yes, but you must cook in batches. Do not attempt to double the tenders in the air fryer basket at once. The maximum capacity for most standard air fryers is about 1 pound of chicken tenders in a single layer. If you double the recipe to 2 pounds, plan on two separate cooking sessions. The reserved sauce can be made in a larger batch and kept at room temperature (for up to 2 hours) or refrigerated and gently warmed before drizzling. The breading process will take longer, so allow for extra prep time.
Q9: Can I use garlic powder instead of fresh garlic?
A: You can, but the result will be noticeably different. Fresh garlic provides a pungent, sharp, and slightly sweet flavor when cooked, along with moisture that helps the sauce adhere. Garlic powder is more concentrated and has a milder, roasted-garlic flavor. If substituting, use 1 teaspoon of garlic powder instead of 3 cloves of fresh. Add the powder to the honey butter mixture along with the paprika. The final dish will still be delicious, but it will lack the vibrant, aromatic punch of fresh garlic.
Q10: My chicken tenders were cooked on the outside but raw inside. Why?
A: This usually indicates that the air fryer temperature was too high, or the tenders were too thick. Verify that your air fryer is actually reaching 400°F (200°C) using an oven thermometer if possible. Some air fryers run hot or cold. If your tenders are browning too quickly on the outside, lower the temperature to 375°F (190°C) and increase the cooking time to 14 to 16 minutes. Also, ensure your chicken tenders are of uniform thickness. If some are much thicker than others, gently pound them with a meat mallet to an even ½-inch thickness before coating. Always use an instant-read thermometer to confirm 165°F (74°C) at the thickest part.

Air Fryer Honey Butter Garlic Chicken Tenders: A Professional Guide to Crispy, Juicy Perfection
- Total Time: 22 minutes
- Yield: 4 servings
Description
Air Fryer Honey Butter Garlic Chicken Tenders are crispy, juicy chicken strips coated in a sweet and savory honey garlic butter glaze and air fried to golden perfection.
Ingredients
- 1 lb chicken tenders
- 1/4 cup honey
- 2 tbsp unsalted butter, melted
- 3 cloves garlic, minced
- 1 tsp paprika
- 1 tsp salt
- 1/2 tsp black pepper
- 1 cup breadcrumbs (panko or regular)
- Cooking spray
Instructions
- Make the Honey Garlic Mixture: In a bowl, whisk honey, melted butter, garlic, paprika, salt, and pepper. Reserve half for drizzling.
- Coat the Chicken: Dip tenders in the mixture, then coat in breadcrumbs.
- Preheat air fryer to 400°F (200°C).
- Arrange chicken in a single layer and spray lightly with cooking spray.
- Air fry for 10–12 minutes, flipping halfway, until golden and cooked through.
- Drizzle reserved sauce over chicken and serve hot.
Notes
- Use panko breadcrumbs for extra crunch.
- Don’t overcrowd the air fryer basket.
- Adjust honey for sweetness preference.
- Prep Time: 10 minutes
- Cook Time: 12 minutes
- Category: Dinner / Snack
- Method: Air Fry
- Cuisine: American