
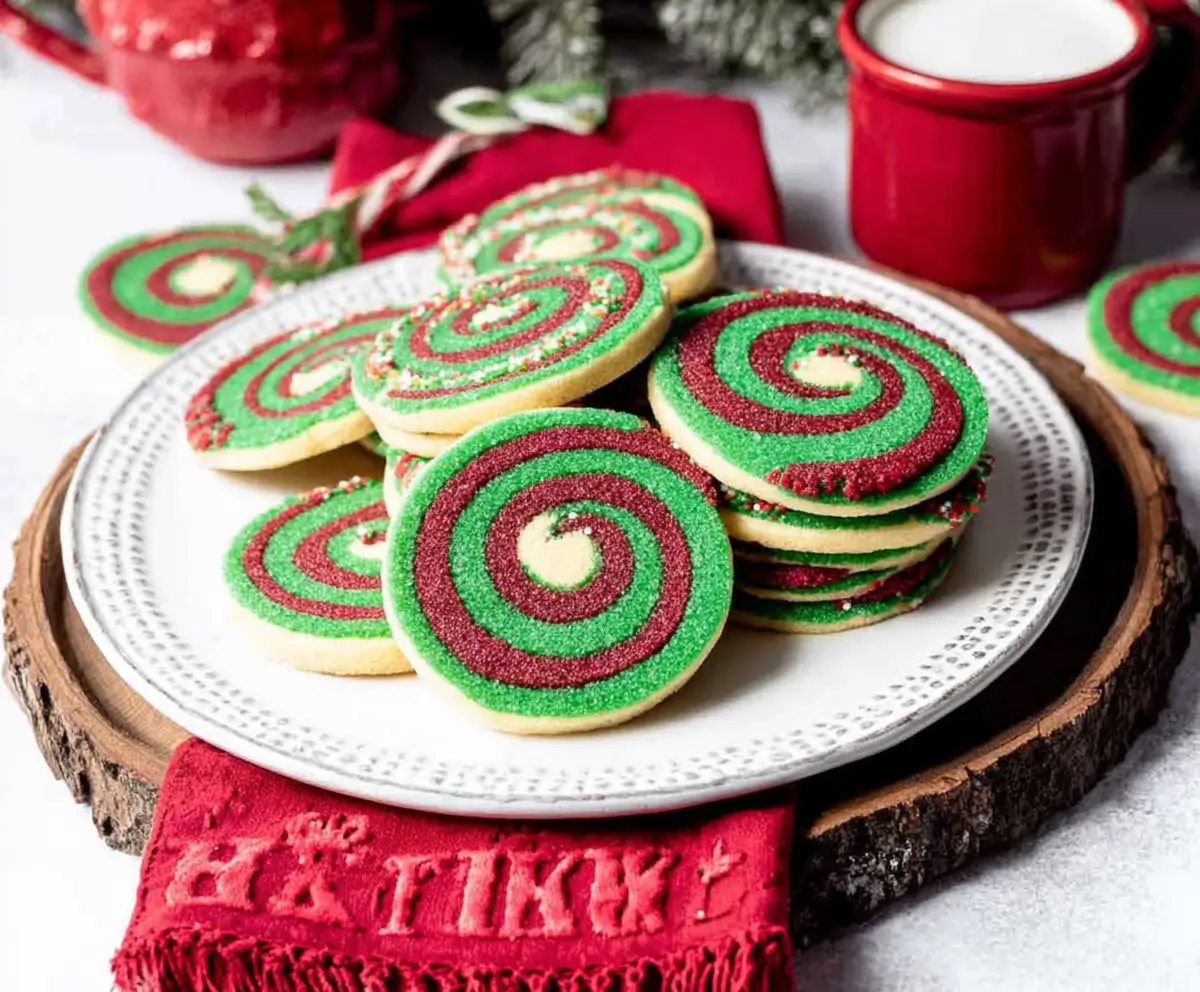
The holidays are all about sharing joy, and what better way to spread festive cheer than with Christmas Pinwheel Cookies? These delightful treats are a feast for both the eyes and the palate. With their hypnotic red, green, and white swirls, rolled in sparkling nonpareil sprinkles, these cookies are the perfect centerpiece for holiday cookie exchanges, parties, or gift tins. Their mesmerizing design is reminiscent of candy canes and traditional Christmas colors, making them instantly recognizable and irresistibly fun.
Though they may look intricate, Christmas Pinwheel Cookies are surprisingly approachable for bakers of all skill levels. With a little patience, some careful layering, and chilling time, anyone can create perfectly shaped swirly cookies that hold their form and flavor beautifully. These cookies strike a balance between buttery, tender dough and the festive crunch of sprinkles, creating a treat that melts in your mouth while delighting the eyes.
Whether you’re baking with family, preparing a special gift, or adding a splash of color to your holiday table, these cookies bring a touch of magic to the season.
Ingredients
For approximately 30 Christmas Pinwheel Cookies, you will need the following ingredients:
- 3/4 cup salted butter, softened to room temperature
- 3/4 cup (150g) granulated sugar
- 3/4 cup (150g) powdered sugar
- 2 large eggs
- 2 teaspoons vanilla extract
- 2 1/2 cups (353g) all-purpose flour
- 1/2 teaspoon baking powder
- 1/2 teaspoon salt
- Red & green gel food coloring
- Holiday colored nonpareils
- Optional: 1/2–1 teaspoon additional flavoring extracts or lemon zest
These ingredients combine to produce a soft, buttery dough with vibrant holiday colors. The combination of granulated and powdered sugar ensures a tender yet structured dough that holds its shape when rolled into spirals. The nonpareil sprinkles add a fun, festive touch, making each cookie sparkle like a tiny holiday decoration.
Step-by-Step Preparation Method
1. Cream Butter and Sugars
In the bowl of a stand mixer or using a hand mixer, combine the butter, granulated sugar, and powdered sugar. Beat on medium speed until light and fluffy, about 2–3 minutes. Scrape the sides of the bowl to ensure all ingredients are evenly incorporated.
This step is key to achieving a tender, well-aerated dough that will roll easily without cracking.
2. Add Eggs and Flavorings
Add the eggs, vanilla extract, and any optional flavoring such as lemon zest or additional extracts. Mix until fully combined. The eggs provide structure and moisture, while the vanilla and optional flavorings enhance the overall depth of flavor.
3. Incorporate Dry Ingredients
In a separate bowl, whisk together the flour, baking powder, and salt. Gradually mix the dry ingredients into the wet mixture until a soft dough forms. Divide the dough into three even portions.
4. Color the Dough
Return one portion of dough to the mixing bowl and add 5–10 drops of red gel food coloring, mixing until evenly colored. Repeat with another portion of dough, adding green gel food coloring. Leave the remaining portion white.
Tip: Gel coloring is recommended to avoid adding extra liquid, which could affect the dough consistency.
5. Chill the Dough
Flatten each colored dough portion into a disc, wrap in plastic wrap, and chill. You can chill in the freezer for 20 minutes or in the refrigerator for 1 hour. Chilling makes the dough easier to roll and prevents the colors from blending together during shaping.
6. Roll Out and Stack Dough
Roll each chilled disc on a floured surface to form rectangles of similar size. Stack the rectangles with the white dough in the middle, and the red and green layers on the top and bottom. Trim the long edges so that the stack is even. The shorter ends will be trimmed later after rolling.
7. Roll the Dough into a Log
Carefully roll the stacked dough into a tight log, using the bottom piece of parchment to help lift and guide the dough. Wrap the log in plastic wrap and chill for at least 1–2 hours. Chilling helps the dough maintain its shape when slicing and ensures clean, defined pinwheels.
8. Add Sprinkles and Slice
Once the dough log is fully chilled, roll it in holiday-colored nonpareils. Press lightly to ensure the sprinkles stick and cover the entire surface. Slice the log into 1/4-inch thick cookies using a sharp knife.
Tip: Remove uneven ends before slicing to achieve uniform, professional-looking cookies.
9. Bake the Cookies
Preheat the oven to 350°F (177°C). Place the cookies on a parchment-lined baking sheet, spacing them 1–2 inches apart. Bake for 10–12 minutes until the cookies are set but still soft in the center. Allow the cookies to cool completely on a wire rack before serving.
Tips for Perfect Pinwheels

- Consistent Rectangle Sizes: Ensure each colored dough rectangle is similar in size to maintain uniform swirls.
- Chill Thoroughly: Chilling is crucial at multiple steps to prevent the dough from cracking or losing its shape.
- Use a Sharp Knife: Clean, precise cuts create crisp swirls. Wipe the knife between cuts if necessary.
- Optional Flavorings: Lemon zest or almond extract adds subtle depth and complements the sweetness.
- Even Sprinkles: Gently press sprinkles to prevent them from falling off during baking.
Storing and Serving
- Store cookies in an airtight container at room temperature for up to 1 week.
- These cookies freeze well before baking. Wrap the dough log in plastic wrap and freeze for up to 1 month. Slice and bake directly from frozen, adding 1–2 minutes to the baking time.
- Perfect for cookie exchanges, holiday gift tins, or festive platters.
Frequently Asked Questions (FAQs)
1. Can I make the dough ahead of time?
Yes, you can prepare the dough, roll it into a log, and wrap it in plastic wrap. Chill in the fridge for up to 1 week, or freeze for up to 1 month. Slice and bake as needed.
2. What type of food coloring is best?
Gel food coloring is preferred because it provides vibrant color without adding liquid, which could affect the dough’s texture.
3. Can I use different colors for the pinwheels?
Absolutely! Swap traditional red and green for any colors that suit your holiday theme or special occasion.
4. Why do I need to chill the dough multiple times?
Chilling ensures the dough is firm enough to roll into a log without cracking and helps maintain defined swirls when slicing.
5. Can I skip the sprinkles?
Yes, the cookies will still be festive and delicious without sprinkles, though the holiday sparkle adds a charming visual touch.
Conclusion
Christmas Pinwheel Cookies are a visually stunning, festive treat that embodies the spirit of the season. The hypnotic swirls, vibrant colors, and sprinkle-covered edges make them a standout addition to any holiday table. With careful preparation and attention to chilling, even beginner bakers can create these charming cookies with ease.
Perfect for gifting, entertaining, or simply enjoying with a cup of hot cocoa, these cookies combine buttery dough, colorful layers, and playful sprinkles in every bite. Whether you make them year after year or for a special celebration, Christmas Pinwheel Cookies are guaranteed to delight friends, family, and anyone lucky enough to sample them.
Print
Christmas Pinwheel Cookies: A Festive Swirl of Holiday Cheer
- Total Time: 2 hours 25 minutes
- Yield: 30 cookies
- Diet: Vegetarian
Description
No Who down in Who-ville can resist the mesmerizing swirls of Christmas Pinwheel Cookies rolled in nonpareil sprinkles for an extra festive touch! These swirly treats are sure to be the talk of your next cookie exchange!
Ingredients
- 3/4 cup salted butter, softened
- 3/4 cup granulated sugar
- 3/4 cup powdered sugar
- 2 large eggs
- 2 teaspoons vanilla extract
- 2 1/2 cups all-purpose flour
- 1/2 teaspoon baking powder
- 1/2 teaspoon salt
- Red & green gel food coloring
- Holiday colored nonpareils
- Optional: 1/2–1 teaspoon of additional flavoring extracts or lemon zest
Instructions
- Combine butter, granulated sugar, and powdered sugar in a mixer and beat until light and fluffy.
- Add eggs, vanilla, and optional flavorings, scraping the sides and bottom of the bowl.
- Mix in flour, baking powder, and salt. Divide dough into three even balls.
- Add red gel food coloring to one portion and green to another; leave one portion plain. Mix until evenly colored.
- Flatten each ball into a disc, wrap in plastic wrap, and chill (20 min freezer or 1 hr fridge).
- Roll out each disc into rectangles, stack layers (white middle, red & green outside), and trim edges.
- Roll stacked dough into a tight log, wrap, and chill 1–2 hours. Roll in nonpareils to coat outside.
- Slice log into 1/4-inch cookies, place on lined baking sheet 1–2 inches apart.
- Bake at 350°F for 10–12 minutes until set. Cool completely on wire rack.
Notes
- Press dough firmly into sprinkles for full coverage.
- Store wrapped dough in the fridge up to 1 week before slicing and baking.
- Prep Time: 15 minutes
- Cook Time: 10 minutes
- Category: Cookies, Dessert
- Method: Bake
- Cuisine: American