
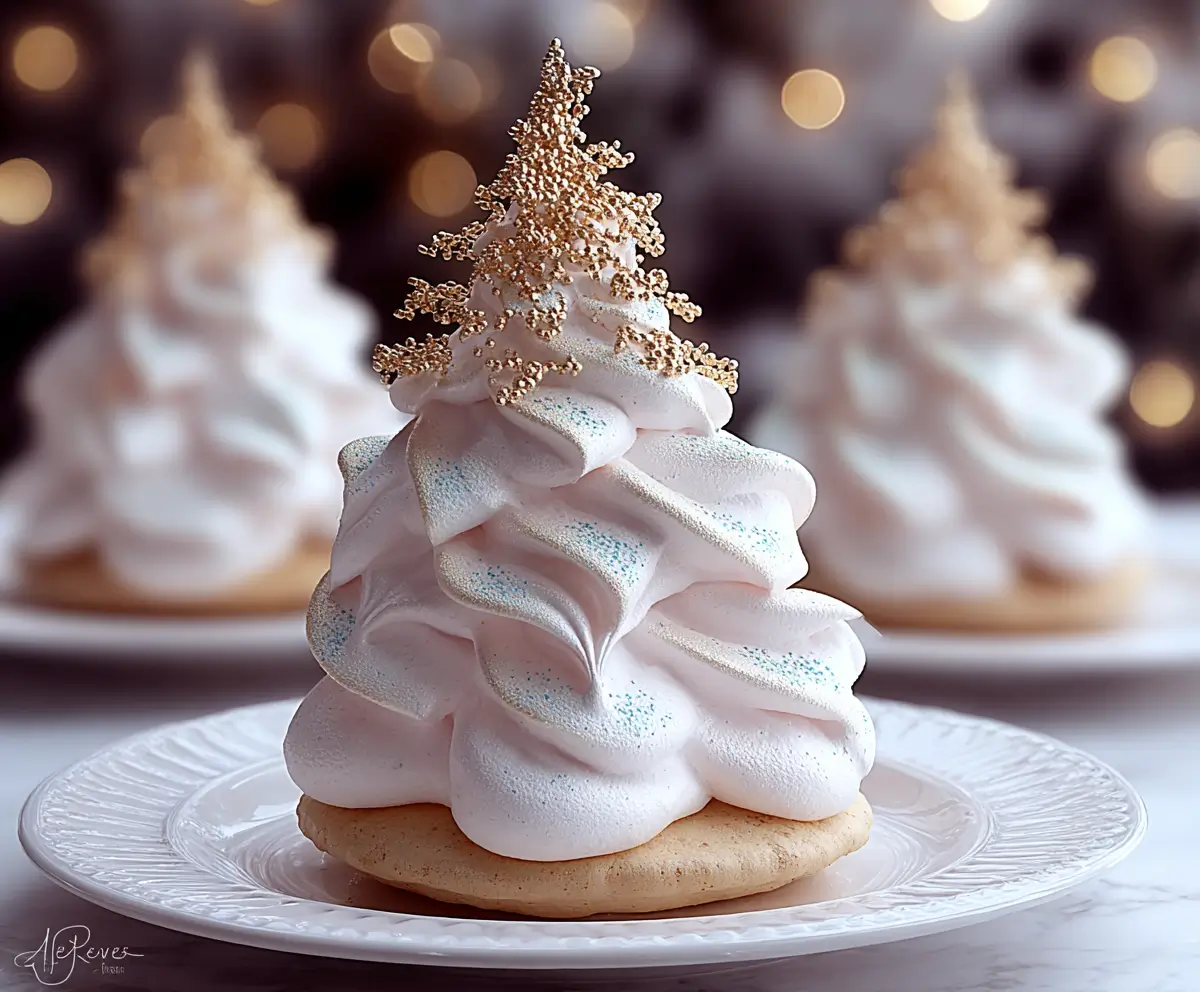
The holiday season is a time for family, festive gatherings, and indulging in sweet treats that brighten your celebrations. Among all the classic holiday desserts, Tree Meringue Cookies stand out for their whimsical design, delicate texture, and festive charm. These cookies are not just a treat for the taste buds—they are a visual delight that can instantly elevate any holiday dessert table. Crafted from airy meringue piped elegantly into the shape of Christmas trees and perched atop buttery shortbread or sugar cookie bases, these cookies are as fun to make as they are to eat. They offer a light, crisp sweetness that contrasts beautifully with the rich, tender cookie base, creating a bite that melts in your mouth with each taste.
Perfect for holiday parties, cookie exchanges, or as thoughtful gifts for friends and family, these Enchanting Tree Meringue Cookies are versatile, allowing you to customize them with your favorite colors, sprinkles, or edible glitter. While they might seem intricate at first glance, with a little patience and attention to detail, even novice bakers can achieve professional-looking results. By the end of this guide, you’ll have everything you need to create a batch of stunning, delicate cookies that will leave a lasting impression.
Ingredients for Enchanting Tree Meringue Cookies
Before diving into the preparation, it’s important to have all the ingredients ready. For approximately 30 cookies, you will need:
- 3 large egg whites
- 3/4 cup granulated sugar
- 1/4 teaspoon cream of tartar
- 1 teaspoon vanilla extract
- 1 pinch salt
- 1 to 2 drops gel food coloring (optional, for a festive touch)
- 5 to 6 flat round cookies (shortbread or sugar cookies work best as sturdy bases)
- Optional decorative sprinkles or edible glitter (to add sparkle and holiday charm)
These simple ingredients combine to create a visually stunning and delectably light cookie. The meringue is airy and crisp, while the base provides stability and buttery richness. The optional food coloring and decorations allow you to infuse your cookies with personal style and holiday cheer.
Step-by-Step Preparation Method

1. Prepare Your Oven and Tools
Start by preheating your oven to 200°F (95°C). This low temperature is crucial for drying the meringues slowly, which ensures a crisp exterior and prevents cracking or browning. Line a baking sheet with parchment paper to prevent sticking and set aside. Prepare a piping bag fitted with a large star tip, which will be used to create the signature tree shape.
Tip: Use a clean, dry bowl for your egg whites. Any residual moisture or grease can prevent your meringue from reaching stiff peaks.
2. Beat the Egg Whites
Place the egg whites in the prepared mixing bowl. Using an electric mixer on medium speed, begin to beat the egg whites until they are foamy. At this stage, add the cream of tartar, which acts as a stabilizer, helping the meringue hold its structure during whipping and baking.
Once foamy, increase the mixer speed and continue beating until soft peaks form. Soft peaks should hold their shape lightly when you lift the beaters, but the tips will gently curl over.
3. Incorporate the Sugar
Slowly add the granulated sugar to the egg whites, one tablespoon at a time, while continuing to beat. This gradual incorporation is key to creating a smooth, glossy, and stable meringue. Be patient during this step—rushing can result in a grainy texture. Continue whipping until stiff, glossy peaks form. Stiff peaks stand tall and firm without collapsing when the beaters are lifted.
4. Add Flavoring and Optional Coloring
Gently fold in vanilla extract for a subtle, aromatic flavor. If you wish to add a festive flair, carefully incorporate 1–2 drops of gel food coloring. Avoid liquid food coloring, as it can affect the meringue’s consistency.
Pro Tip: Fold the color in slowly and gently to avoid deflating the meringue.
5. Prepare the Cookie Bases
Place your flat round cookies (shortbread or sugar cookies) on the parchment-lined baking sheet. These will serve as the sturdy base for each meringue tree. Shortbread cookies are ideal because their buttery flavor complements the meringue without overpowering it.
6. Pipe the Meringue Trees
Fill your prepared piping bag with the meringue mixture. Starting at the center of each cookie base, pipe spirals upwards to form a tree shape. The star tip creates a textured, ridged appearance that mimics the branches of a real Christmas tree.
Tip: Keep a consistent pressure on the piping bag to ensure uniformity across all cookies.
7. Bake the Meringues
Place the baking sheet in your preheated oven. Bake for 1.5 to 2 hours, depending on the size of your trees. Low-and-slow baking dries out the meringues without browning them, resulting in a crisp exterior and a light, airy interior.
Check for doneness: The meringue should easily lift off the parchment paper and feel firm to the touch.
8. Cool and Decorate
Once baked, allow the meringues to cool completely on the baking sheet. After cooling, you can add decorative touches such as sprinkles, edible glitter, or a light dusting of powdered sugar to enhance the festive look.
Presentation Tip: Arrange the cookies on a tiered cake stand or holiday platter to showcase their elegant tree shape.
Tips for Success
- Egg Whites at Room Temperature: Egg whites whip better at room temperature. If they’ve been refrigerated, let them sit out for 20–30 minutes before using.
- Avoid Humidity: Meringues are sensitive to moisture. Avoid baking on humid days or store them in an airtight container once cooled.
- Use Gel Food Coloring: Gel coloring adds vibrant hues without altering the meringue’s consistency.
- Practice Piping: If you’re new to piping, practice on a piece of parchment paper before decorating the actual cookies.
- Cooling: Allowing the cookies to cool completely prevents condensation, which can make meringues sticky.
Storing and Serving
- Store at room temperature in an airtight container for up to 3–5 days.
- Avoid refrigeration, as moisture can soften the crisp meringue.
- These cookies make excellent gifts when packaged in cellophane bags or decorative tins.
- Perfect as a centerpiece for holiday tables or as a sweet treat with coffee, tea, or hot cocoa.
Frequently Asked Questions (FAQs)
1. Can I make these cookies ahead of time?
Yes! You can prepare the meringue mixture and pipe the cookies a day in advance. Keep them covered loosely at room temperature to prevent them from absorbing moisture.
2. Can I use a different type of cookie base?
Shortbread or sugar cookies are recommended for stability, but any firm, flat cookie can work. Avoid soft cookies, as they may not support the meringue well.
3. Can I use liquid food coloring instead of gel?
It’s not recommended. Liquid food coloring can add excess moisture, which may prevent the meringue from achieving stiff peaks and a crisp texture.
4. How can I make the meringue extra crispy?
Bake slowly at low temperatures and allow the cookies to cool completely. Storing them in a dry environment also helps maintain crispness.
5. Are these cookies gluten-free?
The meringue itself is gluten-free. However, the cookie bases typically contain gluten unless you use a gluten-free shortbread or sugar cookie alternative.
6. Can I freeze these cookies?
It’s not ideal to freeze baked meringues, as they may lose their crispness. However, you can prepare and freeze unbaked meringue piped cookies for up to 1 month. Bake directly from frozen at the same temperature, adding a few extra minutes.
Conclusion
Enchanting Tree Meringue Cookies are more than just a holiday treat—they are a work of art. Their crisp, airy texture combined with a buttery cookie base and festive decorations makes them perfect for holiday tables, gifts, and cookie exchanges. With careful attention to preparation and baking, these cookies will not only taste amazing but also bring a touch of elegance and whimsy to your celebrations. Whether you are a seasoned baker or trying your hand at meringue for the first time, this recipe is accessible, rewarding, and guaranteed to delight everyone who sees and tastes them.
Bring the holiday spirit to life with these stunning cookies, and watch as family and friends marvel at your culinary creation. From piping the delicate spirals to adding the finishing touches with edible glitter, every step is a celebration in itself. Enjoy the process, embrace the creativity, and most importantly, savor every bite of these enchanting meringue trees.
Print
Enchanting Tree Meringue Cookies: A Delightful Holiday Treat
- Total Time: 3 hours 30 minutes
- Yield: 30 cookies
- Diet: Vegetarian
Description
Bring the holiday spirit to your table with these stunning Tree Meringue Cookies. Light, crisp, and delicately sweet, these cookies are shaped like elegant Christmas trees and rest on buttery cookie bases.
Ingredients
- 3 large egg whites
- 3/4 cup granulated sugar
- 1/4 teaspoon cream of tartar
- 1 teaspoon vanilla extract
- 1 pinch salt
- 1 to 2 drops gel food coloring (optional)
- 5 to 6 flat round cookies (shortbread or sugar cookies)
- Optional: decorative sprinkles or edible glitter
Instructions
- Preheat oven to 200°F (95°C) and line a baking sheet with parchment paper. Set up a piping bag with a large star tip.
- Beat egg whites in a clean, dry bowl on medium speed. Add cream of tartar and increase speed until soft peaks form.
- Add granulated sugar one tablespoon at a time, beating until stiff, glossy peaks form.
- Gently fold in vanilla extract and optional gel food coloring.
- Place cookie bases on the prepared baking sheet. Pipe meringue spirals on top of each cookie.
- Bake for 1.5 to 2 hours, until meringues are fully dry.
- Cool completely, then decorate with sprinkles, powdered sugar, or edible glitter.
Notes
- Ensure the bowl and mixer are completely grease-free for best meringue results.
- Gel coloring is preferred to avoid thinning the meringue.
- Store in an airtight container to maintain crispiness.
- Prep Time: 30 minutes
- Cook Time: 2 hours
- Category: Dessert, Cookies
- Method: Bake
- Cuisine: American