Introduction
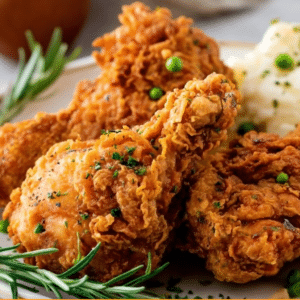
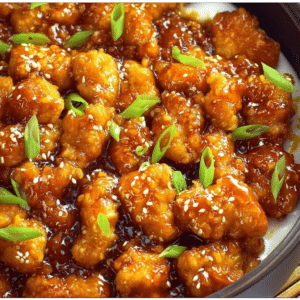
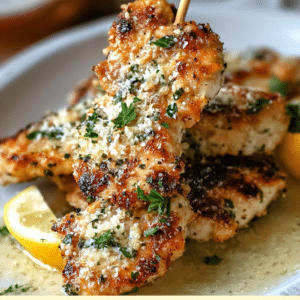
There are fried chicken recipes, and then there is Bloomin’ Fried Chicken. Inspired by the iconic Bloomin’ Onion from Outback Steakhouse—that glorious, crispy, petal-like appetizer served with spicy dipping sauce—this chicken recipe takes the same bold seasoning, the same shatteringly crisp coating, and applies it to juicy, tender chicken breasts. The result is a piece of fried chicken that is anything but ordinary. It is audaciously crunchy, explosively flavorful, and deeply satisfying.
What makes Bloomin’ Fried Chicken so distinctive is its seasoning. The dry coating is a bold blend of seasoned salt, cayenne pepper, smoked paprika, garlic powder, and black pepper. This is not a subtle, one-note breading. It is spicy, smoky, savory, and slightly sweet from the paprika, with a cayenne kick that lingers pleasantly without overwhelming. The double-dredging technique—coating the chicken in the seasoned flour, then dipping in buttermilk, then coating again—creates a thick, craggy crust that fries up into a mosaic of crispy, golden-brown peaks and valleys. Every bite delivers a satisfying crunch followed by juicy, tender chicken.
This copycat recipe brings the Outback Steakhouse experience into your own kitchen. You do not need a deep fryer or any special equipment—a large cast-iron skillet and a few bowls are all it takes. The chicken is pounded thin (or sliced horizontally) to ensure even cooking and maximum surface area for that glorious crust. A brief soak in buttermilk tenderizes the meat and helps the flour coating adhere. The double-dredge ensures a thick, craggy crust that stays crispy long after it comes out of the oil.
Serve this chicken with Outback’s famous Bloomin’ Onion sauce (a creamy, tangy, horseradish-spiked dip), or simply enjoy it with ranch, honey mustard, or your favorite hot sauce. It is perfect for game day, family dinners, or any time you crave fried chicken with serious personality.
In this article, you will find a comprehensive guide to making Outback Steakhouse Bloomin’ Fried Chicken from scratch. We will cover ingredient selection, step-by-step preparation, expert tips for achieving the perfect crust, storage instructions, and detailed answers to frequently asked questions.
Ingredients
Before you begin, gather all of your ingredients. Because frying requires attention and timing, having everything prepped and within reach is essential. Below is the complete list.
For the Bloomin’ Fried Chicken
| Ingredient | Quantity | Notes |
|---|---|---|
| Boneless, skinless chicken breasts | 1 lb (about 2 medium breasts) | Sliced horizontally or pounded thin |
| All-purpose flour | ½ cup | For the dry coating |
| Buttermilk | 1 cup | Full-fat preferred; shake before measuring |
| Water | 1 cup | For thinning the buttermilk |
| Oil (for frying) | 3 tablespoons | Vegetable, canola, or peanut oil |
For the Seasoned Flour Blend
| Ingredient | Quantity | Notes |
|---|---|---|
| Seasoned salt | 2 teaspoons | Lawry’s is classic; use any brand |
| Cayenne pepper | 1½ teaspoons | Adjust for heat preference |
| Smoked paprika | 1 teaspoon | Adds smokiness and color |
| Garlic powder | ¼ teaspoon | Not garlic salt |
| Black pepper | ¼ teaspoon | Freshly ground |
For Serving (Optional)
| Ingredient | Notes |
|---|---|
| Bloomin’ Onion sauce | Copycat recipe included below |
| Ranch dressing | For dipping |
| Honey mustard | For dipping |
| Lemon wedges | For squeezing over finished chicken |
Copycat Bloomin’ Onion Sauce (Optional)
| Ingredient | Quantity |
|---|---|
| Mayonnaise | ½ cup |
| Sour cream | ¼ cup |
| Ketchup | 2 tablespoons |
| Prepared horseradish | 2 tablespoons |
| Smoked paprika | ½ teaspoon |
| Cayenne pepper | ¼ teaspoon |
| Salt | ⅛ teaspoon |
Whisk all sauce ingredients together until smooth. Refrigerate for at least 30 minutes before serving to allow flavors to meld.
Preparation Method
Step 1: Prepare the Chicken
Place the 1 lb of boneless, skinless chicken breasts on a cutting board. You have two options for achieving thin, even pieces that cook quickly and have maximum surface area for coating:
Option A (Slicing): Using a sharp knife, carefully slice each chicken breast horizontally (parallel to the cutting board) to create two thinner cutlets per breast. You should end up with 4 thin pieces total.
Option B (Pounding): Place each chicken breast between two sheets of plastic wrap or parchment paper. Using a rolling pin, meat mallet, or heavy skillet, pound the chicken to an even thickness of about ½ inch. This method keeps the breasts whole but flattens them.
Both methods work equally well. Pounding creates a more uniform shape; slicing yields more pieces. Either way, the goal is thin, even chicken that will cook quickly and have a high crust-to-meat ratio.
Pat the chicken pieces completely dry with paper towels. Set aside.
Step 2: Make the Buttermilk Slurry
In a medium bowl, combine 1 cup of buttermilk and 1 cup of water. Whisk until smooth. The water thins the buttermilk slightly, creating a slurry that coats the chicken evenly without being overly thick.
If you do not have buttermilk, you can make a substitute: add 1 tablespoon of white vinegar or lemon juice to 1 cup of whole milk. Let it sit for 5 minutes until it thickens and curdles slightly.
Step 3: Make the Seasoned Flour Blend
In a separate medium bowl, combine the following dry ingredients:
- ½ cup all-purpose flour
- 2 teaspoons seasoned salt
- 1½ teaspoons cayenne pepper
- 1 teaspoon smoked paprika
- ¼ teaspoon garlic powder
- ¼ teaspoon black pepper
Whisk or stir with a fork until the spices are evenly distributed throughout the flour. The mixture should be reddish-orange from the paprika and cayenne, with visible specks of black pepper.
Taste the flour blend (yes, you can taste a tiny pinch—the flour is raw but a small taste is safe). Adjust the seasoning to your preference. For spicier chicken, add another ½ teaspoon of cayenne. For milder chicken, reduce cayenne to 1 teaspoon.
Step 4: Set Up the Dredging Station
Arrange your dredging station in a logical flow from left to right:
- Seasoned flour (first coating)
- Buttermilk slurry (wet dip)
- Seasoned flour (second coating)
You will use the seasoned flour twice, so make sure you have enough in the bowl. You can also divide the flour into two separate bowls if you prefer, but a single bowl works fine as long as you are careful not to contaminate it with wet buttermilk.
Step 5: Double-Dredge the Chicken
This is the most important step for achieving that signature craggy, crunchy crust.
First coat: Take one piece of chicken and place it in the seasoned flour. Press firmly to ensure the flour adheres to all surfaces. Shake off any excess flour. The chicken should have a thin, even dusting.
Buttermilk dip: Transfer the floured chicken to the buttermilk slurry. Turn to coat both sides. Let any excess drip back into the bowl.
Second coat: Return the chicken to the seasoned flour. This time, press firmly and even toss the flour over the chicken with your hands to create a thick, craggy coating. The flour should cling to the buttermilk in irregular clumps—these clumps will become extra-crispy, crunchy bits when fried.
Place the double-dredged chicken on a wire rack or a plate. Repeat with the remaining pieces.
Important: Use one hand for the dry steps (flour) and the other hand for the wet step (buttermilk) to prevent your fingers from becoming clumpy and messy. This is sometimes called the “wet hand, dry hand” method.
Step 6: Heat the Oil
Place a large cast-iron skillet (12-inch recommended) over medium-high heat. Add 3 tablespoons of oil. Cast iron is ideal because it retains heat well and creates an even, crispy crust.
Heat the oil until it is shimmering and a small pinch of flour dropped into the oil sizzles immediately. The oil temperature should be approximately 350°F to 375°F (175°C to 190°C) . If you have a deep-fry or candy thermometer, use it. If not, test with a small piece of breading—it should bubble vigorously and turn golden in about 60 seconds.
Step 7: Fry the Chicken
Carefully place the double-dredged chicken pieces into the hot oil. Do not overcrowd the pan—fry in batches if necessary. Overcrowding lowers the oil temperature and results in greasy, soggy chicken.
Cook for 3 to 4 minutes per side, depending on thickness. The chicken is done when:
- The crust is deep golden-brown and craggy.
- An instant-read thermometer inserted into the thickest part reads 165°F (74°C) .
- The juices run clear when the chicken is pierced.
Flip the chicken only once, halfway through cooking. Constant flipping disturbs the crust.
Step 8: Drain and Rest
Using tongs, transfer the fried chicken to a wire rack set over a baking sheet or to a plate lined with paper towels. The wire rack is preferable because it allows air to circulate around the chicken, keeping the crust crispy on all sides.
Let the chicken rest for 3 to 5 minutes before serving. This brief rest allows the juices to redistribute and the crust to set.
Step 9: Serve
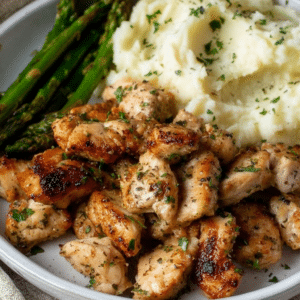
Serve the Bloomin’ Fried Chicken hot, with your choice of dipping sauce. The copycat Bloomin’ Onion sauce (recipe above) is the classic pairing, but ranch, honey mustard, or even extra hot sauce work beautifully.
Garnish with fresh parsley or a squeeze of lemon if desired.
Expert Tips for Perfect Bloomin’ Fried Chicken
- Do not skip the double dredge. The first flour coat adheres to the chicken; the buttermilk creates a sticky layer; the second flour coat forms the thick, craggy crust. This is the secret to Outback’s signature texture.
- Use a cast-iron skillet. Cast iron holds heat evenly and consistently, which is essential for achieving a golden-brown crust without burning. If you do not have cast iron, use a heavy-bottomed stainless steel skillet.
- Maintain proper oil temperature. If the oil is too cool, the chicken will absorb oil and become greasy. If too hot, the crust will burn before the chicken cooks through. Aim for 350–375°F. Adjust the heat as needed between batches.
- Let the dredged chicken rest. After double-dredging, let the chicken sit on a wire rack for 5–10 minutes before frying. This allows the coating to set and adhere more firmly, reducing the chance of the breading falling off in the pan.
- Season the chicken itself. For even more flavor, season the raw chicken breasts lightly with salt and pepper before dredging. This seasons the meat itself, not just the crust.
- Make extra for leftovers. This chicken is delicious cold, sliced over salads, or tucked into sandwiches.
Storage and Reheating
Refrigeration: Store leftover fried chicken in an airtight container in the refrigerator for up to 3 days. The crust will soften, but the flavor remains excellent.
Freezing: Freeze cooked chicken in a single layer on a baking sheet, then transfer to a freezer bag. Freeze for up to 2 months. Reheat directly from frozen.
Reheating (oven): The best method for restoring crispiness. Preheat oven to 375°F. Place chicken on a wire rack over a baking sheet. Bake for 10–12 minutes until heated through and crispy.
Reheating (air fryer): Excellent for single servings. Air fry at 360°F for 4–5 minutes.
Reheating (microwave): Not recommended. The microwave will make the crust soggy and chewy.
Conclusion
Outback Steakhouse Bloomin’ Fried Chicken is more than a copycat recipe—it is a celebration of bold flavors and extraordinary texture. The seasoned flour blend, with its cayenne kick and smoky paprika warmth, transforms ordinary fried chicken into something memorable. The double-dredging technique creates a crust that is thick, craggy, and shatteringly crisp, clinging to every bite of juicy, tender chicken.
This is fried chicken with attitude. It is not shy. It is not subtle. It is the kind of dish that makes you close your eyes after the first bite, smile, and reach for another piece. Serve it with the copycat Bloomin’ Onion sauce for the full Outback experience, or pair it with your favorite dipping sauces. Either way, you are in for a treat.
So heat that cast-iron skillet, mix that seasoned flour, and get ready to make the best fried chicken of your life. Your kitchen is about to smell incredible.
Frequently Asked Questions (FAQ)
1. Can I use chicken thighs instead of chicken breasts?
Yes. Boneless, skinless chicken thighs are even more forgiving and stay juicier than breasts. Pound them to an even ½-inch thickness. Follow the same dredging and frying instructions. Thighs are fully cooked at 165°F.
2. Can I make this recipe gluten-free?
Yes. Substitute the all-purpose flour with a gluten-free 1:1 flour blend (like King Arthur Measure for Measure or Bob’s Red Mill). Ensure your seasoned salt and other spices are gluten-free (most are). The technique remains identical.
3. How spicy is this chicken?
With 1½ teaspoons of cayenne pepper, this chicken is medium-hot. It has a definite kick that lingers but does not overwhelm. For milder chicken, reduce cayenne to ½ or 1 teaspoon. For extra heat, increase to 2 teaspoons or add a pinch of red pepper flakes to the flour.
4. Why did my breading fall off during frying?
Breading falls off for several common reasons:
- Chicken was wet: Pat the chicken completely dry before dredging.
- No resting time: Let the double-dredged chicken rest for 5–10 minutes before frying.
- Oil temperature too low: Low oil causes the breading to absorb oil and slide off.
- Flipping too often: Flip only once, halfway through cooking.
5. Can I deep-fry instead of pan-fry?
Yes. Use a deep pot or Dutch oven with enough oil to fully submerge the chicken. Heat oil to 350°F. Fry for 3–4 minutes total (flipping is not necessary when fully submerged). Drain on a wire rack.
6. What is seasoned salt? Can I make my own?
Seasoned salt is a pre-mixed blend of salt, paprika, turmeric, onion powder, and garlic powder. Lawry’s is the most common brand. To make your own: mix ¼ cup salt, 1 tablespoon paprika, 1 teaspoon turmeric, 1 teaspoon onion powder, and 1 teaspoon garlic powder.
7. Can I bake this chicken instead of frying?
Baking will not produce the same craggy, crispy crust, but you can try. Bake at 425°F on a wire rack over a baking sheet for 20–25 minutes, spraying the chicken with cooking spray before baking. The texture will be closer to baked breaded chicken than fried.
8. What is the best oil for frying?
Use oils with a high smoke point:
- Vegetable oil (affordable, neutral flavor)
- Canola oil (light, neutral)
- Peanut oil (excellent for frying, adds slight nuttiness)
- Avocado oil (high smoke point, healthy)
Avoid olive oil (low smoke point) and butter (burns easily).
9. Can I use this coating for other foods?
Absolutely. This seasoned flour is delicious on:
- Chicken tenders or strips
- Pork chops (pounded thin)
- Fish fillets (cod, catfish, tilapia)
- Onion rings (dip onion rings in buttermilk, then flour)
- Fried pickles
10. How do I make the Bloomin’ Onion sauce?
Combine in a small bowl:
- ½ cup mayonnaise
- ¼ cup sour cream
- 2 tablespoons ketchup
- 2 tablespoons prepared horseradish
- ½ teaspoon smoked paprika
- ¼ teaspoon cayenne pepper
- ⅛ teaspoon salt
Whisk until smooth. Refrigerate for 30 minutes before serving.
11. Can I double this recipe?
Yes. Double all ingredients. Fry the chicken in batches to avoid overcrowding. Keep finished chicken warm in a 200°F oven on a wire rack while you fry the remaining batches.
12. How do I dispose of frying oil properly?
Never pour oil down the sink—it can clog pipes. Instead:
- Let the oil cool completely.
- Pour it into a sealed, non-recyclable container (like an old jar or can).
- Dispose of the container in the trash.
- Some municipalities have oil recycling programs; check locally.

Outback Steakhouse Bloomin’ Fried Chicken – A Copycat Recipe with Extraordinary Crunch and Flavor
- Total Time: 30 minutes
- Yield: 4 servings
Description
Crispy Outback-style Bloomin Fried Chicken made with seasoned breaded chicken breast, buttermilk coating, and bold spices for a crunchy, flavorful fried chicken dish.
Ingredients
- 1 lb boneless chicken breast, sliced and pounded thin
- 1/2 cup all-purpose flour
- 1 cup buttermilk
- 3 tablespoons oil (for frying)
- 2 teaspoons seasoned salt
- 1 1/2 teaspoons cayenne pepper
- 1 teaspoon smoked paprika
- 1/4 teaspoon garlic powder
- 1/4 teaspoon black pepper
- 1 cup water (for buttermilk mixture)
Instructions
- Pound chicken breasts thin for even cooking.
- In a bowl, mix buttermilk with water and stir well.
- In another bowl, combine flour, seasoned salt, cayenne, paprika, garlic powder, and black pepper.
- Coat chicken in seasoned flour mixture.
- Dip into buttermilk mixture, then coat again in flour mixture for extra crispiness.
- Heat oil in a skillet over medium-high heat.
- Fry chicken 4–5 minutes per side until golden brown and cooked through.
- Drain on paper towels and serve hot.
Notes
- Double dredging creates extra crispy coating.
- Maintain oil temperature for even frying.
- Prep Time: 15 minutes
- Cook Time: 15 minutes
- Category: Main Dish
- Method: Fried
- Cuisine: American