Introduction
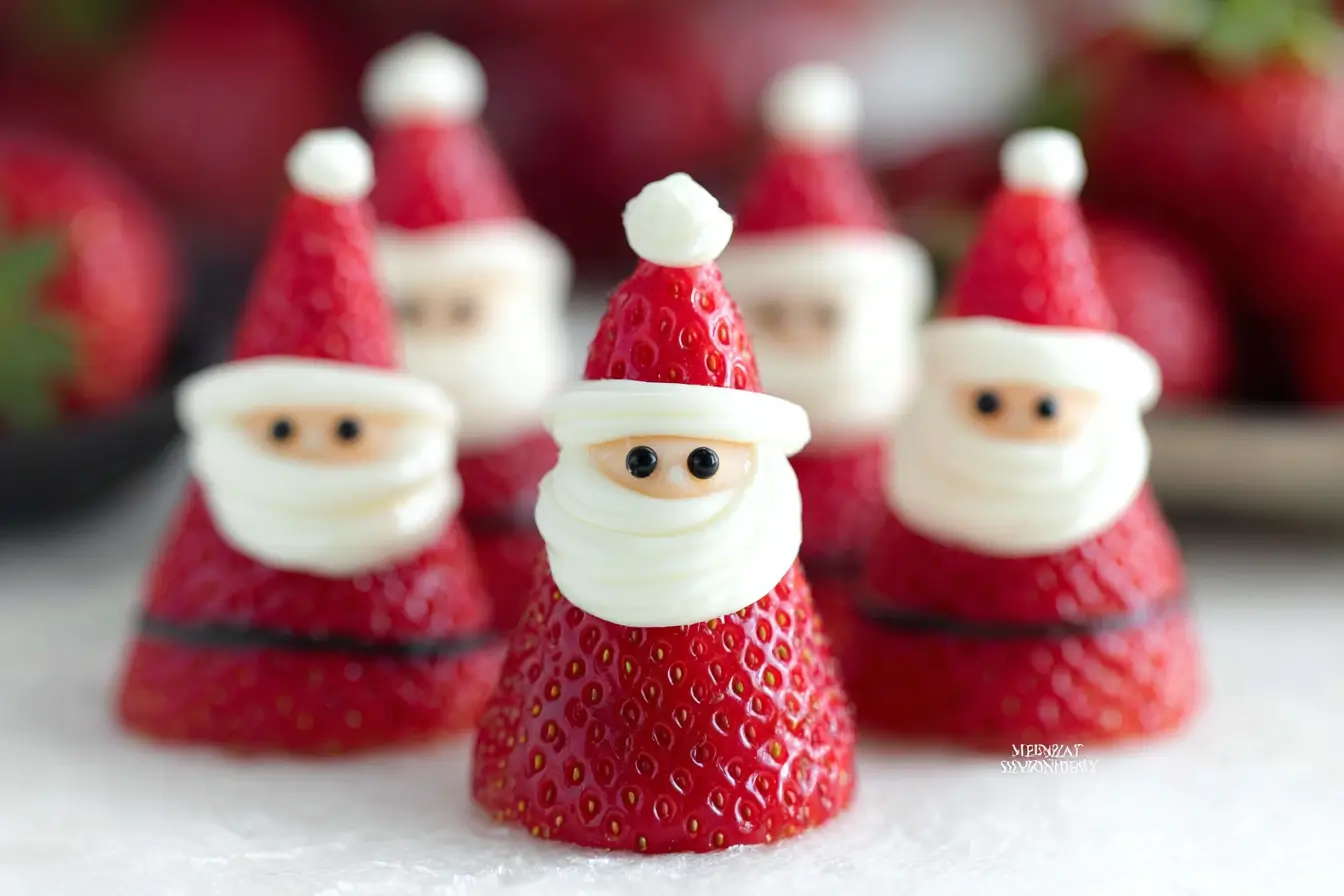
When the holiday season rolls around, most of us crave something festive, sweet, and just a little bit whimsical. Between the cookies, cakes, and endless chocolate treats, it’s refreshing to find a recipe that’s not only adorable but also light, fruity, and incredibly easy to make. That’s exactly what these Strawberry Santas are — delightful little Christmas-themed treats that combine the juicy freshness of strawberries with a creamy vanilla frosting center, topped off with playful little icing eyes.
Perfect for holiday parties, kids’ desserts, or edible table decorations, Strawberry Santas bring smiles wherever they go. They’re the kind of dessert that looks like it took hours to prepare, but in reality, they come together in minutes. You don’t need to be a professional baker or have fancy tools — just a few strawberries, some vanilla frosting, and a touch of creativity.
In this recipe, I’ll walk you through every step to make these festive little figures, along with helpful tips to make sure they stay upright, look cute, and don’t slide apart. Whether you’re hosting a Christmas party, preparing snacks for a holiday movie night, or just want to add some fun to your dessert table, these Strawberry Santas are the perfect choice.
Why You’ll Love This Recipe
Before we jump into the details, here are a few reasons why these tiny Santas will become your go-to holiday treat:
- No Baking Required: You don’t even need to turn on the oven. Everything is fresh, simple, and ready in minutes.
- Kid-Friendly: Little hands can help assemble the Santas, making this a fun family activity.
- Festive and Adorable: The red and white colors instantly bring Christmas cheer to any dessert table.
- Light and Refreshing: After all those heavy holiday meals, these fruity bites are a nice change of pace.
- Customizable: You can easily tweak the frosting flavor, decorate the faces differently, or even make a vegan version.
Ingredients You’ll Need
Here’s everything you’ll need to make your own Strawberry Santas.
Course: Dessert
Cuisine: American
Keyword: strawberry santa
Main Ingredients
- Fresh strawberries – Choose firm, bright red strawberries with a pointed tip. These form Santa’s body and hat.
- Vanilla frosting (in a can or homemade) – This will be Santa’s fluffy, creamy “beard” and the trim on his hat. You can use store-bought frosting or whip up your own vanilla buttercream.
- Black icing gel – For Santa’s little eyes. You can find this in the baking aisle of most grocery stores or make your own edible “ink” with melted chocolate and a toothpick.
Equipment
You don’t need much to make these — just a few simple tools:
- Knife – For cutting off the tops and tips of the strawberries.
- Paper towel – To absorb excess strawberry juice so your frosting doesn’t slide off.
- Piping bag with a small round tip – For neat and precise frosting application. If you don’t have one, a zip-top bag with the corner snipped off works perfectly.
Preparation Method
Step 1: Prepare Your Strawberries
Start by rinsing your strawberries thoroughly under cool running water. Pat them dry with a clean paper towel. It’s very important that they are completely dry before you add any frosting — excess moisture will make the frosting slip right off.
Using a small, sharp knife, cut off the green leafy tops of the strawberries. This creates a flat base so that each “Santa” can stand upright. Next, cut off the pointed tip of each strawberry — this will become Santa’s hat.
You’ll be left with two strawberry pieces per Santa: a large bottom section (the body) and a small pointed top (the hat).
Step 2: Prep the Strawberries to Avoid Slippage
This step is often overlooked but makes all the difference.
After cutting, place the strawberries — cut side down — on a clean napkin or paper towel. Let them rest for a few minutes to allow the napkin to absorb any fresh juice.
Next, gently dab the tops of the larger strawberry pieces with another paper towel. Removing this moisture will help the frosting stay firmly in place and prevent it from sliding off later.
Step 3: Pipe the Frosting
Spoon your vanilla frosting into a piping bag fitted with a small round tip. Don’t have one? No problem — just fill a plastic sandwich bag with the frosting and snip a tiny piece off one corner.
Now, pipe a small swirl of frosting onto the flat surface of each strawberry body. This will form Santa’s fluffy beard and upper body. Try to make the swirl thick enough to support the hat piece you’ll add later.
Step 4: Add the Hat
Take the small strawberry tip you cut earlier and gently place it on top of the frosting. Press down slightly so it sticks but doesn’t squish the frosting out.
Once the hat is in place, add a small dot of frosting on top to create the “pom-pom” at the end of Santa’s hat.
Step 5: Add the Eyes
Now for the fun part — Santa’s face!
Use your black icing gel to carefully dot two little eyes onto the frosting just beneath the hat. If you don’t have icing gel, you can melt a few chocolate chips and use a toothpick to dot on the eyes instead.
And there you have it — your adorable, bite-sized Strawberry Santas are ready!
Expert Tips for Perfect Strawberry Santas
Even though this recipe is simple, a few pro tips can help make your Santas look professional and picture-perfect:
- Dry thoroughly. The biggest reason frosting slides off strawberries is moisture. Make sure to pat them dry well before piping.
- Chill before serving. Once assembled, pop your Santas in the fridge for 15–20 minutes. This helps the frosting firm up and keeps everything in place.
- Use a steady hand. When piping the frosting, go slowly — a small, controlled swirl will look neater than rushing.
- Choose strawberries with flat bases. This makes them easier to stand upright without wobbling.
- Get creative! Add a sprinkle of powdered sugar “snow” or tiny candy buttons to dress up your Santas.
Serving Suggestions
These little treats aren’t just delicious — they’re showstoppers on any holiday table. Here are a few ways to serve and display them:
- On a dessert platter: Arrange them in neat rows or circles for a charming, colorful presentation.
- As cupcake toppers: Place one Strawberry Santa on top of each frosted cupcake for instant Christmas charm.
- On a charcuterie board: Add them to a dessert or fruit board alongside grapes, marshmallows, and chocolate pieces.
- In mini cups: Serve each Santa in a small paper cup for easy grab-and-go snacking at parties.
- As gifts: Wrap a few in a clear box or jar tied with a red ribbon for a simple, homemade holiday gift.
Storage and Make-Ahead Tips
Because these treats are made from fresh fruit and frosting, they’re best enjoyed the same day you make them. However, if you need to prepare ahead:
- Short-term storage: Store in an airtight container in the refrigerator for up to 24 hours. Keep them on a paper towel layer to absorb any juice.
- Avoid freezing: Strawberries tend to become mushy when thawed, so freezing is not recommended.
- Re-fresh frosting: If your frosting softens in the fridge, pipe a little fresh frosting before serving for a clean, fluffy look.
Variations and Customizations
Want to make your Strawberry Santas unique? Try these fun twists:
- Chocolate Santas: Dip the strawberry tips (the hats) in melted white or dark chocolate before assembling.
- Whipped cream filling: Use homemade whipped cream instead of frosting for a lighter version — just serve immediately to prevent melting.
- Flavored frosting: Add a few drops of peppermint extract, almond extract, or even lemon zest to your vanilla frosting for a flavor boost.
- Vegan version: Use a dairy-free frosting (like coconut cream frosting) and vegan chocolate for the eyes.
- Mini Santa army: Use smaller strawberries and a piping bag with a fine tip for bite-sized versions perfect for buffets or kids’ parties.
Troubleshooting Common Issues
Even simple recipes can run into little hiccups — here’s how to fix them:
- The frosting is sliding off: Your strawberries are too wet. Always blot them dry before assembling.
- The frosting isn’t holding shape: It might be too warm. Chill your frosting or place your piping bag in the fridge for 10 minutes.
- Santas keep falling over: Slice a little more off the bottom to create a flat, stable base.
- Eyes are smudging: Let the frosting firm up before adding the eyes, or chill the Santas for a few minutes after decorating.
Nutritional Information (Approximate)
Serving size: 2 Strawberry Santas
- Calories: 90
- Fat: 3g
- Sugar: 10g
- Carbohydrates: 13g
- Fiber: 1g
- Protein: 0.5g
These are light, low-guilt treats — perfect for when you want something sweet without overindulging.
Conclusion
And that’s it — your festive, no-bake Strawberry Santas are ready to spread cheer! 🎅🍓
This recipe is proof that you don’t need complicated techniques or fancy ingredients to create something delightful for the holidays. With just a few simple steps and a touch of creativity, you can turn fresh strawberries into a dessert centerpiece that’s as charming as it is delicious.
They’re perfect for Christmas brunches, cookie exchanges, potlucks, or even as a fun project with kids. Whether you make a dozen or a hundred, they’ll disappear in minutes — guaranteed!
Frequently Asked Questions
1. Can I make Strawberry Santas the night before?
Yes, you can — just store them in an airtight container in the fridge. However, for the freshest look, it’s best to assemble them the same day you plan to serve them.
2. Can I use whipped cream instead of frosting?
Absolutely! Whipped cream makes the Santas lighter and fluffier. Just keep in mind that whipped cream softens quickly, so assemble right before serving.
3. How do I stop the frosting from sliding off the strawberries?
Make sure your strawberries are completely dry and use cold frosting. You can also refrigerate the assembled Santas for 10–15 minutes to help them firm up.
4. Can I use chocolate chips for the eyes instead of black icing gel?
Yes! Mini chocolate chips work wonderfully. Just press them gently into the frosting before it sets.
5. What kind of frosting works best?
A thick, creamy frosting — like vanilla buttercream or canned vanilla frosting — works best. Avoid glazes or thin frostings, which can drip or melt easily.
6. How long can they sit out at room temperature?
For best results, keep them refrigerated until serving. They can sit out for about 1–2 hours at room temperature without issue, depending on the temperature of your space.
7. Can I add decorations to the Santas?
Of course! Add mini sprinkles for buttons, a dab of chocolate for a mouth, or a dusting of powdered sugar for a “snowy” effect.
8. Are Strawberry Santas suitable for kids’ parties?
Definitely — kids love assembling and eating them! Just supervise the knife work and let the little ones handle the frosting and decorating.
Final Tip:
If you’re looking for a fun and memorable treat that captures the spirit of Christmas without the stress of baking, Strawberry Santas are your new holiday favorite. They’re simple, charming, and endlessly customizable — a true reminder that sometimes, the sweetest joys come from the simplest recipes.

Strawberry Santas: A Fun, Festive, and Easy Holiday Dessert
- Total Time: 15 minutes
- Yield: 12 Strawberry Santas
- Diet: Vegetarian
Description
Little Strawberry Santas with a fluffy vanilla center for the Holidays! These adorable treats are fun, festive, and easy to make — perfect for Christmas parties or kids’ desserts.
Ingredients
- Fresh strawberries
- Vanilla frosting (in a can or homemade)
- Black icing gel
Instructions
- Rinse the strawberries and cut off the leaves (discard).
- Cut the pointed end off of each strawberry. Place the newly cut edge down on a clean napkin to absorb excess juice.
- Quickly dab the “body” of Santa on a paper towel to remove moisture. This helps the frosting stay in place.
- Fill a piping bag (or zip lock bag with the corner cut off) with vanilla frosting.
- Gently swirl some vanilla frosting on the top of each strawberry body.
- Place the strawberry tip (Santa’s hat) on top of the frosting.
- Add a small dab of frosting on top of the hat.
- Use black icing gel to carefully add two eyes to complete the Strawberry Santas.
Notes
- Keep refrigerated until ready to serve for best results.
- Use a small piping tip for more precise details.
- Make sure strawberries are fully dry before decorating to prevent sliding.
- Prep Time: 15 minutes
- Cook Time: 0 minutes
- Category: Dessert
- Method: No-Bake
- Cuisine: American