
Strawberry Shortcake Truffles are the kind of dessert that instantly captivates anyone who sees—or tastes—them. With their soft, creamy centers, delicate strawberry flavor, and elegant candy coating, these treats combine the nostalgic charm of strawberry shortcake with the sophistication of handcrafted confectionery. Whether you’re preparing desserts for a celebration, gifting homemade sweets, or simply treating yourself to something special, these truffles deliver both beauty and flavor in every bite.
What makes this recipe especially appealing is its balance of simplicity and professional-level results. You don’t need advanced pastry skills, specialized culinary equipment, or hard-to-find ingredients. Instead, you rely on carefully chosen components, proper preparation techniques, and a few expert tips that ensure consistent success. The result is a batch of truffles that look as if they came from a boutique bakery display case.
This comprehensive recipe article is designed not only to guide you step-by-step through the process but also to teach you the techniques, principles, and insights that professional bakers use to achieve flawless desserts. By understanding why each step matters—from heat-treating the cake mix to properly melting the coating—you’ll be able to recreate this recipe confidently again and again.
Why Strawberry Shortcake Truffles Are So Popular
Before diving into the ingredients and method, it helps to understand why these truffles have become a favorite dessert for gatherings, parties, and gift boxes.
1. Perfect Flavor Balance
The combination of strawberry cake mix and cream cheese creates a smooth, tangy-sweet filling that mimics the flavor profile of classic strawberry shortcake while adding a creamy twist.
2. Eye-Catching Presentation
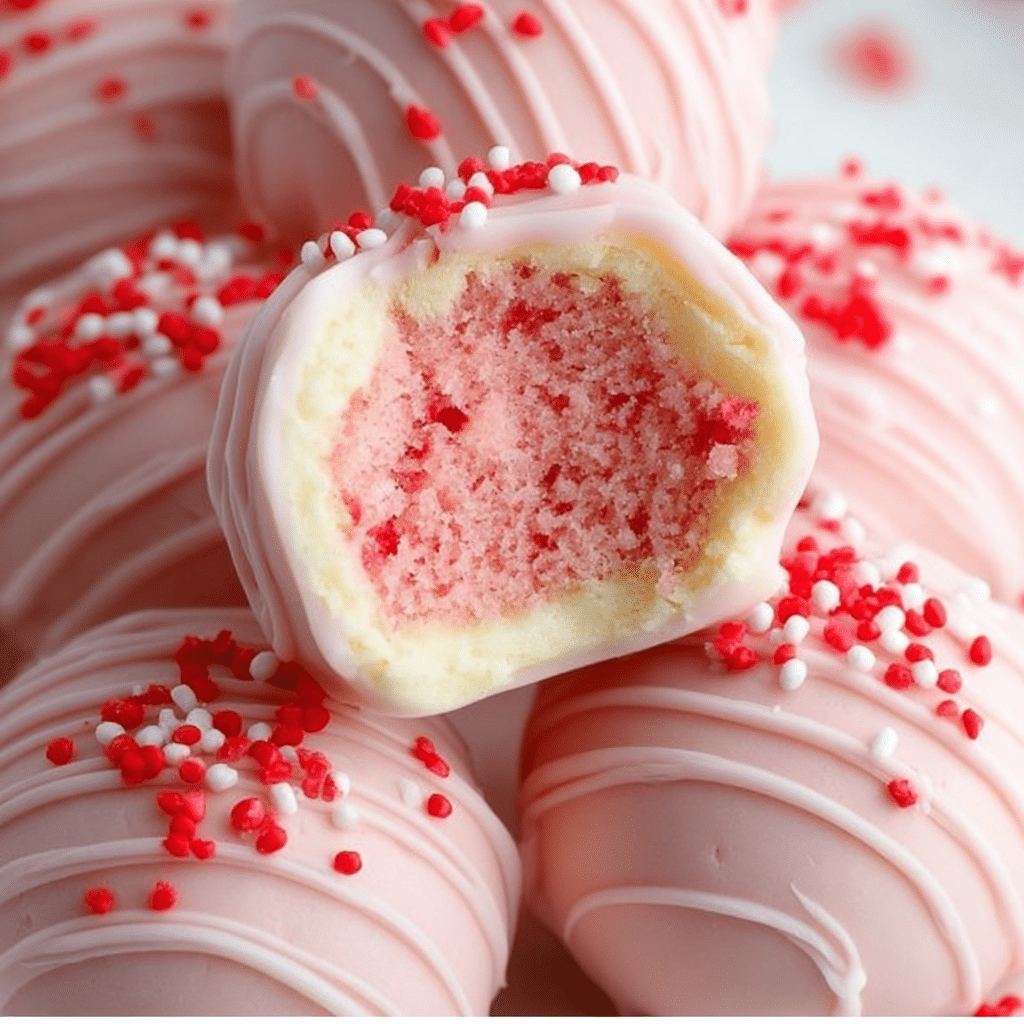
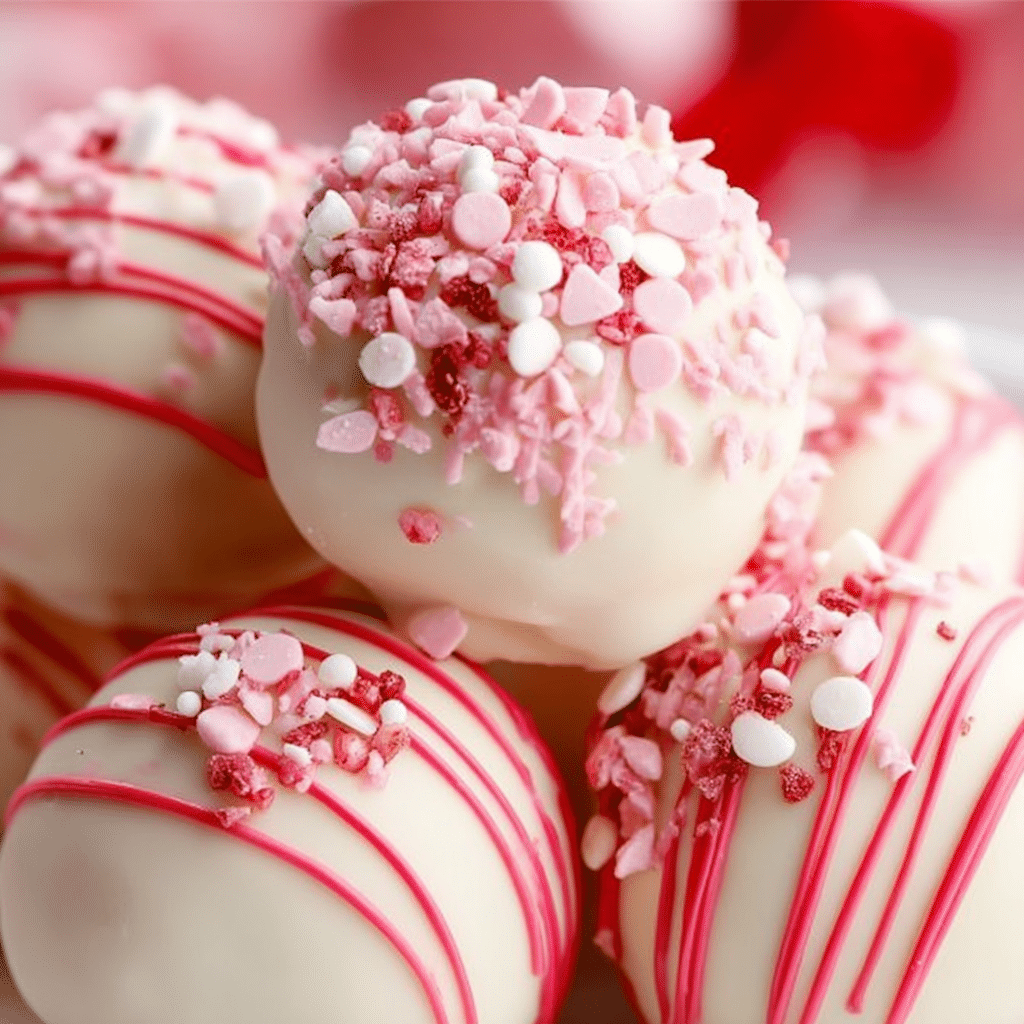
With white coating, pink drizzle, and optional sprinkles, these truffles are visually stunning. Presentation is crucial for desserts, and these deliver a professional appearance without complicated decoration techniques.
3. Beginner-Friendly Technique
Despite their elegant look, the steps are simple and forgiving. Even novice bakers can achieve excellent results by following the instructions carefully.
4. Ideal for Any Occasion
From birthdays and baby showers to holidays and casual gatherings, these truffles fit every setting. Their bite-size format makes them easy to serve and share.
Ingredients for Strawberry Shortcake Truffles
To achieve the ultimate texture and flavor, using quality melting wafers and room-temperature cream cheese is essential. Each ingredient plays a specific role in the structure, taste, or appearance of the final truffles.
- Strawberry Cake Mix — 15.25 oz. (A proven choice is Betty Crocker.)
- Cream Cheese — 8 oz. block, softened
- Cream Cheese Chips — ⅓ cup, roughly chopped for a unique crunch
- Vanilla Melting Wafers — 2 bags (10 oz each) from Ghirardelli
- Pink Candy Melts — ½ cup pink and ½ cup bright pink from Wilton
- Sprinkles — optional, for a vibrant finish
Understanding the Role of Each Ingredient
Professional bakers don’t just follow recipes—they understand the function of each component. Knowing this helps you troubleshoot, adjust, or customize the recipe without compromising quality.
Strawberry Cake Mix
This is the base of the truffle dough. It provides sweetness, flavor, and structure. Using a reliable brand ensures consistent texture and taste.
Cream Cheese
Cream cheese binds the dry mix into a soft dough while adding richness and a slight tang that balances the sweetness.
Cream Cheese Chips
These small pieces create pockets of creamy texture and subtle flavor bursts. Chopping them ensures even distribution.
Vanilla Melting Wafers
They form the smooth outer shell. High-quality wafers melt evenly and set with a glossy finish.
Pink Candy Melts
These are used for decorative drizzle, giving the truffles a professional bakery-style appearance.
Sprinkles
Optional but highly recommended for visual appeal, especially for festive occasions.
Preparation Method
Follow these carefully structured steps to ensure your truffles turn out perfectly every time.
Step 1 – Heat Treat for Safety
Preheat your oven to 350°F (175°C). Spread the cake mix evenly on a lined baking sheet and bake for 5 minutes. This step eliminates bacteria that may be present in raw flour, making the mixture safe to eat.
Alternative Method:
Microwave the cake mix for 3 minutes, stirring every 30 seconds.
Allow the mix to cool completely before using. This is crucial because warm cake mix can melt the cream cheese and ruin the dough’s consistency.
Step 2 – Create the Dough
Place the softened cream cheese in a mixing bowl and beat until smooth and creamy. This step ensures there are no lumps, which would affect texture.
Fold in the cooled cake mix with a spatula first. This prevents dry powder from flying out of the bowl. Once incorporated, switch to a hand mixer and blend until a soft, uniform dough forms.
Fold in the chopped cream cheese chips. These add a remarkable flavor boost and subtle texture contrast.
Step 3 – Chill and Roll
Cover the dough and refrigerate for 2 hours. Chilling is essential because it firms the mixture, making it easier to shape.
Use a 1½-tablespoon scoop to portion the dough and roll it into balls.
Expert Tip:
After rolling, let the balls sit at room temperature for about 15 minutes. This allows them to expand slightly, which helps prevent cracking in the coating later.
Step 4 – The Professional Dip
Melt the vanilla wafers using a double boiler. This gentle heating method prevents scorching and produces a smooth, glossy coating.
Place a dough ball on a fork, dip it fully into the melted coating, and tap off the excess. Transfer it to parchment paper.
Add sprinkles to half of the truffles before the coating dries.
Step 5 – The Pink Drizzle
Melt the two shades of pink candy melts separately in piping bags. Snip tiny openings at the tips and drizzle over the remaining truffles for a vibrant, fresh look.
Allow all truffles to set completely before serving.
Professional Tips for Perfect Results
Use Room-Temperature Ingredients
Cold cream cheese won’t blend smoothly and can leave lumps.
Don’t Skip Chilling
Chilled dough holds its shape better during dipping.
Work in Batches
Keep unused dough refrigerated while coating others to prevent softening.
Avoid Overheating Coating
Melting wafers should be warm, not hot. Overheating can make them thick or grainy.
Texture and Flavor Profile
When prepared correctly, these truffles should have:
- A smooth outer shell that snaps lightly when bitten
- A creamy, slightly dense center
- Balanced sweetness with a hint of tang
- Gentle strawberry flavor rather than artificial intensity
The contrast between the firm coating and soft interior is what makes truffles so satisfying.
Creative Variations
Once you master the base recipe, you can experiment with variations.
Chocolate Drizzle Version
Replace pink drizzle with melted dark chocolate.
Strawberry Crunch Coating
Roll freshly dipped truffles in crushed vanilla cookies.
White Chocolate Strawberry Swirl
Mix pink melts into white coating for a marbled finish.
Gift Box Assortment
Decorate different batches with different toppings for a professional confectionery selection.
Storage and Shelf Life
Proper storage keeps truffles fresh and safe to eat.
- Refrigerator: Store in an airtight container for up to 5 days.
- Freezer: Freeze for up to 2 months. Thaw in the fridge before serving.
- Room Temperature: Safe for about 6 hours if the room is cool.
Avoid warm environments, as the coating may soften.
Serving Suggestions
Strawberry Shortcake Truffles can be served in many elegant ways:
- On a dessert platter with fresh strawberries
- In mini cupcake liners for parties
- Wrapped individually as edible gifts
- Arranged on tiered stands for special events
Presentation matters. A beautiful display enhances the perception of taste and quality.
Common Mistakes and How to Avoid Them
Cracked Coating
Cause: Dough too cold or coating too hot.
Fix: Let balls rest briefly before dipping.
Grainy Coating
Cause: Overheated wafers.
Fix: Melt slowly using gentle heat.
Sticky Dough
Cause: Insufficient chilling.
Fix: Refrigerate longer.
Uneven Shape
Cause: Hand-rolling inconsistently.
Fix: Use a scoop for uniform portions.
Nutritional Considerations
These truffles are a dessert treat, so they’re best enjoyed in moderation. They contain sugar, dairy, and fats typical of confectionery items. For lighter versions, you can:
- Use reduced-fat cream cheese
- Make smaller portions
- Skip sprinkles or drizzle
Why This Recipe Works So Well
This recipe succeeds because it balances science and simplicity. The cake mix provides structure, the cream cheese supplies fat and moisture, and the coating seals everything into a neat package. Each step builds on the previous one, ensuring that texture, flavor, and appearance all align.
Professional pastry chefs often emphasize that desserts should be predictable. This recipe delivers reliable results because it uses stable ingredients and proven techniques.
Conclusion
Strawberry Shortcake Truffles are more than just a sweet treat—they are a demonstration of how simple ingredients can be transformed into an elegant dessert through thoughtful preparation. Their creamy centers, smooth coating, and decorative finish make them suitable for everything from casual gatherings to formal celebrations.
By following the detailed steps and professional tips in this guide, you can confidently produce truffles that look stunning, taste delicious, and impress anyone who tries them. Whether you’re an experienced baker or someone just beginning to explore dessert making, this recipe offers a rewarding experience with consistently beautiful results.
Print
Strawberry Shortcake Truffles: A Complete Professional Guide to the Perfect Bite-Sized Dessert
- Total Time: 2 hours 25 minutes
- Yield: 24 truffles
- Diet: Vegetarian
Description
These Strawberry Shortcake Truffles are soft, creamy, and coated in a smooth vanilla shell with decorative pink drizzle. Made with cake mix and cream cheese, they’re an easy no-bake dessert perfect for parties or gifting.
Ingredients
- 15.25 oz strawberry cake mix
- 8 oz cream cheese, softened
- 1/3 cup cream cheese chips, chopped
- 2 bags (10 oz each) vanilla melting wafers
- 1/2 cup pink candy melts
- 1/2 cup bright pink candy melts
- Sprinkles (optional)
Instructions
- Preheat oven to 350°F. Spread cake mix on a lined baking sheet and bake 5 minutes to heat treat. Let cool completely.
- Beat cream cheese until smooth. Fold in cooled cake mix, then mix until dough forms. Stir in chopped cream cheese chips.
- Cover and refrigerate dough for 2 hours. Scoop into balls and let sit 15 minutes.
- Melt vanilla wafers using a double boiler. Dip each ball, tap off excess, place on parchment, and add sprinkles if desired.
- Melt pink candy melts and drizzle over truffles. Let set completely before serving.
Notes
- Heat treating the cake mix improves safety and texture.
- Chilling the dough makes rolling easier.
- Let rolled balls rest before dipping to prevent cracking.
- Use quality melting wafers for the smoothest coating.
- Prep Time: 20 minutes
- Cook Time: 5 minutes
- Category: Dessert
- Method: No-Bake, Dip
- Cuisine: American
Frequently Asked Questions
1. Can I make these truffles ahead of time?
Yes. They can be made up to three days in advance and stored in the refrigerator.
2. Why do I need to heat-treat the cake mix?
Heat-treating eliminates bacteria that may be present in raw flour, making the mixture safe to eat.
3. Can I use homemade cake mix instead of boxed?
Yes, but ensure it is heat-treated the same way to maintain safety and texture.
4. What if I don’t have a double boiler?
You can melt wafers in a microwave using 30-second intervals, stirring each time.
5. Can I skip the cream cheese chips?
You can, but they add texture and flavor contrast. Without them, the truffles will be smoother.
6. Why is my coating too thick?
It may have overheated. Stir gently and add a small amount of melted wafers to thin it.
7. Can I change the flavor?
Yes. Substitute strawberry cake mix with another flavor while keeping the rest of the recipe the same.
8. How do I get perfectly round truffles?
Use a scoop for portioning and roll gently between your palms.
9. Are these safe for children to help make?
Yes, with supervision—especially during melting steps.
10. Can I ship these as gifts?
Yes. Pack them in insulated containers with cooling packs if shipping to warm climates.
