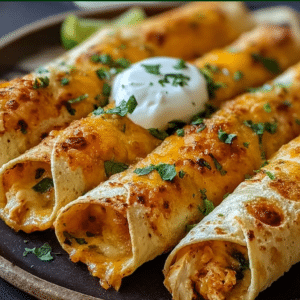
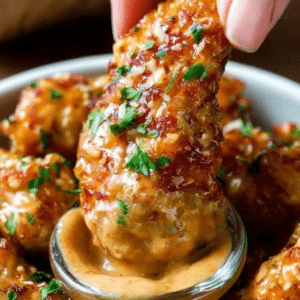
The taquito, which literally translates to “little taco,” is a staple of Mexican-inspired cuisine that has captured the hearts of snackers and dinner guests alike. At its core, the taquito is a study in texture: the shatteringly crisp exterior provides the perfect vessel for a rich, savory, and tender interior. While often found in the frozen aisle of grocery stores, the homemade version is a revelation, offering a freshness and depth of flavor that mass-produced versions simply cannot replicate.
In this comprehensive guide, we will explore the nuances of building the ultimate Crispy Chicken Taquito. We aren’t just rolling chicken in a tortilla; we are balancing acidity, creaminess, and spice to create a bite-sized masterpiece. Whether you are prepping for a Sunday football gathering, a quick weeknight dinner, or a sophisticated appetizer tray, mastering this recipe ensures you have a crowd-pleaser in your culinary repertoire.
The Science of the Filling
The secret to a professional-grade taquito lies in the structural integrity of the filling. Many amateur recipes result in a dry, crumbly interior that falls out of the shell. By using a base of softened cream cheese, we create a binder that keeps the shredded chicken moist during the high-heat baking process. This “glue” also acts as a flavor conductor, carrying the warmth of the cumin and the kick of the chili powder to every corner of the tortilla.
Using rotisserie chicken is a professional “shortcut” that actually improves the dish. Because rotisserie chickens are slow-roasted, the meat remains succulent and seasoned, saving you the time of poaching or roasting chicken breasts from scratch. When paired with a vibrant salsa and a sharp cheddar or Mexican blend, the result is a complex flavor profile that hits every part of the palate.
Texture and Technique
The transition from a soft tortilla to a crispy shell is achieved through a process called the Maillard reaction. By lightly coating the exterior in oil or cooking spray and subjecting it to $220°C$ (425°F), we dehydrate the surface of the tortilla, allowing it to brown and harden while the inside stays tender. This temperature is the “sweet spot”—hot enough to crisp the shell before the filling becomes overcooked or the cheese begins to leak out of the ends.
Whether you choose flour or corn tortillas is a matter of personal preference, but the technique remains the same. Corn tortillas offer a more traditional, nutty flavor and a sturdier crunch, whereas flour tortillas result in a lighter, flakey, almost pastry-like exterior.
Ingredients
To achieve the best results, ensure your cream cheese is truly at room temperature before beginning. This ensures a smooth, homogenous mixture without lumps.
The Core Filling:
- 2 cups cooked shredded chicken: Using a store-bought rotisserie chicken is highly recommended for its tenderness and time-saving benefits.
- 4 oz cream cheese, softened: This serves as the creamy binder for your filling.
- ½ cup shredded cheddar or Mexican blend cheese: Adds sharpness and that classic “cheese pull.”
- ¼ cup salsa: Choose mild for families or spicy for an extra kick. This adds necessary moisture and acidity.
- ½ tsp garlic powder: For a savory, aromatic baseline.
- ½ tsp chili powder: Provides a mild heat and deep color.
- ½ tsp cumin: The essential “earthy” note of Mexican cuisine.
- Salt and black pepper to taste: To brighten and balance the other spices.
The Shells and Prep:
- 8 small flour or corn tortillas: The canvas for your creation.
- Cooking spray or oil: Essential for achieving that golden-brown finish.
Optional Toppings (The Finishing Touches):
- Chopped cilantro: Adds a burst of freshness.
- Sour cream: To cool down the spices.
- Guacamole: For a rich, buttery contrast.
- Extra shredded cheese: Because there is no such thing as too much cheese.
Preparation Method
Step 1: Setting the Stage
Start by preheating your oven to 425°F (220°C). Professional baking requires a fully calibrated and hot oven environment. If the oven isn’t hot enough when the taquitos go in, the tortillas will soak up the oil and become greasy rather than crispy. Line a large baking sheet with parchment paper to prevent sticking and to make cleanup effortless. Alternatively, a lightly greased baking sheet works well for direct-contact browning.
Step 2: Crafting the Filling
In a large mixing bowl, combine the shredded chicken, softened cream cheese, shredded cheese, salsa, garlic powder, chili powder, and cumin. Use a sturdy spatula or a large spoon to fold the ingredients together until the chicken is thoroughly coated. Taste a small amount of the mixture and adjust with salt and black pepper. The filling should be thick and creamy; if it looks too dry, add an extra tablespoon of salsa.
Step 3: Preparing the Tortillas
Tortillas, especially corn ones, can be brittle when cold. To prevent them from cracking as you roll them, wrap them in a damp paper towel and warm them in the microwave for approximately 20 seconds. This makes the starch in the tortillas more pliable and easier to handle.
Step 4: The Rolling Process
Place a warmed tortilla on a clean work surface. Spoon 2 to 3 tablespoons of the chicken mixture onto one side of the tortilla, forming a neat log shape. Do not overstuff, or the filling will burst through the seam. Roll the tortilla as tightly as possible around the filling. This tightness is crucial—it prevents air pockets that could cause the taquito to become soggy.
Step 5: Positioning and Coating
Place each rolled taquito onto your prepared baking sheet, ensuring the seam-side is facing down. The weight of the taquito will keep the seam closed without the need for toothpicks. Once all eight are lined up, lightly brush the tops and sides with oil or give them an even coating of cooking spray. This fat is what facilitates the frying-like effect in the oven.
Step 6: The Bake
Slide the tray into the center rack of the oven. Bake for 15 to 20 minutes. You are looking for a deep golden hue and edges that appear dry and crispy. For those who prefer a “shatter-crisp” texture, turn on the oven’s broiler for the final 1 to 2 minutes. Watch them closely during this time, as the high heat of a broiler can turn “perfect” into “burnt” in a matter of seconds.
Step 7: Presentation
Remove the taquitos from the oven and let them rest for 2 to 3 minutes. This allows the internal cheese to set slightly so it doesn’t run out when you take your first bite. Arrange them on a platter and garnish with cilantro or extra cheese as desired.
Conclusion and Frequently Asked Questions
Homemade chicken taquitos are a testament to the fact that simple ingredients, when treated with the right technique, can yield extraordinary results. By baking instead of deep-frying, you achieve a cleaner flavor profile and a lighter snack that doesn’t compromise on the crunch. This recipe is adaptable, reliable, and inherently satisfying.
Frequently Asked Questions
Q: Can I use corn tortillas instead of flour?
A: Absolutely. Corn tortillas are the traditional choice for taquitos (often called flautas when made with flour). If using corn, ensure they are very warm before rolling, as they are more prone to tearing than flour tortillas.
Q: How do I store and reheat leftovers?
A: Leftover taquitos can be stored in an airtight container in the refrigerator for up to 3 days. To maintain the crunch, reheat them in a toaster oven or back in a $400°F$ oven for 5 minutes. Avoid the microwave for reheating, as it will make the tortillas chewy.
Q: Can I freeze these before baking?
A: Yes! This is an excellent “make-ahead” meal. Roll the taquitos and place them on a baking tray in the freezer for an hour. Once firm, transfer them to a freezer bag. You can bake them directly from frozen; just add an extra 5 to 10 minutes to the total baking time.
Q: My taquitos are cracking while I roll them. What happened?
A: This usually means the tortillas aren’t warm enough or have dried out. Keep them covered in a warm, damp towel while you work, and only take one out at a time to fill and roll.
Q: What is the best way to shred the chicken?
A: If the chicken is warm, you can use two forks to pull the meat apart. For a professional trick, place warm chicken chunks in a stand mixer with the paddle attachment and run it on low speed for 30 seconds—it shreds perfectly every time!
Q: Are these gluten-free?
A: To make this recipe gluten-free, simply ensure you use 100% corn tortillas and check that your chili powder and salsa do not have any hidden gluten additives.
Enjoy your crispy, golden creations! They are sure to be the highlight of your next meal.
Print
The Art of the Perfect Crunch: A Deep Dive into Crispy Chicken Taquitos
- Total Time: 30 minutes
- Yield: 8 taquitos
Description
Crispy Chicken Taquitos are crunchy, cheesy, and packed with flavorful shredded chicken—baked until golden and perfect for dipping.
Ingredients
Taquitos
- 2 cups cooked shredded chicken
- 4 oz cream cheese, softened
- 1/2 cup shredded cheddar or Mexican blend cheese
- 1/4 cup salsa
- 1/2 tsp garlic powder
- 1/2 tsp chili powder
- 1/2 tsp cumin
- Salt and black pepper to taste
- 8 small tortillas (flour or corn)
- Cooking spray or oil
Optional Toppings
- Chopped cilantro
- Sour cream
- Guacamole
- Extra shredded cheese
Instructions
- Preheat oven to 425°F (220°C) and line a baking sheet.
- Mix chicken, cream cheese, shredded cheese, salsa, and spices until combined.
- Warm tortillas to make them flexible.
- Spoon filling onto tortillas and roll tightly.
- Place seam-side down on baking sheet.
- Brush lightly with oil or spray.
- Bake 15–20 minutes until crispy and golden.
- Optional: Broil 1–2 minutes for extra crispiness.
- Serve warm with toppings.
Notes
- Don’t overfill tortillas to prevent breaking.
- Use rotisserie chicken for convenience.
- Air fryer option: cook at 400°F for 8–10 minutes.
- Prep Time: 10 minutes
- Cook Time: 20 minutes
- Category: Appetizer, Snack
- Method: Bake
- Cuisine: Mexican-American