The Perfect Adorable Cake for Birthdays and Special Occasions
Introduction
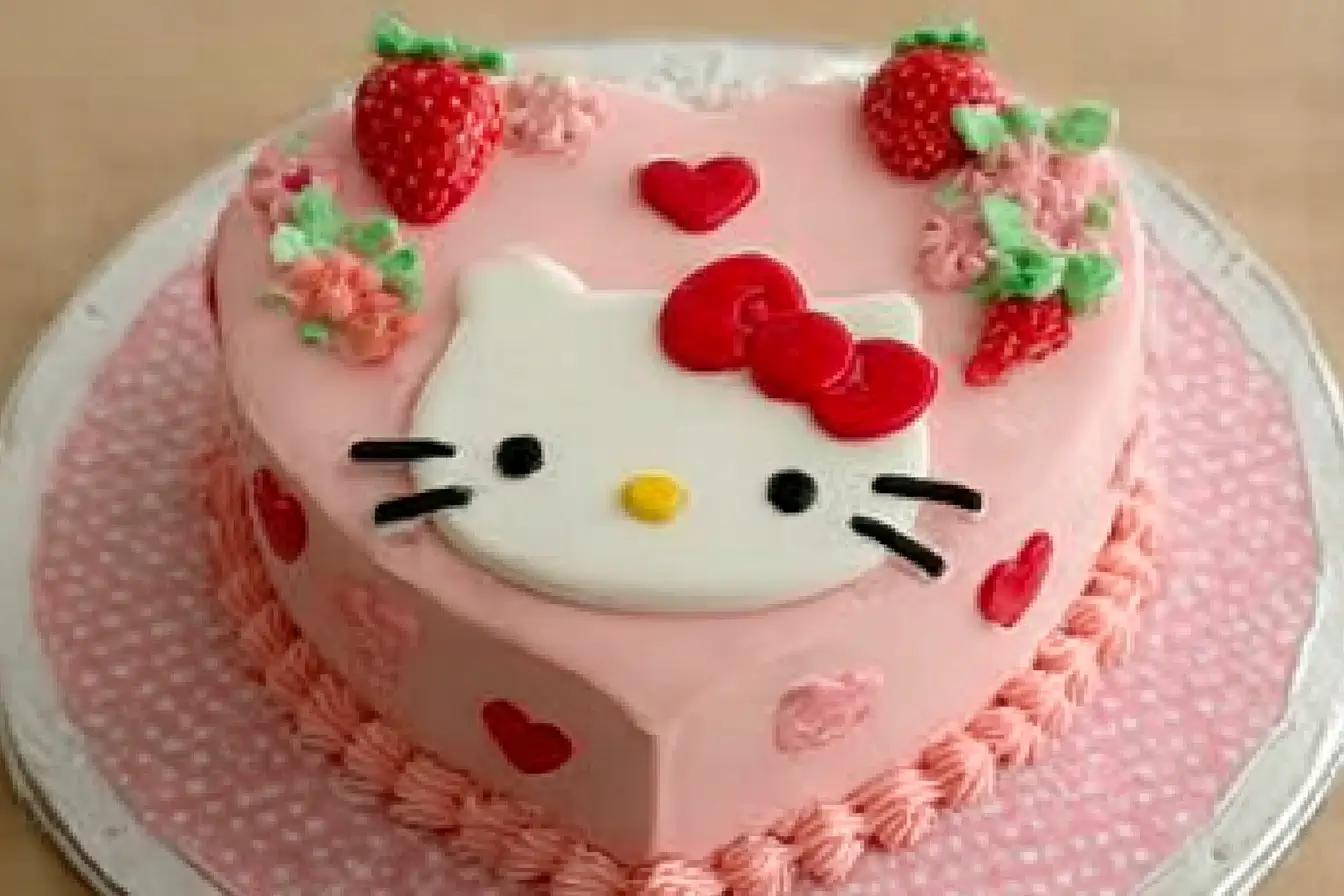
Creating a cake that is both visually adorable and delicious can seem intimidating, but with the right guidance, even beginners can achieve stunning results. The Hello Kitty Cake has become a beloved favorite for children’s birthdays and themed parties, thanks to its iconic design and charming appeal. With its recognizable face, bright bow, and sweet flavor, it’s a cake that not only delights the eyes but also satisfies the taste buds.
This article provides a comprehensive guide to making an Easy Hello Kitty Cake from scratch. Using classic ingredients like all-purpose flour, butter, and sugar, along with simple decorations such as fondant, colored frosting, or edible markers, you can create a cake that looks professional without requiring advanced baking skills. In addition to the step-by-step instructions, this guide offers tips for perfect cake texture, frosting consistency, decoration techniques, and storage advice.
Whether you are an experienced baker looking for a fun project or a beginner seeking to impress at a birthday party, this recipe will walk you through every detail to ensure success.
Ingredients
To make this delightful Hello Kitty Cake, the ingredients are divided into three sections: cake, frosting, and decoration.
the Cake:
- 1 ½ cups all-purpose flour
- 1 ½ tsp baking powder
- ¼ tsp salt
- ½ cup unsalted butter, softened
- 1 cup granulated sugar
- 2 large eggs
- 2 tsp vanilla extract
- ½ cup milk
For the Frosting:
- 1 cup unsalted butter, softened
- 4 cups powdered sugar
- 2–3 tbsp milk
- 1 tsp vanilla extract
- Pink and red food coloring
For Decoration:
- Black edible marker or chocolate melts (for eyes & whiskers)
- Small candies or fondant for the bow
Preparation Method
Step 1: Preheat and Prepare Your Pan
Begin by preheating your oven to 350°F (175°C). While the oven heats, grease and flour a 6–8 inch round cake pan to prevent sticking. Proper preparation ensures a smooth cake release and a clean, professional-looking shape.
Step 2: Make the Cake Batter
- Combine dry ingredients: In a medium-sized bowl, whisk together the all-purpose flour, baking powder, and salt. This ensures that the baking powder and salt are evenly distributed, giving the cake a uniform rise.
- Cream butter and sugar: In a separate large bowl, beat the unsalted butter and granulated sugar until fluffy and pale in color. This step incorporates air into the batter, which contributes to a light and tender cake.
- Add eggs and vanilla: Beat in the eggs one at a time, ensuring each is fully incorporated before adding the next. Then mix in the vanilla extract for flavor.
- Combine dry and wet ingredients: Gradually add the dry ingredients alternately with the milk, beginning and ending with the dry ingredients. Mix until smooth but avoid overmixing, as this can make the cake dense.
Step 3: Bake the Cake
Pour the prepared batter into the greased cake pan, smoothing the top with a spatula. Bake in the preheated oven for 25–30 minutes, or until a toothpick inserted into the center comes out clean. Baking times may vary slightly depending on your oven, so it’s important to monitor the cake closely toward the end. Once baked, allow the cake to cool completely on a wire rack before frosting. Cooling prevents the frosting from melting and ensures the cake maintains its shape.
Step 4: Prepare the Frosting
- Cream the butter: In a large bowl, beat the unsalted butter until creamy and smooth.
- Add powdered sugar: Gradually add powdered sugar, mixing well to avoid lumps.
- Incorporate milk and vanilla: Add milk and vanilla extract, adjusting the amount of milk to achieve your desired frosting consistency. The frosting should be spreadable yet thick enough to hold decorative shapes.
- Color the frosting: Divide portions of the frosting into separate bowls. Use pink and red food coloring to create the different shades required for Hello Kitty’s bow and other decorative elements.
Step 5: Assemble and Frost the Cake
- Base layer: Spread a smooth layer of white frosting over the cooled cake. This forms the foundation for the decorations.
- Create Hello Kitty’s bow: Use the pink and red frosting to form the signature bow on Hello Kitty’s head. Piping bags or spatulas can help achieve clean lines.
- Add facial features: Draw Hello Kitty’s eyes, nose, and whiskers with a black edible marker or melted chocolate. Small candies or fondant can be used for the nose or bow accents.
- Finishing touches: Smooth any uneven areas and ensure all elements are proportionally placed for an aesthetically pleasing result.
Tips for Success
- Room temperature ingredients: Ensure butter, eggs, and milk are at room temperature for better mixing and smoother batter.
- Even baking: Rotate your cake halfway through baking to ensure even cooking.
- Frosting consistency: Adjust powdered sugar or milk to achieve the right consistency for piping decorations.
- Use templates: For precise facial features, print a Hello Kitty face template and lightly trace it on the frosted cake with a toothpick.
- Practice piping: Before decorating the cake, practice bow shapes and whiskers on parchment paper to perfect your technique.
Storage and Serving
- Storing: Keep the cake covered at room temperature for up to 2 days, or refrigerate for 3–4 days.
- Freezing: The cake can be frozen without frosting for up to 2 months. Thaw completely before decorating.
- Serving: Slice with a serrated knife for clean edges. Serve with extra candies or a themed party setup for added charm.
Variations
- Flavor variations: Add cocoa powder to the batter for a chocolate Hello Kitty cake or almond extract for a subtle nutty flavor.
- Frosting alternatives: Use cream cheese frosting or whipped cream for a lighter option.
- Vegan adaptation: Substitute plant-based butter, milk, and egg replacers to make a vegan Hello Kitty cake.
- Mini cakes: Make smaller 4-inch cakes for individual servings or cupcake-sized Hello Kitty treats.
Frequently Asked Questions (FAQ)
1. Can I make this cake ahead of time?
Yes. Bake the cake a day ahead and store it tightly covered. Frost and decorate on the day you plan to serve for the freshest appearance.
2. What if I don’t have pink or red food coloring?
You can mix red with white frosting to achieve pink or use natural alternatives like beet juice for coloring.
3. Can I use fondant for decorations?
Absolutely! Fondant is excellent for creating bows, eyes, and other small features, offering a smooth, professional finish.
4. How do I prevent the frosting from melting?
Ensure the cake is fully cooled before frosting. If your kitchen is warm, refrigerate the cake for 15–20 minutes before decorating.
5. Can I make this cake gluten-free?
Yes. Substitute all-purpose flour with a gluten-free flour blend, adjusting for moisture if needed.
6. How do I make the whiskers straight and even?
Use a piping bag with a fine tip, or draw lightly with a toothpick and fill in with melted chocolate or edible marker.
7. Is this recipe suitable for kids to help with?
Definitely! Children can help with frosting, placing small decorations, or creating the bow under supervision.
8. How long does the entire process take?
From start to finish, including cooling and decorating, plan for about 2.5 to 3 hours.
Conclusion
The Easy Hello Kitty Cake is more than just a dessert; it’s a creative project that combines baking skills with fun, whimsical decoration. With this step-by-step guide, anyone can create a cake that looks professionally made while remaining accessible to beginners. By carefully following the instructions for the cake, frosting, and decorative details, you can produce a stunning Hello Kitty cake that will delight children and adults alike.
This cake is perfect for birthdays, themed parties, or simply to show off your baking skills. Beyond the visual appeal, it’s a moist, flavorful cake that everyone will enjoy.
With practice and patience, your Hello Kitty Cake will not only taste amazing but also become a centerpiece that brings smiles and memories to any celebration.
Print
Easy Hello Kitty Cake Recipe
Description
A fun and easy Hello Kitty cake that’s perfect for birthdays or special occasions! Soft vanilla cake layered with buttery frosting and decorated to resemble Hello Kitty.
Ingredients
- For the Cake:
- 1 ½ cups all-purpose flour
- 1 ½ tsp baking powder
- ¼ tsp salt
- ½ cup unsalted butter, softened
- 1 cup granulated sugar
- 2 large eggs
- 2 tsp vanilla extract
- ½ cup milk
- For the Frosting:
- 1 cup unsalted butter, softened
- 4 cups powdered sugar
- 2–3 tbsp milk
- 1 tsp vanilla extract
- Pink and red food coloring
- For Decoration:
- Black edible marker or chocolate melts (for eyes & whiskers)
- Small candies or fondant for the bow
Instructions
- Preheat & Prepare: Preheat oven to 350°F (175°C). Grease and flour a 6–8 inch round cake pan.
- Make the Cake: In a bowl, whisk together flour, baking powder, and salt. In another bowl, cream butter and sugar until light and fluffy. Add eggs and vanilla, mixing well. Gradually add flour mixture alternating with milk until smooth. Pour batter into prepared pan and bake for 25–30 minutes or until a toothpick comes out clean. Let cool completely.
- Prepare the Frosting: Beat butter until smooth, gradually add powdered sugar. Mix in milk and vanilla until creamy. Divide frosting and color portions pink and red for decoration.
- Decorate the Cake: Frost the cooled cake. Use black edible marker or chocolate melts for eyes and whiskers. Add candies or fondant to create Hello Kitty’s bow.
Notes
- Can make two 6-inch cakes and layer them for a taller cake.
- Adjust food coloring intensity for desired shade.
- Works well for themed birthday parties or celebrations.