

Introduction
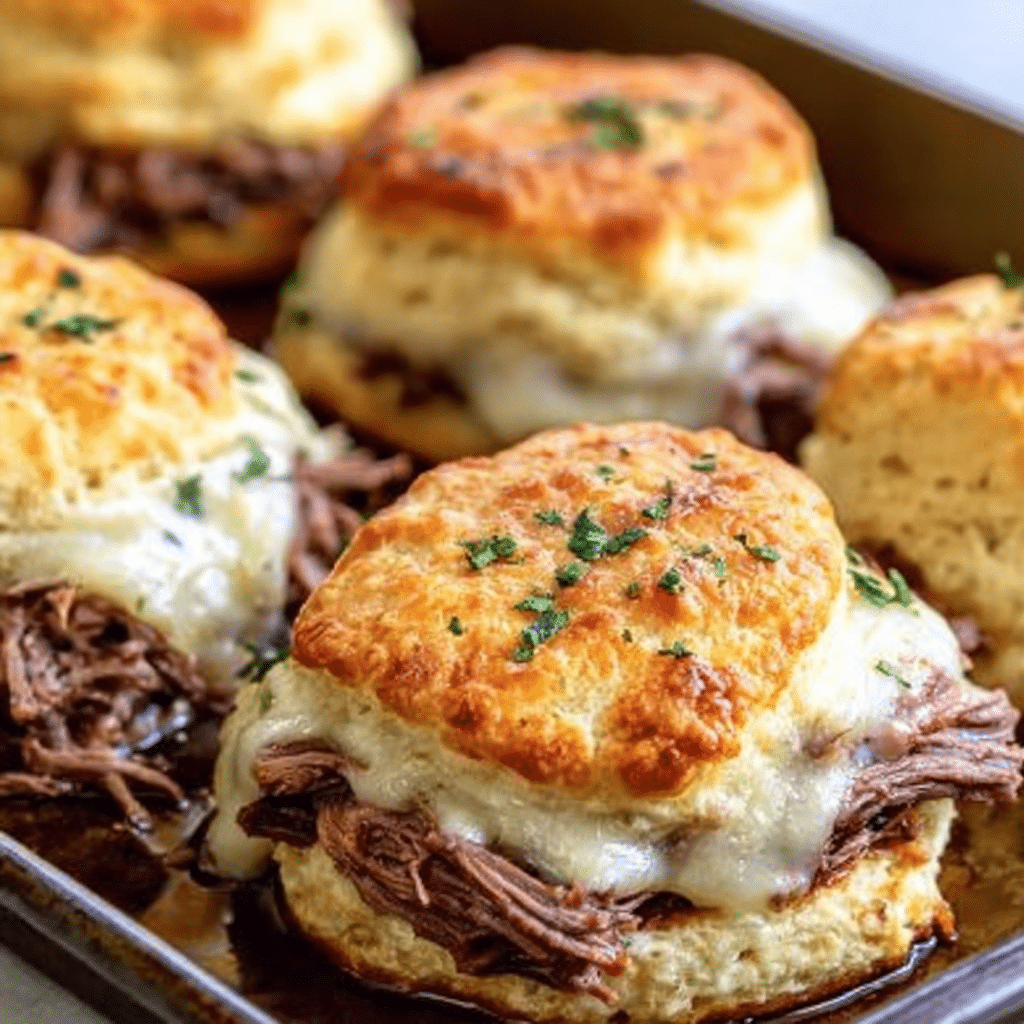
Few dishes capture the spirit of comfort food quite like warm, golden biscuits filled with savory meat and melted cheese. The Baked French Dip Biscuits recipe is a delicious twist on the classic French dip sandwich, transforming its beloved flavors into a handheld, oven-baked creation that’s easy to prepare and perfect for sharing. This dish combines tender roast beef, creamy melted provolone, fluffy biscuit dough, and a rich au jus dipping sauce, delivering a satisfying bite every time.
The inspiration behind this recipe comes from the traditional French dip sandwich, known for its thinly sliced beef served on bread with a flavorful broth for dipping. While the sandwich version is iconic, this baked biscuit adaptation offers a more convenient, family-friendly presentation. Each biscuit is individually filled, sealed, and baked until perfectly golden, creating a portable, mess-free alternative that still retains the signature dipping experience.
One of the greatest strengths of this recipe is its simplicity. With minimal prep time, straightforward steps, and easily accessible ingredients, it’s ideal for home cooks of all skill levels. Yet despite its simplicity, the finished dish looks and tastes impressive, making it suitable for everything from casual weeknight dinners to party appetizers or game-day snacks.
Another reason this recipe stands out is its balance of textures and flavors. The exterior is lightly crisp and buttery, while the interior remains soft and fluffy. The roast beef brings savory richness, the provolone adds creamy depth, and the herb-infused butter topping enhances aroma and taste. Paired with warm beef broth for dipping, each bite becomes a comforting combination of warmth, flavor, and satisfaction.
In this detailed guide, you’ll learn everything you need to know to make Baked French Dip Biscuits successfully—from understanding the ingredients and preparation techniques to tips for customization, storage, serving suggestions, and troubleshooting. By the end, you’ll not only know how to prepare this recipe, but you’ll also understand why it works so well and how to adapt it to your personal taste.
Recipe Overview
Total Time: 40 minutes
Yield: 8 biscuits
Prep Time: 15 minutes
Cook Time: 25 minutes
Category: Appetizer
Method: Baking
Cuisine: American
Description:
Golden-brown baked French dip biscuits filled with roast beef and melted cheese, served with a side of au jus for dipping.
Ingredients
- 1 can (16.3 oz) refrigerated biscuit dough
- 8 slices deli roast beef
- 8 slices provolone cheese
- 1/4 cup butter, melted
- 1 tablespoon Worcestershire sauce
- 1 teaspoon garlic powder
- 1 teaspoon onion powder
- 1/2 teaspoon dried thyme
- 1/2 teaspoon dried rosemary
- 1/2 teaspoon salt
- 1/2 teaspoon black pepper
- 1 cup beef broth
Preparation Method
Step 1: Preheat and Prepare the Dish
Preheat your oven to 350°F (175°C). Lightly grease a baking dish and set it aside. Preparing the dish first ensures the biscuits can be transferred immediately after assembly without delays that might affect dough texture.
Step 2: Separate and Flatten the Dough
Open the can of refrigerated biscuit dough and separate it into 8 individual biscuits. Using your hands or a rolling pin, gently flatten each biscuit into a round disc. Avoid pressing too hard; you want them flattened but still soft and airy.
Step 3: Add the Filling
Place one slice of deli roast beef and one slice of provolone cheese onto each flattened biscuit. Center the filling so it’s evenly distributed and easier to seal later.
Step 4: Seal the Biscuits
Carefully fold the edges of the dough up and around the filling. Pinch the seams together tightly to seal, forming a ball. Proper sealing is crucial because it keeps the cheese from leaking out during baking.
Step 5: Arrange in Baking Dish
Place each filled biscuit seam-side down in the prepared baking dish. Leave a small amount of space between each one so they bake evenly and develop a golden crust.
Step 6: Prepare the Butter Mixture
In a small bowl, combine the melted butter, Worcestershire sauce, garlic powder, onion powder, thyme, rosemary, salt, and black pepper. Stir well until the mixture is fully blended.
Step 7: Brush the Biscuits
Using a pastry brush, generously coat the tops of the biscuits with the seasoned butter mixture. This step adds flavor, aroma, and a glossy golden finish.
Step 8: Bake
Place the baking dish in the preheated oven and bake for 20–25 minutes, or until the biscuits are golden brown and cooked through. The tops should appear lightly crisp while the dough inside remains soft.
Step 9: Prepare the Au Jus
While the biscuits bake, pour the beef broth into a small saucepan and heat over medium heat until warm. Do not boil; gentle heating preserves the flavor.
Step 10: Serve
Remove the biscuits from the oven and allow them to cool slightly. Serve warm with the heated beef broth on the side for dipping.
Understanding the Ingredients
Understanding how each ingredient contributes to the final dish helps ensure consistent success and allows for confident substitutions.
Refrigerated Biscuit Dough
Provides the fluffy, buttery outer layer. It simplifies preparation while still delivering a homemade texture.
Roast Beef
The star of the filling. Thin slices cook quickly and absorb flavor from the surrounding ingredients.
Provolone Cheese
Chosen for its smooth melt and mild flavor, which complements the beef without overpowering it.
Butter
Enhances browning and adds richness to the crust.
Worcestershire Sauce
Adds umami depth and subtle tanginess that mimics the flavor profile of traditional French dip sandwiches.
Garlic and Onion Powder
Deliver savory notes that permeate the biscuits as they bake.
Thyme and Rosemary
These herbs bring warmth and a slightly earthy aroma, elevating the dish from simple to gourmet.
Salt and Pepper
Essential for balance, highlighting the flavors of all other ingredients.
Beef Broth
Serves as the dipping sauce, providing moisture and savory intensity.
Why This Recipe Works
The success of this recipe lies in the harmony between texture and flavor. Baking the biscuits instead of frying keeps them light while still creating a crisp exterior. The sealed dough traps steam during baking, which helps melt the cheese and warm the beef evenly. Meanwhile, the seasoned butter topping infuses the crust with aromatic herbs and spices, ensuring every bite is flavorful from the outside in.
The dipping broth is equally important. Rather than soaking the biscuits beforehand, serving the broth on the side lets diners control how much moisture they want, preserving the biscuit’s texture while still enjoying the classic French dip experience.
Tips for Perfect Results
- Seal tightly: Properly pinched seams prevent filling leakage.
- Don’t overfill: Too much filling can tear the dough.
- Use quality ingredients: Better roast beef and cheese mean better flavor.
- Brush generously: The butter mixture is key to flavor and color.
- Bake until golden: Color indicates both flavor and doneness.
Serving Suggestions
Baked French Dip Biscuits are incredibly versatile and can be served in many ways:
- As an appetizer platter for gatherings
- As a main dish with salad or roasted vegetables
- As a snack for movie nights
- As a lunchbox treat (without broth until serving)
- As party finger food with dipping cups
For presentation, arrange them on a serving platter with small bowls of warm broth for dipping. Garnishing with fresh herbs adds visual appeal.
Variations and Customizations
One of the joys of cooking is making recipes your own. Here are several variations you can try while keeping the same base concept:
Spicy Version: Add a pinch of chili flakes to the butter mixture.
Garlic Lovers: Increase garlic powder or add roasted garlic paste.
Cheese Blend: Mix provolone with mozzarella or Swiss.
Herb Swap: Replace thyme and rosemary with Italian seasoning.
Mini Version: Cut biscuits in half for bite-size appetizers.
Storage and Reheating
Refrigeration: Store leftovers in an airtight container for up to 3 days.
Freezing: Freeze baked biscuits for up to 2 months.
Reheating: Warm in a 325°F oven for about 10 minutes. Add fresh warm broth when serving.
Avoid microwaving if possible, as it can make the biscuit texture soft rather than lightly crisp.
Nutritional Information (Per Serving)
- Calories: 310
- Sugar: 3g
- Sodium: 810mg
- Fat: 18g
- Saturated Fat: 9g
- Unsaturated Fat: 7g
- Trans Fat: 0g
- Carbohydrates: 27g
- Fiber: 1g
- Protein: 11g
- Cholesterol: 40mg
Common Mistakes to Avoid
Under-sealing the dough
This can cause cheese to leak out and burn.
Skipping preheating
Starting in a cold oven leads to uneven baking.
Overbaking
Too much time in the oven can dry out the biscuits.
Using cold butter mixture
It won’t spread evenly; melted butter ensures smooth coating.
Cooking Techniques Explained
Flattening Dough Evenly
Ensures uniform cooking and prevents thick dough sections.
Layering Ingredients
Placing cheese on top of beef helps keep the meat moist during baking.
Seam-Side Down Placement
Keeps the biscuit sealed as it expands in the oven.
Pairing Ideas
These biscuits pair well with:
- Light green salads
- Roasted vegetables
- Coleslaw
- Pickles
- Potato wedges
For beverages, consider iced tea, sparkling water, or a mild soda to balance the richness.
Conclusion
Baked French Dip Biscuits are the perfect example of how a classic flavor combination can be reinvented into something new, convenient, and family-friendly. With their golden crust, savory beef filling, melted cheese center, and flavorful dipping broth, they offer a satisfying culinary experience that appeals to both kids and adults.
This recipe stands out because it’s easy to make, adaptable, and consistently delicious. Whether you’re hosting guests, feeding your family, or preparing snacks for a special occasion, these biscuits deliver comfort and flavor in every bite. Once you try them, they’re likely to become a regular addition to your meal rotation.
Print
Baked French Dip Biscuits Recipe: A Comforting, Family-Friendly Meal
- Total Time: 40 minutes
- Yield: 8 biscuits
Description
Golden-brown baked French dip biscuits filled with roast beef and melted cheese, served with a warm side of au jus for dipping. A comforting, family-friendly meal that’s simple and satisfying.
Ingredients
- 1 can (16.3 oz) refrigerated biscuit dough
- 8 slices deli roast beef
- 8 slices provolone cheese
- 1/4 cup butter, melted
- 1 tablespoon Worcestershire sauce
- 1 teaspoon garlic powder
- 1 teaspoon onion powder
- 1/2 teaspoon dried thyme
- 1/2 teaspoon dried rosemary
- 1/2 teaspoon salt
- 1/2 teaspoon black pepper
- 1 cup beef broth
Instructions
- Preheat oven to 350°F (175°C). Grease a baking dish.
- Separate biscuit dough into 8 biscuits and flatten each slightly.
- Place one slice roast beef and one slice provolone cheese onto each biscuit.
- Fold dough edges over filling and pinch to seal into balls.
- Place seam-side down in prepared baking dish.
- Mix melted butter, Worcestershire sauce, garlic powder, onion powder, thyme, rosemary, salt, and pepper.
- Brush mixture generously over biscuits.
- Bake 20–25 minutes until golden brown.
- Heat beef broth in a saucepan until warm.
- Serve biscuits warm with broth for dipping.
Notes
- Use high-quality roast beef and cheese for best flavor.
- Pinch dough well to keep filling sealed inside.
- Prep Time: 15 minutes
- Cook Time: 25 minutes
- Category: Appetizer
- Method: Baking
- Cuisine: American
Frequently Asked Questions
1. Can I prepare these ahead of time?
Yes. Assemble them and refrigerate unbaked for up to 24 hours, then bake when ready.
2. Can I freeze them before baking?
Yes. Freeze assembled biscuits on a tray, then store in a bag. Bake from frozen with extra time.
3. What cut of roast beef works best?
Thinly sliced deli roast beef is ideal because it heats quickly and stays tender.
4. Can I use homemade biscuit dough?
Absolutely. Homemade dough can add richer flavor and texture.
5. How do I keep them from opening while baking?
Pinch seams tightly and place seam-side down in the dish.
6. Can I make them without cheese?
Yes, though cheese adds creaminess and flavor. Without it, consider adding sautéed onions.
7. Is the broth necessary?
It’s optional but recommended, as it provides the classic dipping experience.
8. How do I make them crispier?
Bake slightly longer or brush with extra butter before baking.
9. Can I add vegetables inside?
Yes. Thin slices of sautéed onions or peppers work well.
10. Are they suitable for parties?
Definitely. Their handheld size and dipping sauce make them ideal party food.
