
Graduation is one of life’s biggest milestones — a moment filled with pride, relief, and joy. Whether it’s celebrating a high school senior, a college graduate, or someone completing their master’s degree, no graduation party feels complete without a show-stopping cake. A homemade graduation cake not only adds a personal touch but also allows you to match the celebration’s theme, school colors, and personality of the graduate.
In this comprehensive guide, you’ll learn how to make the perfect graduation cake from scratch, including how to bake the sponge, prepare the frosting, assemble the layers, and decorate it beautifully for that picture-perfect finish. The recipe is designed to be flexible, so you can make it vanilla, chocolate, or red velvet—whatever your graduate loves most.
🎓 Why Make a Homemade Graduation Cake?
Baking your own graduation cake is a creative and meaningful way to say “Congratulations.” You’re not just baking a dessert — you’re crafting a memory. Store-bought cakes may look good, but a homemade one lets you personalize every detail — from the flavor and color to the message and design.
Besides, this recipe is easy enough for beginners and detailed enough to impress experienced bakers. The result? A soft, moist cake layered with creamy frosting and decorated to perfection.
🧁 Ingredients You’ll Need
You can prepare this graduation cake using vanilla, chocolate, or red velvet as your base flavor. Below are the ingredients for a classic vanilla sponge, with simple variations included.
For the Cake Base
You’ll need:
- 2 ½ cups (315g) all-purpose flour
- 2 ½ tsp baking powder
- ½ tsp salt
- 1 cup (225g) unsalted butter, softened
- 2 cups (400g) granulated sugar
- 4 large eggs, room temperature
- 1 tbsp vanilla extract
- 1 cup (240ml) milk (whole milk or buttermilk for richness)
Optional Variation:
For chocolate cake – add 3 tbsp cocoa powder and reduce flour by 3 tbsp.
For red velvet – add 2 tbsp cocoa powder and 1–2 tsp red food coloring, plus ½ tsp vinegar for that signature tang.
🍰 For the Frosting (Buttercream or Whipped Cream)
You can use either classic buttercream for a rich finish or whipped cream frosting for a lighter texture.
Buttercream Ingredients:
- 1 cup (230g) unsalted butter, softened
- 3–4 cups (375–500g) powdered sugar
- 2–3 tbsp heavy cream or milk
- 1 tsp vanilla extract
- Food coloring (optional – match school colors or use gold and black)
Whipped Cream Option:
- 2 cups (480ml) heavy whipping cream
- ½ cup (60g) powdered sugar
- 1 tsp vanilla extract
Whipped cream should be chilled and whipped until stiff peaks form for best results.
🧑🍳 Step-by-Step Instructions
Follow these simple steps to create a soft, fluffy graduation cake that looks as good as it tastes.
Step 1: Prepare the Batter
- Preheat the oven to 350°F (175°C).
- Grease and line two 8-inch (20cm) round pans with parchment paper.
- In a medium bowl, whisk together the flour, baking powder, and salt.
- In a large mixing bowl, beat butter and sugar together using an electric mixer for 2–3 minutes until light and fluffy.
- Add the eggs one at a time, mixing well after each addition.
- Stir in the vanilla extract.
- Gradually alternate adding the dry ingredients and milk, mixing until just combined. Avoid overmixing to keep the cake light.
For chocolate or red velvet variations, add your cocoa powder and coloring at this stage.
Step 2: Bake the Cake
- Divide the batter evenly between your prepared pans.
- Smooth the tops with a spatula to ensure even baking.
- Bake for 25–30 minutes, or until a toothpick inserted in the center comes out clean.
- Let the cakes cool in the pans for 10 minutes, then transfer them to a wire rack to cool completely.
Allowing the layers to cool ensures the frosting won’t melt or slide off later.
Step 3: Make the Frosting
While the cakes cool, prepare your frosting.
For Buttercream:
- Beat softened butter on medium speed until creamy (about 2 minutes).
- Gradually add powdered sugar, one cup at a time.
- Mix in heavy cream or milk and vanilla extract, continuing to beat until light and fluffy.
- Adjust the consistency — add more sugar for a thicker texture or more milk for a smoother one.
- Add food coloring if desired (for example, gold and black for a graduation theme or the graduate’s school colors).
For Whipped Cream:
- In a chilled bowl, whip heavy cream, sugar, and vanilla until stiff peaks form.
- Keep refrigerated until ready to use.
Step 4: Assemble the Cake
Now comes the fun part — assembling and decorating your masterpiece.
- Level the cake layers using a serrated knife or cake leveler so they’re flat.
- Place one layer on a cake board or serving plate.
- Spread your chosen filling — buttercream, whipped cream, jam, or chocolate ganache.
- Place the second layer on top.
- Apply a thin crumb coat (a light layer of frosting that traps crumbs).
- Chill for 30 minutes to firm up the base.
- Apply the final layer of frosting smoothly using a spatula or bench scraper.
Use a turntable for even coverage — it makes the process much easier and gives a professional look.
🎨 Decoration Ideas for a Graduation Cake
Once your cake is frosted, it’s time to make it graduation-ready! Choose a theme that matches the graduate’s school colors, personality, or the overall vibe of the party.
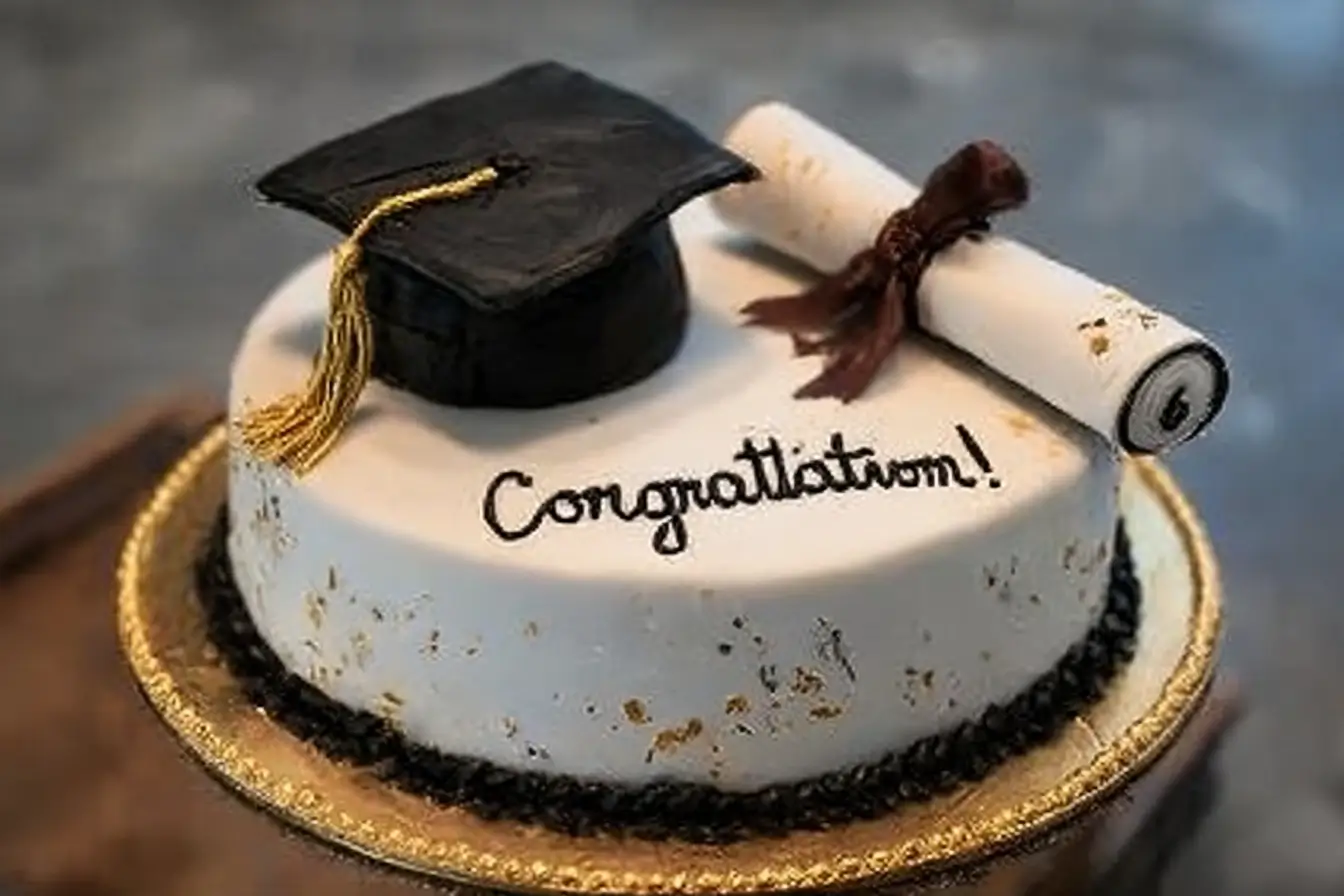
🎓 Classic Graduation Theme
- Add a fondant graduation cap (mortarboard) on top.
- Roll white fondant into small diploma scrolls and tie them with ribbon.
- Use piped frosting or edible markers to write: “Congratulations [Name]!” or “Class of 2025.”
- Add mini fondant books, stars, or a tassel topper for a fun touch.
🖤 Elegant Gold & Black Theme
- Tint your buttercream black using gel food coloring.
- Brush on edible gold paint or add gold leaf for luxury.
- Drizzle chocolate ganache for a glossy drip effect.
- Sprinkle with edible glitter or gold pearls for an elegant finish.
🎈 Fun & Colorful Theme
- Pipe buttercream rosettes in school or team colors.
- Add confetti sprinkles, fondant stars, or edible confetti.
- Place a custom “Congrats Grad!” topper or the graduate’s photo on the cake.
💡 Pro Baking & Decorating Tips
- Chill before frosting – A cool cake is easier to frost smoothly.
- Use room temperature ingredients – This ensures the batter mixes evenly.
- Measure accurately – Baking is science; level off your flour and sugar.
- For sharp edges, use a bench scraper dipped in warm water.
- Don’t rush the cooling process – Warm cake layers can ruin your frosting.
- Store smartly – Keep your cake covered in the refrigerator for up to 3 days.
- Transporting the cake? Keep it chilled and place it on a non-slip mat inside a sturdy box.
🧁 Creative Filling Options
A great filling adds both flavor and texture. Try one of these between your cake layers:
- Chocolate ganache – for rich indulgence.
- Whipped cream and berries – light and fruity.
- Cream cheese frosting – pairs perfectly with red velvet.
- Fruit jam – such as strawberry, raspberry, or mango for a tangy twist.
Mix and match to find your favorite combination — it’s your celebration, after all!
🥇 How to Personalize Your Graduation Cake
To make your cake even more memorable, personalize it:
- Include the graduate’s name and graduation year in frosting.
- Add an edible photo topper with their picture or school logo.
- Use edible gold glitter or fondant decorations for a professional bakery look.
- Choose a shape that matches the occasion — round, square, or even tiered for a grand centerpiece.
🍴 Serving & Storage
- Serving: For clean slices, dip your knife in hot water and wipe it dry before each cut.
- Storage: Store the frosted cake in an airtight container or cake box in the fridge for up to 3 days.
- Freezing: You can freeze the unfrosted layers for up to 2 months. Wrap them tightly in plastic wrap and thaw at room temperature before decorating.
🎉 Final Thoughts
A homemade graduation cake is more than just dessert — it’s a delicious way to honor achievement and hard work. With its soft, moist sponge, creamy frosting, and customizable decorations, this cake becomes the centerpiece of the celebration.
Whether you keep it simple with buttercream swirls or go all out with fondant decorations, your graduate will feel celebrated and loved. The best part? You’ll enjoy every step of the process — from mixing and baking to decorating and serving.
❓ Frequently Asked Questions (FAQ)
1. Can I make the cake ahead of time?
Yes! You can bake the cake layers up to two days in advance. Wrap them tightly in plastic and store at room temperature or refrigerate them before frosting.
2. How can I make the cake more moist?
Use buttermilk instead of regular milk, avoid overbaking, and don’t overmix the batter.
3. Can I use store-bought frosting?
Absolutely. While homemade buttercream tastes best, store-bought frosting is convenient and works perfectly for quick decorating.
4. How do I transport the cake safely?
Refrigerate it first to firm up the frosting. Then place it on a non-slip mat inside a cake carrier or sturdy box.
5. What’s the best size for a graduation party?
For a small gathering, an 8-inch two-layer cake serves about 12–16 people. For larger parties, consider a 3-layer or sheet cake.
6. Can I make this cake gluten-free?
Yes, simply replace the flour with a 1:1 gluten-free baking blend.
7. What colors are best for a graduation cake?
Classic choices include gold and black, but you can match the graduate’s school colors for a personal touch.
8. Can I add a drip effect?
Yes — use a chocolate ganache or colored candy melt drip after chilling your frosted cake for at least 30 minutes.
9. What’s the easiest decoration for beginners?
Pipe simple buttercream swirls or add sprinkles and a topper — elegant yet effortless.
10. How long does the cake stay fresh?
The cake remains soft and delicious for up to three days in the fridge or two months in the freezer (unfrosted).


Your article helped me a lot, is there any more related content? Thanks!