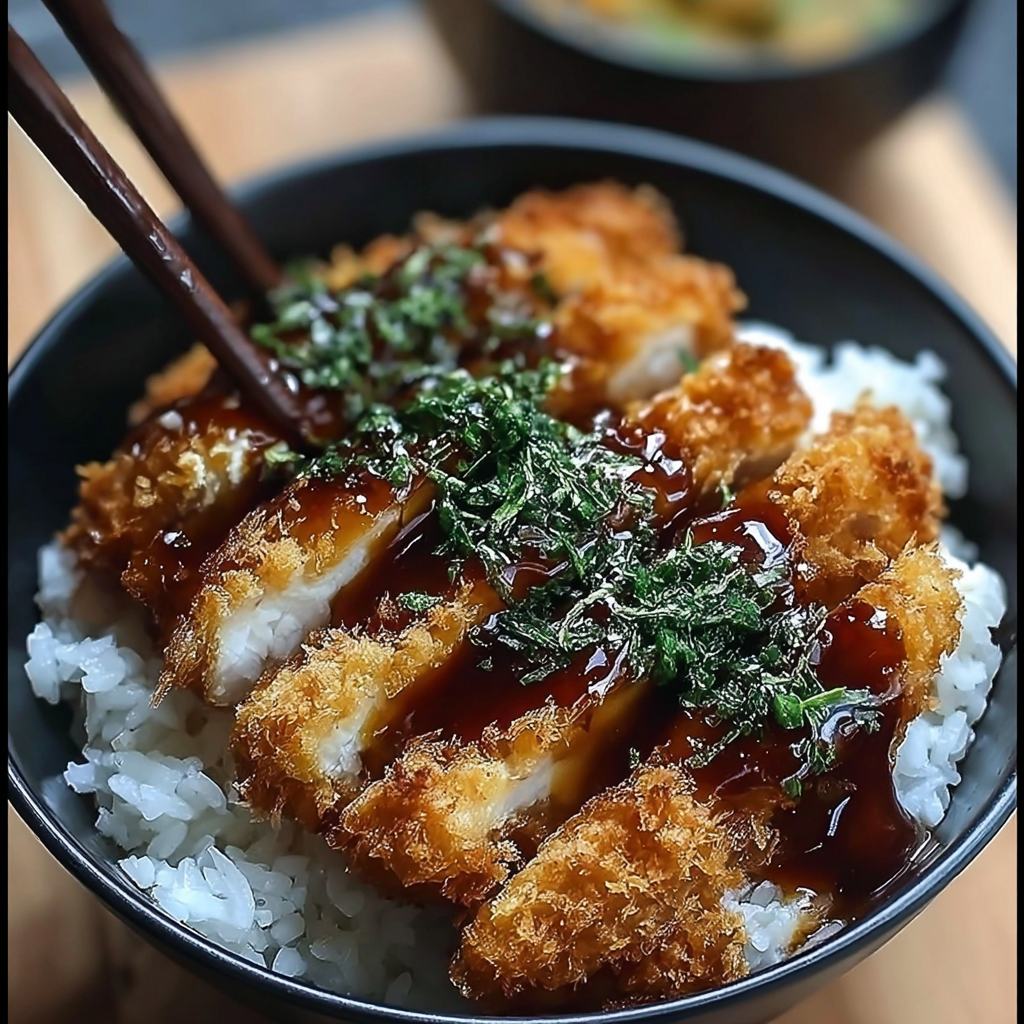
Let me take you to Japan. Not literally—though I wish I could. But with one bite of this dish, you’ll feel like you’ve been transported to a cozy Tokyo kitchen, steam rising from a bowl of perfectly cooked rice, the sound of something crispy being sliced.
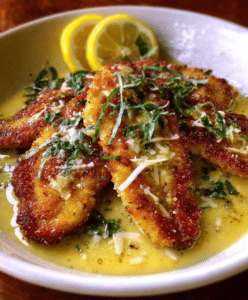
Katsu is magic. A golden, panko-crusted cutlet—chicken or pork—fried until it shatters when you bite into it, then sliced into strips and served over a bed of fluffy short-grain rice. Drizzled with sweet-savory tonkatsu sauce. Accompanied by shredded cabbage, sliced green onions, sesame seeds, and pickled ginger. It’s simple. It’s satisfying. It’s one of Japan’s most beloved comfort foods.
And you can make it at home. Authentically. Deliciously. Without a deep fryer or any special equipment.
This Japanese Katsu Bowl guide will walk you through everything you need to know: the perfect panko crust, the ideal tonkatsu sauce, the secrets to fluffy sushi rice, and the art of assembly. By the time you’re done, you’ll be making katsu bowls that rival your favorite Japanese restaurant.
Why You’ll Love This Recipe
- Crispy, shatteringly crunchy panko crust – That signature katsu texture that shatters with every bite.
- Juicy, tender chicken or pork – The meat stays moist and flavorful inside the golden shell.
- Perfectly seasoned Japanese rice – Slightly sticky, slightly tangy, and absolutely essential.
- Homemade tonkatsu sauce – Sweet, tangy, savory, and so much better than store-bought.
- Better than takeout – Fresher, faster (once you get the hang of it), and exactly how you like it.
- Fun to assemble – Everyone can build their own bowl with their favorite toppings.
Ingredients
For the Katsu
- 2 boneless chicken breasts (or pork loin, if preferred) – The protein. Chicken katsu (torikatsu) is lighter; pork katsu (tonkatsu) is richer and more traditional. Both are delicious.
- Salt and pepper, to taste – For seasoning the meat before breading.
- 1 cup all-purpose flour – The first layer of coating. Helps the egg wash adhere.
- 2 large eggs – The binder. Beaten until smooth.
- 1 cup panko breadcrumbs – The secret to the shatteringly crisp crust. Panko is lighter, flakier, and crunchier than regular breadcrumbs. Do not substitute.
- Vegetable oil, for frying – Neutral oil with a high smoke point. Canola, peanut, or avocado oil all work.
For the Rice
- 2 cups Japanese short-grain rice – Calrose, sushi rice, or any short-grain Japanese variety. The slightly sticky texture is essential for katsu bowls.
- 2 ½ cups water – For cooking the rice.
- 1 tablespoon rice vinegar – Adds tanginess and helps the rice shine.
- 1 tablespoon sugar – A touch of sweetness balances the vinegar.
- ½ teaspoon salt – Enhances all the flavors.
For the Tonkatsu Sauce
- ¼ cup tonkatsu sauce (or store-bought if you prefer) – The base. Bull-Dog is a popular brand. Or make your own from scratch.
- If making from scratch:
- 1 tablespoon soy sauce – Umami and saltiness.
- 1 teaspoon Worcestershire sauce – Tangy, savory depth.
- 1 teaspoon ketchup – Sweetness, tanginess, and body.
For the Bowl Assembly
- 1 cup shredded cabbage – Finely shredded. Adds crunch, freshness, and color.
- 2 green onions, sliced – Mild onion flavor and a pop of green.
- Sesame seeds, for garnish – Toasted white or black sesame seeds add nuttiness.
- Pickled ginger (optional) – Bright, tangy, palate-cleansing. Gari or beni shoga both work.
How to Make Japanese Katsu Bowls
Part 1: Make the Rice
Step 1: Rinse the Rice
Place the Japanese short-grain rice in a fine-mesh strainer. Rinse under cold running water, stirring with your hand, until the water runs clear. This removes excess starch and prevents the rice from becoming gummy.
Step 2: Cook the Rice
In a medium saucepan, combine the rinsed rice and 2 ½ cups of water. Bring to a boil over high heat. Reduce the heat to low, cover, and simmer for 15 minutes. Do not lift the lid. Remove from heat and let it rest, covered, for 10 minutes.
Step 3: Season the Rice
In a small bowl, whisk together the rice vinegar, sugar, and salt until the sugar and salt dissolve. Transfer the cooked rice to a large bowl (or a hangiri if you have one). Gently fold in the vinegar mixture with a spatula using a cutting motion (not stirring, which can mash the rice). Let the rice cool to room temperature while you prepare the katsu.
Part 2: Make the Tonkatsu Sauce
Step 1: Combine Ingredients
In a small bowl, combine the tonkatsu sauce (or the homemade mixture of soy sauce, Worcestershire sauce, and ketchup). Whisk until smooth. Taste and adjust—more ketchup for sweetness, more Worcestershire for tang, more soy sauce for saltiness. Set aside.
Part 3: Make the Katsu
Step 1: Prepare the Chicken
Place the chicken breasts between two sheets of plastic wrap. Using a meat mallet or rolling pin, gently pound them to an even thickness of about ½ inch. This ensures even cooking. Season both sides with salt and pepper.
Step 2: Set Up the Breading Station
Arrange three shallow bowls in a row:
- Bowl 1: All-purpose flour
- Bowl 2: 2 large eggs, beaten until smooth
- Bowl 3: Panko breadcrumbs
Step 3: Bread the Chicken
Working with one piece of chicken at a time:
- Dredge in the flour, shaking off excess.
- Dip in the beaten eggs, letting excess drip off.
- Press into the panko breadcrumbs, coating all sides. Press firmly so the panko adheres.
Place the breaded chicken on a plate while you finish the remaining pieces.
Step 4: Heat the Oil
Pour vegetable oil into a deep skillet or heavy-bottomed pot to a depth of about 1 inch. Heat over medium-high heat to 350°F (175°C). (If you don’t have a thermometer, test by dropping a panko crumb into the oil—it should sizzle and float immediately.)
Step 5: Fry the Katsu
Carefully place the breaded chicken into the hot oil, one or two pieces at a time (do not overcrowd). Fry for 3–4 minutes per side, until golden brown and cooked through (internal temperature should reach 165°F / 74°C). Transfer to a wire rack or paper towel-lined plate to drain.
Step 6: Rest and Slice
Let the katsu rest for 2–3 minutes. This allows the juices to redistribute. Slice each breast crosswise into ½-inch strips.
Part 4: Assemble the Bowls
Step 1: Layer the Rice
Divide the seasoned Japanese rice between two large bowls. Use a rice paddle or spoon to create a slight well in the center.
Step 2: Add the Cabbage
Place a generous pile of shredded cabbage next to the rice (or on top, depending on your preference).
Step 3: Arrange the Katsu
Arrange the sliced katsu over the rice, fanning the pieces out slightly so they look beautiful.
Step 4: Drizzle with Sauce
Drizzle tonkatsu sauce over the katsu. Don’t drown it—a light drizzle is perfect. Serve extra sauce on the side.
Step 5: Garnish and Serve
Sprinkle with sliced green onions and sesame seeds. Add a small pile of pickled ginger on the side if desired. Serve immediately.
Tips for Success
- Pound the chicken to even thickness – Uneven chicken means dry edges and undercooked centers. A uniform ½ inch ensures perfect cooking.
- Use panko, not regular breadcrumbs – Panko is lighter, flakier, and creates that signature shatteringly crisp crust. Regular breadcrumbs will be denser and less crunchy.
- Press the panko firmly – Don’t just dip and shake. Use your hands to press the panko into the chicken so it adheres well.
- Maintain oil temperature – 350°F (175°C) is the sweet spot. Too hot, and the outside burns before the inside cooks. Too cool, and the katsu absorbs oil and becomes greasy.
- Let the katsu rest before slicing – This prevents the juices from running out onto your cutting board. A 2–3 minute rest makes a huge difference.
- Rinse the rice – This removes excess starch and prevents gummy, clumpy rice. Don’t skip this step.
- Don’t skip the rice vinegar – That subtle tanginess is what makes Japanese sushi rice special. It balances the richness of the fried katsu.
Equipment Needed
- Meat mallet or rolling pin
- Three shallow bowls (for breading)
- Deep skillet or heavy-bottomed pot (for frying)
- Wire rack or paper towels (for draining)
- Fine-mesh strainer (for rinsing rice)
- Medium saucepan with lid (for rice)
- Large bowl (for seasoning rice)
- Knife and cutting board
- Instant-read thermometer (optional but recommended for oil and chicken)
Recipe Variations
Tonkatsu (Pork Katsu) – Replace the chicken breasts with 2 boneless pork loin chops or pork cutlets. Pound to ½-inch thickness. Fry for the same amount of time (pork should reach 145°F / 63°C with a 3-minute rest).
Katsu Curry Bowl – Skip the tonkatsu sauce. Serve the sliced katsu over rice with a generous ladle of Japanese curry (from a roux block or homemade). Add the shredded cabbage on the side.
Katsu Sando (Katsu Sandwich) – Skip the rice and cabbage entirely. Place the sliced katsu between two slices of soft Japanese milk bread (shokupan) with a drizzle of tonkatsu sauce. The ultimate Japanese sandwich.
Spicy Katsu Bowl – Add 1 tablespoon of sriracha or gochujang to the tonkatsu sauce. Sprinkle red pepper flakes over the finished bowl. Serve with spicy kimchi instead of pickled ginger.
Chicken Katsu with Egg (Katsu Don) – After frying the katsu, simmer it in a mixture of dashi, soy sauce, mirin, and sugar with sliced onions. Pour beaten eggs over the top, cover, and cook until the eggs are set. Serve over rice. This is a completely different (and equally delicious) dish.
Vegetarian Katsu Bowl – Use thick slices of firm tofu, eggplant, or zucchini. Press the tofu to remove excess water before breading. Fry for 2–3 minutes per side. Serve as directed.
Gluten-Free Katsu Bowl – Use gluten-free panko (many brands offer it) and gluten-free flour. Use tamari instead of soy sauce in the tonkatsu sauce. Ensure your other ingredients are gluten-free.
Serving Suggestions
This bowl is a complete meal on its own, but the right additions make it even better.
- Miso soup – A warm, savory starter. Traditional and comforting.
- Japanese pickles (tsukemono) – A small side of pickled daikon, cucumber, or eggplant adds brightness.
- Edamame – Steamed and salted. Simple, healthy, and perfect for snacking.
- Japanese potato salad – Creamy, tangy, and studded with vegetables. A wonderful side dish.
- Cold beer or green tea – The bubbles or warmth pair beautifully with the rich, fried katsu.
For a katsu bowl bar – Set out bowls of rice, sliced katsu, shredded cabbage, tonkatsu sauce, green onions, sesame seeds, pickled ginger, and other toppings like nori strips, furikake, or spicy mayo. Let everyone build their own bowl.
For bento boxes – Pack the rice, sliced katsu, and cabbage in separate compartments of a bento box. Include a small container of tonkatsu sauce for dipping.
FAQs
Can I use chicken thighs instead of breasts?
Absolutely. Boneless, skinless chicken thighs are juicier and more forgiving. Pound them to ½-inch thickness and fry for the same amount of time (165°F / 74°C internal).
What’s the best oil for frying katsu?
Vegetable oil, canola oil, peanut oil, or avocado oil are all excellent. They have high smoke points and neutral flavors. Avoid olive oil (low smoke point, strong flavor) and coconut oil (flavor competes with the katsu).
Can I bake or air fry katsu instead of deep-frying?
You can, but it won’t be the same. Baking or air frying produces a drier, less crispy crust. If you must, bake at 400°F for 15–20 minutes (flip halfway) or air fry at 380°F for 10–12 minutes. Brush or spray with oil before cooking.
Can I make katsu ahead of time?
Katsu is best served immediately, when the crust is still shatteringly crisp. Leftover katsu will soften. However, you can bread the chicken and refrigerate it (uncooked) for up to 4 hours before frying.
How do I store leftovers?
Store leftover katsu in an airtight container in the refrigerator for up to 2 days. The crust will be soft. To reheat with some crispiness, use an air fryer or oven (not microwave). Store leftover rice separately for up to 4 days.
What’s the best way to reheat katsu?
Reheat in an air fryer at 375°F (190°C) for 3–4 minutes, or in a 400°F (200°C) oven on a wire rack for 8–10 minutes. The microwave will make the crust soggy.
Can I freeze katsu?
Yes. Freeze the fully cooked, cooled katsu in a single layer on a baking sheet, then transfer to a freezer bag. Freeze for up to 2 months. Reheat from frozen in a 400°F oven for 15–20 minutes. The crust won’t be as crispy as fresh, but it’s still delicious.
Is tonkatsu sauce the same as Worcestershire sauce?
No. Tonkatsu sauce is thicker, sweeter, and fruitier than Worcestershire sauce. It’s made with a base of Worcestershire sauce but includes additional sweeteners, tomato products, and spices. Bull-Dog is the most popular brand.
Can I use regular long-grain rice instead of Japanese short-grain?
You can, but the texture will be different. Short-grain rice is slightly sticky and clings together, which is ideal for katsu bowls. Long-grain rice is fluffier and less sticky. If you use long-grain, skip the rice vinegar seasoning.
Why is my panko crust falling off?
A few possibilities. Your chicken may have been too wet (pat it dry before flouring). You may have skipped the flour step (the flour helps the egg wash adhere). You may not have pressed the panko firmly enough. Or you may have moved the chicken too much during frying.
What can I use instead of panko?
Panko is the traditional and best choice for katsu. If you absolutely can’t find it, use crushed cornflakes (similar crunch) or very coarse breadcrumbs. Regular fine breadcrumbs will not produce the same texture.
Final Thoughts
There’s a reason katsu is one of Japan’s most beloved comfort foods. It’s simple enough for a weeknight, special enough for guests, and satisfying enough to make you close your eyes and say “mm” after the first bite. The shatteringly crisp panko crust. The juicy, tender meat inside. The fluffy, slightly tangy rice. The sweet-savory tonkatsu sauce. The cool crunch of shredded cabbage.
It’s a bowl of contrasts and perfect balance.
Making katsu at home might seem intimidating, but it’s really just three simple components: rice, sauce, and fried cutlet. Master those, and you can make katsu bowls anytime the craving strikes. And trust me—once you’ve made it yourself, with that perfect golden crust and that homemade tonkatsu sauce, you’ll never look at takeout the same way again.
So rinse that rice. Pound that chicken. Set up your breading station. Heat that oil to the perfect temperature. Fry until golden. Slice. Assemble. Drizzle. Garnish.
Then take a bite, close your eyes, and enjoy the best katsu bowl you’ve ever had.
Tried this recipe? I’d love to hear how it turned out. Did you make chicken katsu or pork tonkatsu? Use homemade sauce or store-bought? Leave a comment or tag your photo—and don’t forget to save this recipe for your next Japanese night. Happy cooking.
Print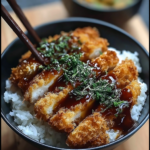
Japanese Katsu Bowls: A Delicious Guide to Making Authentic Katsu at Home
- Total Time: 40 minutes
- Yield: 2–3 servings
Description
Japanese Katsu Bowls are crispy, golden chicken (or pork) cutlets served over fluffy rice with shredded cabbage and a savory tonkatsu sauce for a comforting homemade Japanese-style meal.
Ingredients
- 2 boneless chicken breasts (or pork loin)
- Salt and pepper to taste
- 1 cup all-purpose flour
- 2 large eggs
- 1 cup panko breadcrumbs
- Vegetable oil for frying
- 2 cups Japanese short-grain rice
- 2 1/2 cups water
- 1 tablespoon rice vinegar
- 1 tablespoon sugar
- 1/2 teaspoon salt
- 1/4 cup tonkatsu sauce
- 1 tablespoon soy sauce
- 1 teaspoon Worcestershire sauce
- 1 teaspoon ketchup
- 1 cup shredded cabbage
- 2 green onions, sliced
- Sesame seeds for garnish
- Pickled ginger (optional)
Instructions
- Cook rice: rinse rice and cook with water until fluffy. Stir in rice vinegar, sugar, and salt. Set aside.
- Season chicken or pork with salt and pepper.
- Dredge meat in flour, dip in beaten eggs, then coat with panko breadcrumbs.
- Heat oil in a pan and fry cutlets until golden brown and cooked through (3–4 minutes per side). Drain on paper towels.
- Slice katsu into strips.
- Mix tonkatsu sauce, soy sauce, Worcestershire sauce, and ketchup in a bowl.
- Assemble bowls: rice on bottom, shredded cabbage, sliced katsu on top.
- Drizzle sauce over everything.
- Garnish with green onions, sesame seeds, and pickled ginger if desired.
Notes
- Use panko for extra crispiness.
- Chicken thighs can be used for juicier katsu.
- Air fryer can be used instead of frying for a lighter version.
- Prep Time: 20 minutes
- Cook Time: 20 minutes
- Category: Dinner
- Method: Fry
- Cuisine: Japanese