Black Pepper Chicken is a cornerstone of contemporary Chinese-American cuisine, yet its roots are deeply embedded in the traditional stir-fry techniques of Canton and the bold, aromatic spice profiles of Southeast Asia. Unlike many stir-fry dishes that rely on the sweetness of hoisin or the heat of dried chilies, Black Pepper Chicken celebrates the complex, floral, and woody pungency of Piper nigrum—the common black peppercorn. When executed correctly, this dish offers a sophisticated balance of savory “umami” from fermented soy, a hint of sweetness to round out the edges, and a lingering warmth that stimulates the palate without the overwhelming fire of capsicum.
In this exhaustive professional guide, we will break down the mechanics of the perfect stir-fry. We will explore the vital role of “velveting” meat, the chemistry of the Maillard reaction in a high-heat environment, and the importance of sauce emulsification. By following this 3,000-word masterclass, you will move beyond simply following a recipe; you will understand the fundamental principles of wok-style cooking that can be applied to any professional kitchen setting.
The Philosophy of the Wok and the Black Peppercorn
To make an exceptional Black Pepper Chicken, one must understand that “stir-frying” is a race against time and moisture. The goal is to cook the ingredients at such a high temperature that the exterior sears and caramelizes before the interior loses its natural juices. This creates the “Wok Hei” or “breath of the wok”—that elusive smoky charred flavor that defines high-end stir-fry.
The star of the show, the black pepper, must be treated with respect. In this recipe, we utilize coarsely ground black pepper. The coarser the grind, the more intense the “pop” of flavor when you bite into the dish. Fine pepper powder often results in a muddy, grey sauce that tastes flat. Coarse grains, however, release their volatile oils gradually, providing a layered heat that builds as you eat.
The Essential Ingredients
Precision in measurement is the hallmark of a professional cook. Please ensure your ingredients are prepared and measured before you turn on the stove. Stir-frying happens too fast to allow for chopping mid-way through the process.
The Protein and Marinade:
- 1 lb (450g) Chicken Breasts (or Thighs): Sliced against the grain into thin 1/4-inch (5-mm) pieces. Slicing against the grain is non-negotiable for tenderness.
- 1 tablespoon Light Soy Sauce: This provides the initial salt and fermented depth.
- 1 tablespoon Shaoxing Wine (or Dry Sherry): An essential Chinese rice wine that neutralizes any “meaty” odors and adds a distinct floral aroma.
- 1 tablespoon Cornstarch: This is the key to the “velveting” process, creating a protective barrier that keeps the chicken silky and tender.
The Signature Black Pepper Sauce:
- 1/2 cup Chicken Broth: The liquid base that provides body and savory depth.
- 2 tablespoons Light Soy Sauce: For salt and color.
- 2 tablespoons Shaoxing Wine: To reinforce the aromatic profile.
- 2 teaspoons Dark Soy Sauce: This is thicker and less salty than light soy; its primary purpose is to provide a rich, mahogany color to the sauce.
- 1 tablespoon Cornstarch: The thickening agent that ensures the sauce clings to every surface.
- 1 1/2 tablespoons Sugar: To balance the salt and the sharpness of the pepper.
- 2 teaspoons Coarsely Ground Black Pepper: The protagonist of the dish.
- 1/8 teaspoon Salt: A final touch to sharpen the overall flavor profile.
The Aromatics and Vegetables (The Stir-Fry):
- 2 tablespoons Peanut Oil (or Vegetable Oil): These oils have a high smoke point, which is essential for high-heat searing.
- 1 tablespoon Minced Ginger: Provides a bright, zesty contrast to the heavy pepper.
- 2 cloves Garlic, minced: Adds a pungent, savory backbone.
- 1/2 White Onion, chopped: Provides sweetness and a structural crunch.
- 2 Bell Peppers, chopped: Use mixed colors (red, yellow, or green) for visual vibrancy and a mild, sweet crunch.
The Preparation Method: A Step-by-Step Technical Guide
Phase 1: The Velveting Process (Marination)
In a medium-sized glass or stainless steel bowl, combine your sliced chicken with the 1 tablespoon of light soy sauce, 1 tablespoon of Shaoxing wine, and 1 tablespoon of cornstarch.
Use your hands to gently massage the mixture into the meat. This isn’t just about flavor; the cornstarch and liquid form a “slurry” that coats each piece of chicken. During cooking, this coating gelatinizes, creating a physical shield that prevents the high heat from drying out the delicate protein fibers. Let the chicken marinate for 10 to 15 minutes. This short rest allows the soy sauce to penetrate the meat slightly while the cornstarch adheres firmly.
Phase 2: Mixing the “Mother Sauce”
While the chicken marinates, prepare your sauce. In a small bowl, whisk together the chicken broth, light soy sauce, Shaoxing wine, dark soy sauce, cornstarch, sugar, black pepper, and salt.
It is critical to mix this thoroughly. Cornstarch is notorious for settling at the bottom of the bowl. By having this sauce ready and pre-mixed, you prevent the risk of “clumpy” sauce later in the process. This mixture is an emulsion of flavors that will transform into a glossy glaze the moment it hits the hot pan.
Phase 3: The Primary Sear (High-Heat Protein Development)
Place a large skillet or wok over medium-high heat. Allow the pan to get hot before adding the 1 tablespoon of peanut oil. You’ll know it’s ready when the oil “shimmers” or produces a tiny wisp of smoke.
Add the chicken to the pan. Immediately use a spatula to spread the pieces into a single layer. Resist the urge to stir right away. Let the chicken sear undisturbed for about 1 minute. This allows the cornstarch coating to set and the meat to brown slightly.
Flip the chicken and cook for another 30 to 60 seconds. The chicken should be browned on the outside but still slightly pink in the very center. At this stage, we are not cooking the chicken through; we are building flavor. Transfer the chicken to a clean plate and set it aside. This prevents the chicken from becoming rubbery while we prepare the vegetables.
Phase 4: Sautéing Aromatics and Vegetables
Wipe out any burnt bits from the skillet if necessary, then add the remaining 1 tablespoon of oil. Once hot, toss in the minced ginger and garlic. Stir rapidly for about 10 seconds. You are looking for them to become “fragrant”—the air should suddenly smell of toasted garlic and spicy ginger. Do not let them turn dark brown or they will taste bitter.
Immediately add the chopped white onion and bell peppers. Stir-fry these for only 20 seconds. In a professional stir-fry, vegetables should be “crisp-tender”—meaning they are hot and vibrant but still have a firm “snap” when bitten. Prolonged cooking at this stage will cause the peppers to lose their color and the onions to turn translucent and mushy.
Phase 5: The Emulsification and Final Assembly
Give your sauce mixture a quick stir to re-incorporate the cornstarch that may have settled. Pour the sauce into the skillet with the vegetables.
The reaction will be almost instantaneous. As the cornstarch reaches its thickening temperature (approximately 62°C to 70°C), the sauce will transform from a thin liquid into a thick, glossy glaze. This should only take a few seconds.
As soon as the sauce begins to bubble and thicken, add the browned chicken back into the skillet. Quickly stir a few times to ensure every piece of chicken and vegetable is coated in the peppery glaze.
Phase 6: Thermal Management
Turn off the heat immediately. In professional cooking, “carry-over cooking” is a significant factor. If you leave the ingredients in the hot skillet, the residual heat will continue to cook the chicken and soften the vegetables beyond their peak state. Immediately transfer the Black Pepper Chicken to a large serving plate. This stops the cooking process and preserves the integrity of the textures you’ve worked so hard to create.
The Science of the Stir-Fry: Why These Techniques Work
The Importance of Slicing Against the Grain: Meat is made of long muscle fibers. If you slice parallel to these fibers, the diner has to chew through the tough strings of protein. By slicing “against the grain” (perpendicular to the fibers), you shorten those strands, making the meat feel significantly more tender in the mouth. For a 1/4-inch slice, this effect is magnified, giving the chicken a “melt-in-the-mouth” quality.
Dark Soy Sauce vs. Light Soy Sauce:
Many home cooks assume all soy sauce is the same. However, Light Soy Sauce is used primarily for salt and a sharp, thin savory note. Dark Soy Sauce has been aged longer and often has molasses or caramel added. It is much thicker and has a profound darkening effect. Without the dark soy, your Black Pepper Chicken will look pale and unappealing. With it, the dish takes on a professional, deep amber-brown hue that looks as good as it tastes.
The Role of Cornstarch:
In the marinade, cornstarch facilitates a technique called “velveting.” In the sauce, it acts as a stabilizer. Unlike flour, which creates an opaque and somewhat heavy sauce, cornstarch creates a translucent, “glassy” finish. This allows the colors of the bell peppers and the specks of black pepper to remain visible and appetizing.
Nutritional Information
A standard serving of Black Pepper Chicken (assuming the recipe serves four) provides a balanced profile of lean protein and essential minerals.
| Nutrient | Amount per Serving |
| Calories | 310 kcal |
| Protein | 26g |
| Total Carbohydrates | 14g |
| Sugars | 6g |
| Total Fat | 16g |
| Saturated Fat | 3g |
| Sodium | 920mg |
| Iron | 8% DV |
While the sodium content is characteristic of soy-based dishes, the use of chicken breast and fresh bell peppers keeps the calorie count relatively low while providing a high amount of Vitamin C and lean protein.
Conclusion and Mastery
Mastering Black Pepper Chicken is a rite of passage for any cook interested in Asian techniques. It teaches you the importance of mise en place (preparation), the necessity of high-heat management, and the delicate balance of the five basic tastes: salt, sweet, sour, bitter, and umami.
The beauty of this dish lies in its contrast—the crunch of the peppers against the velvet texture of the chicken, and the sweetness of the onions against the biting heat of the peppercorns. When you serve this, you are serving a dish that has been refined by generations of cooks to be the perfect accompaniment to a simple bowl of steamed jasmine rice.
Frequently Asked Questions (FAQ)
Q: Can I use pre-ground black pepper from a shaker?
A: You can, but the results will be vastly inferior. Pre-ground pepper loses its aromatic oils quickly and can make the sauce taste “dusty” rather than spicy. For the best results, use a pepper mill on the coarsest setting or crush whole peppercorns with a mortar and pestle.
Q: What is a good substitute for Shaoxing wine?
A: The best substitute is a dry Pale Cream Sherry. If you must avoid alcohol, you can substitute it with an equal amount of chicken broth with a teaspoon of white wine vinegar added, though you will lose some of the authentic aromatic depth.
Q: Why did my chicken stick to the pan?
A: This usually happens because the pan wasn’t hot enough when the chicken was added, or you tried to move the chicken too soon. The cornstarch coating needs a moment of high heat to “set.” If it’s sticking, wait another 30 seconds; usually, the meat will “release” itself from the pan once a crust has formed.
Q: Is peanut oil necessary?
A: Peanut oil is favored in stir-frying for its high smoke point and neutral, slightly nutty flavor. If you have a nut allergy, any high-smoke-point oil like canola, grapeseed, or refined vegetable oil will work perfectly. Avoid extra virgin olive oil or butter, as they will burn at the temperatures required for this dish.
Q: My sauce is too thick. How do I fix it?
A: Cornstarch-based sauces can thicken rapidly. If it becomes too gloopy, simply whisk in a tablespoon of chicken broth or water to thin it out to your desired consistency.
Q: Can I add other vegetables?
A: Certainly. Snap peas, bok choy, or sliced celery are excellent additions. Just remember to keep the total volume of vegetables consistent so you don’t “crowd the pan,” which lowers the temperature and causes the ingredients to steam rather than sear.
Q: How do I get the “Wok Hei” flavor at home?
A: To get that smoky flavor on a standard home stove, cook in small batches. If you put too much food in the pan at once, the temperature drops. Cooking the chicken first, removing it, then cooking the vegetables ensures the pan stays as hot as possible throughout the process.
Q: Can I use frozen chicken?
A: You can, but it must be completely thawed and patted dry. Frozen chicken often releases a lot of excess water when cooking, which will boil the meat instead of searing it, ruining the “velvet” texture.
Print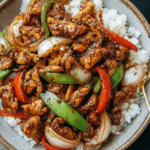
The Definitive Guide to Authentic Black Pepper Chicken: A Symphony of Spice and Technique
- Total Time: 25 minutes
- Yield: 4 servings
Description
A classic Chinese-style Black Pepper Chicken stir-fry featuring tender marinated chicken, crisp bell peppers, and a bold, savory-sweet peppery sauce.
Ingredients
- 1 lb chicken breasts (or thighs), sliced against the grain
- Marinade: 1 tbsp light soy sauce, 1 tbsp Shaoxing wine, 1 tbsp cornstarch
- Sauce: 1/2 cup chicken broth, 2 tbsp light soy sauce, 2 tbsp Shaoxing wine, 2 tsp dark soy sauce, 1 tbsp cornstarch, 1.5 tbsp sugar, 2 tsp coarse black pepper, 1/8 tsp salt
- Stir Fry: 2 tbsp peanut oil, 1 tbsp minced ginger, 2 cloves garlic, 1/2 white onion, 2 bell peppers (mixed colors)
Instructions
- Marinate chicken with soy sauce, Shaoxing wine, and cornstarch for 10–15 minutes.
- Whisk all sauce ingredients in a small bowl and set aside.
- Heat 1 tbsp oil in a skillet. Sear chicken in a single layer for 1 minute until browned; flip and cook 30 seconds more. Remove to a plate.
- Add remaining oil, ginger, and garlic; stir until fragrant. Add onion and peppers; cook for 20 seconds.
- Stir the sauce to Ensure cornstarch is dissolved, then pour into the skillet.
- Once the sauce thickens, add chicken back in. Toss quickly to coat and remove from heat immediately.
Notes
- Slice chicken against the grain for maximum tenderness.
- Shaoxing wine can be substituted with dry sherry.
- Do not overcook the chicken in step 3 as it will finish in the sauce.
- Prep Time: 15 minutes
- Cook Time: 10 minutes
- Category: Main Dish
- Method: Stir Fry
- Cuisine: Chinese