In the world of home cooking, few things are as universally beloved as the combination of heat, sugar, and salt. This trifecta forms the backbone of some of the most iconic dishes in global gastronomy, but it finds a particularly harmonious home in Tex-Mex and Asian-fusion cuisines. When you are looking for a meal that delivers maximum impact with minimal effort, Sticky Sweet Chili Chicken stands as the definitive answer. This dish is designed for the modern kitchen—efficient, high-heat, and incredibly rewarding. Whether you are using an air fryer or a conventional oven, the goal is to achieve a skin that is shatteringly crisp while the meat remains succulent, all bound together by a glaze that clings to the palate.
The beauty of the chicken thigh, particularly the bone-in variety, lies in its resilience. Unlike the lean breast, the thigh contains enough intramuscular fat and connective tissue to withstand high temperatures without drying out. This makes it the perfect candidate for a “sticky” application. As the chicken renders its fat, it creates a natural base for the glaze to adhere to. The resulting caramelization is not just a matter of aesthetics; it is a chemical transformation known as the Maillard reaction, which creates hundreds of different flavor compounds that give the dish its deep, savory complexity.
This guide is more than just a set of instructions; it is a deep dive into the techniques that separate a soggy weeknight meal from a restaurant-quality experience. We will explore the science of skin crisping, the architecture of a balanced glaze, and the thermal dynamics of the air fryer. By understanding the “why” behind every step, you will be able to replicate these results consistently, making this recipe a permanent staple in your culinary repertoire.
The Science of Essential Ingredients
A great recipe is built on a foundation of high-quality components that work in synergy. In this Sticky Sweet Chili Chicken, every ingredient has a functional role to play, from the choice of cooking oil to the specific viscosity of the oyster sauce. Understanding these roles allows you to cook with intention rather than just following a list.
The Protein and Surface Prep
- 8 Bone-in Chicken Thighs: While boneless thighs can be used for speed, bone-in thighs are the superior choice for flavor and moisture retention. The bone acts as a thermal conductor, helping the meat cook evenly from the inside out while providing structural support that prevents the meat from shrinking excessively under high heat.
- 1 Tablespoon Avocado Oil: Choosing the right oil is critical for high-heat cooking. Avocado oil has one of the highest smoke points of any plant-based oil (approximately 520°F). This allows you to air fry or roast at 375°F without the oil breaking down or imparting a bitter, burnt flavor to the chicken.
- 1 Teaspoon Garlic Powder: Unlike fresh garlic, which can burn and turn acrid in a 20-minute air fryer cycle, garlic powder provides a consistent, savory baseline that penetrates the skin and meat more evenly.
- 1/2 Teaspoon Salt and 1/2 Teaspoon Pepper: These are the primary seasoning agents. Salt is particularly important here not just for flavor, but for its ability to draw moisture out of the skin, which is the secret to achieving that coveted crunch.
The Architecture of the Sticky Glaze
- 1/2 Cup Sweet Chili Sauce: This provides the bulk of the glaze’s body and its primary sugar content. The sugar is what allows the sauce to “stick” and caramelize under the heat.
- 3 Tablespoons Soy Sauce: This is the primary source of umami and salt. It balances the sweetness of the chili sauce and provides the deep amber color that makes the final dish look so appetizing.
- 1 Tablespoon Oyster Sauce: Often the “secret ingredient” in professional kitchens, oyster sauce adds a thick, syrupy consistency and a complex, savory depth that soy sauce alone cannot provide. It acts as a binder for the rest of the glaze.
- 1 Tablespoon Sesame Oil: This is an aromatic finishing oil. It contributes a toasted, nutty scent that defines the “Asian-fusion” profile of the dish. Because sesame oil can be delicate, it is integrated into the glaze rather than used for the initial high-heat roasting.
Technical Preparation: The Secret to Crispy Skin
The most common pitfall in cooking glazed chicken is ending up with “flabby” skin. To avoid this, we follow a two-stage cooking process: the render and the glaze.
Stage One: The Render and Crisp
Before the chicken ever touches the heat, you must perform the most important step: drying. Use paper towels to pat the skin of each thigh until it is bone-dry. Moisture is the enemy of crispiness; if there is water on the surface, the chicken will steam rather than fry. Once dry, coat the thighs in the avocado oil and season with the garlic powder, salt, and pepper.
Preheat your air fryer to 375°F (190°C). This high starting temperature is necessary to immediately begin rendering the subcutaneous fat. Place the chicken thighs in the basket skin-side down. This might seem counterintuitive, but starting skin-side down allows the fat to render directly onto the heating elements (or the bottom of the basket), effectively shallow-frying the skin in its own fat for the first 15 minutes. This creates a sturdy, crispy base that can later support the weight of a heavy glaze.
Stage Two: Constructing and Applying the Glaze
While the chicken undergoes its first 15 minutes of cooking, prepare the Sticky Glaze. In a small glass bowl, whisk together the sweet chili sauce, soy sauce, oyster sauce, and sesame oil. You want the mixture to be completely homogenous.
After the initial 15 minutes, flip the chicken thighs so they are skin-side up. This is where the transformation begins. Using a pastry brush, apply a generous coat of the glaze to the skin. Do not simply pour it over; brushing ensures an even layer that won’t pool at the bottom of the air fryer.
The Art of the Baste
To achieve a true “sticky” finish, one coat of sauce is rarely enough. The goal is to build layers of flavor. Return the chicken to the air fryer for an additional 10 minutes, but pause the cooking every 3 to 4 minutes to apply another layer of glaze. This technique, known as “lacquering,” builds a thick, caramelized crust. Each layer of sauce dehydrates slightly in the heat, becoming stickier and more concentrated before the next layer is applied.
Continue this process until the chicken reaches an internal temperature of 165°F (74°C) when measured with a digital meat thermometer. For those who want an even more aggressive finish, you can move the chicken to a conventional oven broiler for the final 2 minutes. Watch it like a hawk during this stage—the high sugar content in the glaze can move from “perfectly caramelized” to “burnt” in a matter of seconds.
Resting and Serving Suggestions
Once the chicken is removed from the heat, it must rest for at least 5 minutes. During this time, the internal juices—which have been pushed toward the center by the intense heat—redistribute throughout the meat. If you cut into the chicken immediately, these juices will escape, leaving the meat dry. Furthermore, the glaze will “set” during the resting period, becoming even tackier and more adherent to the skin.
For a professional presentation, serve the Sticky Sweet Chili Chicken over a bed of fluffy jasmine rice. The rice acts as a neutral sponge for any excess glaze that drips off the chicken. Complement the richness of the dish with a bright, acidic side, such as a quick-pickled cucumber salad or steamed bok choy with a squeeze of lime. The contrast between the sweet, sticky chicken and the fresh, crisp vegetables creates a balanced and sophisticated plate.
Professional Tips for Success
- Air Flow is Key: In an air fryer, the magic happens because of rapid air circulation. Do not overcrowd the basket. If the chicken thighs are touching, the air cannot circulate around the sides, resulting in “bald spots” where the skin is soft rather than crispy. Cook in batches if necessary.
- The Thermometer Rule: While 25 minutes is a standard guideline, every air fryer and chicken thigh varies in size and power. Always rely on a meat thermometer. Taking the chicken to exactly 165°F ensures peak juiciness.
- Internal Cleanup: To make cleanup easier, you can place a small piece of parchment paper or foil at the very bottom of the air fryer (under the tray) to catch the sugar-heavy drippings, but ensure you aren’t blocking the actual airflow to the chicken.
Frequently Asked Questions
Can I use chicken breasts instead of thighs? You can, but you must adjust the cooking time significantly. Chicken breasts are leaner and will dry out much faster. If using breasts, check the internal temperature starting at the 12-minute mark. You will likely need to baste more frequently to keep the surface moist.
What if I don’t have an air fryer? You can easily make this in a standard oven. Preheat your oven to 400°F (205°C) and place the chicken on a wire rack set over a baking sheet. The wire rack is essential as it allows air to circulate under the chicken, mimicking the effect of an air fryer. Increase the total cooking time to approximately 35-40 minutes.
Is oyster sauce necessary? While you can omit it, the oyster sauce provides a unique viscosity and “funk” that is hard to replace. If you need a substitute, a thick hoisin sauce or a reduction of balsamic vinegar and soy sauce can work in a pinch, though the flavor profile will shift slightly.
How do I get the skin even crispier? Beyond drying the skin with paper towels, you can leave the chicken uncovered in the refrigerator for 2 to 4 hours before cooking. This “air-dries” the skin, resulting in an even more dramatic crunch once it hits the high heat of the air fryer.
Can I make the glaze ahead of time? Absolutely. The glaze can be mixed and stored in an airtight container in the refrigerator for up to a week. This makes the 25-minute weeknight goal even more attainable.
My sauce is burning before the chicken is done. What happened? This usually happens if the glaze is applied too early. Ensure the chicken has at least 15 minutes of “dry” cooking time to render the fat before you start basting. If the sugar in the sauce is exposed to high heat for the full 25 minutes, it will almost certainly burn.
Is this dish spicy? The “heat” in sweet chili sauce is generally very mild. It provides a tingle rather than a burn. If you prefer a spicier profile, you can add a teaspoon of sriracha or red pepper flakes to the glaze mixture.
How do I store and reheat leftovers? Store leftovers in an airtight container for up to 3 days. To reheat, avoid the microwave, which will make the skin rubbery. Instead, place the chicken back in the air fryer at 350°F for 4-5
Print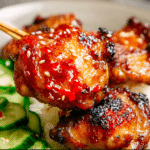
The Ultimate Guide to Sticky Sweet Chili Chicken: A 25-Minute Masterclass in Asian-Fusion Flavors
- Total Time: 25 minutes
- Yield: 8 chicken thighs
Description
Sticky Sweet Chili Chicken is a quick and flavorful dish featuring crispy chicken thighs coated in a glossy, sweet and savory chili glaze—ready in just 25 minutes.
Ingredients
Chicken
- 8 chicken thighs (bone-in or boneless)
- 1 tbsp avocado oil
- 1 tsp garlic powder
- 1/2 tsp salt
- 1/2 tsp pepper
Sticky Glaze
- 1/2 cup sweet chili sauce
- 3 tbsp soy sauce
- 1 tbsp oyster sauce
- 1 tbsp sesame oil
Instructions
- Preheat air fryer to 375°F (190°C).
- Pat chicken dry and season with oil, garlic powder, salt, and pepper.
- Air fry chicken skin-side down for 15 minutes.
- Mix sweet chili sauce, soy sauce, oyster sauce, and sesame oil in a bowl.
- Baste chicken with glaze multiple times during cooking.
- Cook an additional 10 minutes or until internal temp reaches 165°F (74°C).
- Optional: Broil 2–3 minutes for extra crispiness.
- Let rest briefly, then serve.
Notes
- Baste at least 3 times for a rich glaze.
- Can be baked instead of air fried.
- Serve with rice or vegetables.
- Prep Time: 5 minutes
- Cook Time: 20 minutes
- Category: Main Dish, Chicken
- Method: Air Fry / Bake
- Cuisine: Asian