Introduction
There are certain recipes that every home cook needs in their back pocket—dishes that are fast enough for a frantic Tuesday night, flavorful enough to serve to guests, and simple enough to memorize after a single try. Butter Garlic Chicken Bites are exactly that kind of recipe. Imagine tender, golden-brown morsels of chicken breast, each piece coated in a light, seasoned flour that crisps up beautifully in hot olive oil. Then imagine those same bites finished in a luxurious bath of melted butter, fresh garlic, and parsley, creating a silky pan sauce that begs to be sopped up with bread or spooned over rice.
This dish is a masterclass in efficiency. From the moment you open your pantry to the moment you take your first bite, you are looking at roughly 20 minutes. There is no marinating, no complicated techniques, and no long simmering. Yet the result feels far more sophisticated than the effort suggests. The contrast between the crunchy, peppery exterior of the chicken and the rich, aromatic butter sauce is deeply satisfying.
In this article, you will learn not only the step-by-step method but also the subtle techniques that separate good chicken bites from great ones. We will cover why uniform sizing matters, how to achieve that perfect golden crust without burning the garlic, and how to customize the flavor profile to suit your mood. Whether you are feeding a family, meal-prepping for the week, or simply craving something warm and savory, these Butter Garlic Chicken Bites will become a staple.
Ingredients
Understanding each ingredient’s role will help you cook with confidence and make smart substitutions when needed. This recipe serves 4 as a main course or 6 as an appetizer.
For the Chicken Coating
- 2 tbsp olive oil – Used for searing the chicken. Olive oil has a relatively high smoke point and adds a subtle fruity note. You can substitute avocado oil or vegetable oil.
- 1½ lbs boneless, skinless chicken breasts – Cut into bite-size pieces (approximately 1-inch cubes). Chicken breasts are lean and cook quickly. For an even juicier result, you can substitute boneless, skinless chicken thighs.
- 3 tbsp all-purpose flour – Creates a light, crispy crust that also helps the butter garlic sauce cling to the chicken. For a gluten-free version, use almond flour, rice flour, or a 1:1 gluten-free baking blend.
- ½ tsp salt – Essential for seasoning the flour and enhancing the natural flavor of the chicken. Kosher salt is preferred over table salt for its purity and ease of distribution.
- ½ tsp pepper – Adds a gentle warmth and sharpness. Freshly ground black pepper is noticeably more aromatic.
- ½ tsp Italian seasoning – A blend typically containing oregano, basil, rosemary, thyme, and marjoram. This brings herbaceous complexity without requiring five separate jars.
- ½ tsp onion powder – Provides a sweet, savory depth that complements the garlic. Do not substitute onion salt, as that would increase the sodium level.
For the Butter Garlic Sauce
- 3 tbsp butter – Melted. Unsalted butter is recommended so you can control the salt level. The butter provides richness, body, and that irresistible glossy sheen.
- 4 tsp garlic – Minced. Fresh garlic is non-negotiable here; it offers a pungent, slightly spicy kick that jarred garlic cannot replicate. Approximately 4 medium cloves.
- 1 tbsp fresh parsley – Finely chopped. Parsley adds a bright, grassy contrast to the rich butter and garlic. Dried parsley can be used in a pinch (1 tsp dried), but fresh is vastly superior for both flavor and color.
Equipment
Having these tools ready before you begin will make the cooking process seamless.
- 1-gallon freezer bag or large mixing bowl
- Large skillet (12-inch cast iron, stainless steel, or non-stick)
- Small mixing bowl
- Whisk or small fork
- Cutting board
- Sharp chef’s knife
- Measuring cups and spoons
- Tongs or a slotted spatula
- Paper towels
Method
The total active cooking time is approximately 15–18 minutes. Read through all steps before turning on the heat.
Step 1: Prepare the Seasoned Flour
Take your 1-gallon freezer bag and add the 3 tablespoons of all-purpose flour, ½ teaspoon of salt, ½ teaspoon of pepper, ½ teaspoon of Italian seasoning, and ½ teaspoon of onion powder. Close the bag securely (removing excess air), then shake vigorously for 10–15 seconds until the spices are evenly distributed throughout the flour. Alternatively, you can whisk these dry ingredients together in a shallow bowl, but the bag method is cleaner and more efficient.
Step 2: Coat the Chicken
Cut your 1½ pounds of boneless, skinless chicken breasts into uniform bite-size pieces—aim for approximately 1-inch cubes. Uniformity is critical for even cooking. Add all the chicken pieces to the freezer bag containing the seasoned flour. Close the bag again and shake thoroughly until every piece of chicken is well coated. The flour should adhere in a thin, even layer. Set the bag aside.
Chef’s note: Shaking the bag rather than stirring with a spoon prevents the flour from becoming gummy and ensures a lighter crust.
Step 3: Prepare the Butter Garlic Mixture
In a small bowl, combine the 3 tablespoons of melted butter, 4 teaspoons of minced garlic, and 1 tablespoon of finely chopped fresh parsley. Whisk with a fork until all ingredients are well combined. Set this bowl aside near the stove. Do not add this mixture to the pan prematurely, as the garlic can burn.
Step 4: Sear the Chicken
Place your large skillet over medium-high heat. Add the 2 tablespoons of olive oil and swirl to coat the bottom of the pan. Allow the oil to heat for about 60–90 seconds. The oil is ready when it shimmers and thins out, or when a tiny piece of flour sizzles immediately upon contact.
Carefully add the coated chicken pieces to the skillet in a single layer. Do not overcrowd the pan. If necessary, cook in two batches. Leaving space between each piece allows steam to escape and promotes browning rather than steaming.
Let the chicken cook undisturbed for 2–3 minutes on the first side. Resist the urge to stir or flip prematurely. You are looking for a deep golden-brown crust. Using tongs or a slotted spatula, flip each piece and cook for another 2–3 minutes on the second side. The chicken should be golden brown on the outside and nearly cooked through. It will finish cooking in the next step.
Step 5: Add the Butter Garlic Sauce
Reduce the heat to medium. Pour the prepared butter, garlic, and parsley mixture evenly over the seared chicken bites. Stir gently with a spatula or toss the pan (if you are comfortable with the technique) to coat every piece of chicken in the glossy sauce. Continue cooking for exactly 1 minute. This brief cooking time allows the garlic to mellow slightly and the butter to infuse the chicken without burning the delicate herbs.
Step 6: Serve Immediately
Remove the skillet from the heat. Transfer the Butter Garlic Chicken Bites to a serving platter or individual plates. Spoon any remaining sauce from the bottom of the pan over the top. Garnish with additional fresh parsley if desired. Serve while hot.
Nutrition
This nutritional information is an estimate based on standard ingredient brands and a serving size of approximately 6 ounces of chicken (one-quarter of the recipe). Values will vary depending on specific products and portion sizes.
Per serving (serves 4):
- Calories: 385
- Protein: 36g
- Fat: 21g (Saturated Fat: 8g)
- Carbohydrates: 10g
- Fiber: 0.5g
- Sugar: 0.5g
- Sodium: 520mg
- Cholesterol: 135mg
*Note: To reduce calories and saturated fat, substitute 2 tablespoons of olive oil for the butter and reduce the total oil to 1 tablespoon. For a lower-sodium version, use unsalted butter and reduce the added salt to ¼ teaspoon.*
Notes
Professional tips, variations, and storage advice to ensure your success every time.
On Achieving the Perfect Golden Crust
The single most common mistake with this recipe is moving the chicken too often. Once the chicken pieces are in the hot skillet, let them be. A proper sear requires direct, uninterrupted contact with the hot surface. If you stir or flip constantly, the flour coating will turn pale and pasty rather than crispy and golden. Set a timer for 2–3 minutes per side and trust the process.
On Uniform Sizing
Chicken breasts are notoriously irregular in shape—thick at one end and thin at the other. To achieve uniform bite-size pieces, first slice the chicken breast horizontally (butterfly it) to create two even-thickness pieces, then cut those into cubes. Pieces that are the same size will cook in the same amount of time, preventing dry, overcooked morsels next to undercooked ones.
On Garlic Management
Garlic burns quickly. Burnt garlic becomes bitter and acrid, ruining the sauce. That is why the garlic is mixed with melted butter and parsley but not added to the pan until the final minute of cooking. If you prefer a more intense garlic flavor, add an additional 1–2 teaspoons of fresh garlic with the butter mixture. For a milder, sweeter garlic flavor, use roasted garlic paste instead of raw minced garlic.
On Customizing the Seasoning
The beauty of this recipe is its adaptability. Consider these variations:
- Spicy Buffalo Version: Add 2 tablespoons of buffalo sauce or Frank’s RedHot to the butter mixture. Sprinkle with crushed red pepper flakes before serving.
- Lemon Herb Version: Add the zest of one lemon and 1 extra tablespoon of fresh parsley to the butter mixture. Squeeze fresh lemon juice over the finished dish.
- Parmesan Crust Version: Add 2 tablespoons of grated Parmesan cheese to the flour mixture before shaking. The cheese will create an extra-crispy, nutty crust.
- Smoky Paprika Version: Replace the Italian seasoning with ½ teaspoon of smoked paprika and ¼ teaspoon of cayenne pepper.
On Pairings
These chicken bites are incredibly versatile. Serve them over:
- Fluffy white rice or brown rice
- Buttered egg noodles or fettuccine
- Mashed potatoes (the butter sauce is exceptional here)
- Roasted vegetables such as broccoli, asparagus, or green beans
- A crisp garden salad for a lighter meal
- Warm crusty bread to soak up every drop of the sauce
On Storage and Reheating
- Refrigeration: Store leftovers in an airtight container for up to 3 days.
- Reheating: The microwave will work, but it often makes the chicken rubbery and the flour coating soggy. For best results, reheat in a dry skillet over medium heat for 2–3 minutes, flipping once, until warmed through and slightly crisp again. Add a tiny pat of butter if the chicken seems dry.
- Freezing: These chicken bites freeze reasonably well for up to 2 months. Freeze them on a parchment-lined baking sheet until solid, then transfer to a freezer bag. Reheat directly from frozen in a 375°F oven for 12–15 minutes.
On Meal Prep
This recipe is ideal for meal prep. Cook the chicken bites as directed (without the final butter garlic addition if you prefer). Refrigerate the plain cooked chicken bites and the butter garlic mixture separately. When ready to eat, reheat the chicken in a skillet, add the butter mixture, and cook for 1 minute. The result tastes freshly made.
Conclusion
Butter Garlic Chicken Bites occupy a rare and wonderful space in the culinary world. They are simple enough for a novice cook to execute successfully on the first try, yet delicious enough to impress someone who has been cooking for decades. The combination of a lightly crisped, seasoned exterior and a rich, aromatic butter garlic finish creates a textural and flavor contrast that feels far more complex than the ingredient list suggests.
This recipe is also a template. Once you master the basic technique—coating, searing, saucing—you can apply it to shrimp, pork tenderloin, firm tofu, or even cauliflower florets. You can change the seasoning blend to suit any cuisine, from Cajun to curry to simple salt and pepper. But the original version, with its Italian herbs, sweet onion powder, and generous garlic, remains a classic for a reason.
The next time you need a quick, crowd-pleasing dinner that doesn’t feel like a compromise, remember these golden bites. They are proof that weeknight cooking does not have to be boring.
Frequently Asked Questions (FAQ)
Q1: Can I use chicken thighs instead of chicken breasts?
Absolutely. Boneless, skinless chicken thighs are actually more forgiving than breasts because they contain more fat and remain juicy even if slightly overcooked. Follow the exact same recipe, cutting the thighs into uniform bite-size pieces. Cooking times may increase by 1 minute per side because thighs are denser. The final internal temperature should reach 165°F (74°C).
Q2: Why did my chicken turn out soggy instead of crispy?
Sogginess typically results from one of three issues. First, the skillet was not hot enough before adding the chicken, causing the flour to absorb oil rather than crisp. Second, you overcrowded the pan, which trapped steam and prevented browning. Third, you stirred or flipped the chicken too frequently. For crispy results: preheat the pan thoroughly, cook in batches if necessary, and flip only once after 2–3 minutes.
Q3: Can I make this recipe dairy-free?
Yes, with two simple swaps. Replace the 3 tablespoons of butter with a high-quality dairy-free butter substitute (such as Miyoko’s or Earth Balance) or with 3 tablespoons of additional olive oil. The flavor will be slightly less rich, but the dish will still be delicious. All other ingredients are naturally dairy-free.
Q4: How do I know when the chicken is fully cooked without a thermometer?
If you do not have an instant-read thermometer, use the visual and tactile cues. Cut into the largest piece of chicken; the juices should run clear, not pink. The meat should be opaque all the way through and should feel firm but still springy to the touch. When pierced with a fork, the chicken should shred slightly rather than feeling raw and rubbery. That said, a $10 instant-read thermometer is one of the best investments a home cook can make.
Q5: Can I prepare this recipe ahead of time for a party?
Yes, and this is a smart strategy. Cook the chicken bites through step 4 (seared but without the butter mixture). Let them cool completely, then refrigerate on a baking sheet. Up to 2 hours before serving, reheat the chicken in a 375°F oven for 8–10 minutes, then transfer to a skillet, add the butter garlic mixture, and cook for 1 minute. Serve immediately. This method keeps the chicken crispy and the sauce fresh.
Q6: What can I use instead of Italian seasoning?
If you do not have Italian seasoning, create your own blend from common pantry spices. Combine ¼ teaspoon dried oregano, ¼ teaspoon dried basil, ⅛ teaspoon dried rosemary, and a pinch of dried thyme. Alternatively, use Herbes de Provence, dried marjoram, or simply double the onion powder and add ¼ teaspoon of garlic powder (in addition to the fresh garlic in the sauce).
Q7: My garlic turned brown and bitter. What went wrong?
You added the garlic too early or cooked it for too long. Garlic needs only 30–60 seconds in a hot pan to become fragrant. In this recipe, the garlic is mixed with melted butter and added only during the final minute of cooking. If you add it earlier or leave it on the heat beyond 1 minute, the natural sugars in the garlic will caramelize, then burn, turning bitter. Stick to the 1-minute rule.
Q8: Can I double this recipe?
Yes, but do not double everything into one skillet. A crowded pan will not produce a golden crust. Instead, cook the chicken in two separate batches, transferring the first batch to a warm oven (200°F) while you cook the second. Then return all the chicken to the skillet, add the butter garlic mixture (you may need to increase the butter to 4 tablespoons and garlic to 5–6 teaspoons), and cook for 1 minute, tossing to coat.
Q9: Is it necessary to use a freezer bag? Can I use a bowl instead?
A freezer bag is convenient but not essential. You can absolutely combine the flour and seasonings in a shallow bowl or pie plate, then dredge each piece of chicken individually. The bag method is simply faster, less messy, and ensures even coating with minimal effort. If using a bowl, add the chicken in small batches and toss with your hands or two forks.
Q10: What is the best way to reheat leftovers without losing the crispy texture?
Avoid the microwave. Instead, reheat the chicken bites in a dry skillet (no additional oil needed) over medium heat for 2–3 minutes, flipping once halfway through. The residual heat will crisp the exterior while warming the interior. If the chicken seems dry, add a tiny pat of butter or a teaspoon of olive oil during the last 30 seconds. For larger batches, reheat on a baking sheet in a 375°F oven for 6–8 minutes.
Print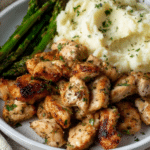
Butter Garlic Chicken Bites: Golden, Juicy, and on Your Table in 20 Minutes
- Total Time: 20 minutes
- Yield: 4 servings
Description
Butter Garlic Chicken Bites are juicy, golden-seared chicken pieces coated in a rich garlic butter sauce, finished with herbs for a quick and flavorful meal.
Ingredients
- Chicken:
- 2 tbsp olive oil
- 1 1/2 lbs boneless, skinless chicken breasts, bite-sized pieces
- 3 tbsp all-purpose flour
- 1/2 tsp salt
- 1/2 tsp pepper
- 1/2 tsp Italian seasoning
- 1/2 tsp onion powder
- Garlic Butter Sauce:
- 3 tbsp butter, melted
- 4 tsp garlic, minced
- 1 tbsp fresh parsley, finely chopped
Instructions
- Mix flour, salt, pepper, Italian seasoning, and onion powder in a bag.
- Add chicken and shake until coated evenly.
- Heat olive oil in a skillet over medium-high heat.
- Cook chicken 2–3 minutes per side until golden and cooked through.
- Mix melted butter, garlic, and parsley in a bowl.
- Pour garlic butter over chicken and cook 1 more minute.
- Serve hot with vegetables, rice, or potatoes.
Notes
- Cut chicken evenly for consistent cooking.
- Let chicken sear without stirring too often for crisp edges.
- Add chili flakes or hot sauce for extra heat.
- Prep Time: 10 minutes
- Cook Time: 10 minutes
- Category: Dinner
- Method: Stovetop
- Cuisine: American