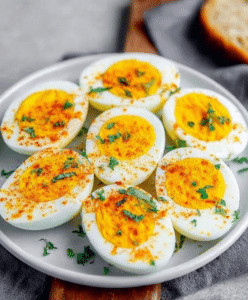
Thanksgiving is a time for gratitude, good company, and of course, exceptional food. While the turkey often takes center stage, it’s the appetizers and side dishes that set the tone for the feast. Among these, deviled eggs hold a special place — simple, comforting, and endlessly adaptable. For this holiday season, let’s elevate this classic appetizer into something both festive and elegant: Thanksgiving Deviled Eggs.
These beautifully presented eggs aren’t just delicious; they’re visually delightful, too. Infused with the warm, cozy flavors of thyme, sage, and rosemary, each bite captures the essence of Thanksgiving. The creamy, savory filling contrasts with the soft egg whites, while a touch of paprika adds a gentle warmth and color. Finished with delicate chive “stems,” these deviled eggs resemble tiny pumpkins — making them an irresistible addition to any holiday platter.
Whether you’re hosting a large family dinner or attending a potluck, these deviled eggs are easy to prepare, require minimal ingredients, and can be made ahead of time. Let’s explore how to bring this charming dish to life, step by step.
Why You’ll Love These Thanksgiving Deviled Eggs
Before we dive into the recipe, here are a few reasons these deviled eggs will become a must-have on your Thanksgiving menu:
- Festive and Fun Presentation:
The pumpkin-like design transforms a traditional snack into a seasonal centerpiece. Guests of all ages will admire their creative touch before enjoying them. - Perfect Balance of Flavors:
The combination of mayonnaise, mustard, and aromatic herbs like thyme, sage, and rosemary creates a rich, savory filling reminiscent of classic Thanksgiving stuffing. - Quick and Easy to Make:
With a total prep and cook time of under an hour, you can whip these up while other dishes are in progress. - Make-Ahead Friendly:
These deviled eggs can be made earlier in the day and stored in the refrigerator, making them ideal for busy holiday schedules. - Light Yet Satisfying:
At only about 63 calories per serving, they’re a flavorful, guilt-free appetizer option.
Ingredients You’ll Need
To create these festive Thanksgiving Deviled Eggs, you’ll need just a handful of simple, pantry-friendly ingredients. Here’s what you’ll need for approximately 12 servings:
- 6 eggs
The foundation of this recipe. Fresh, large eggs yield the best texture for both the whites and the yolk filling. - ¼ cup mayonnaise
This gives the yolk filling its signature creaminess and smooth texture. - ¼ teaspoon yellow mustard
Adds a gentle tang that balances the richness of the mayonnaise. - ¼ teaspoon paprika
Brings mild heat and warm color to the filling. It also enhances the pumpkin-inspired appearance. - ¼ teaspoon dried thyme
Adds an earthy, aromatic flavor that complements the holiday herbs. - ¼ teaspoon dried sage
A quintessential Thanksgiving flavor — slightly peppery and savory. - ¼ teaspoon dried rosemary
Brings a woody, fragrant note that rounds out the herbal profile. - Salt and pepper to taste
Essential for seasoning. Adjust to suit your taste preferences. - Fresh chives, chopped into “stems”
These serve as the finishing touch to create the “pumpkin stem” look.
Kitchen Equipment You’ll Need
Before starting, gather these tools to ensure smooth preparation:
- Medium-sized pot for boiling the eggs
- Mixing bowl
- Fork or potato masher for mashing yolks
- Piping bag fitted with a large round tip (or a resealable plastic bag with the corner cut off)
- Chopstick or thin skewer for creating the pumpkin grooves
- Serving platter
- Airtight container (for storage)
Step-by-Step Preparation Method
Now that you’ve assembled your ingredients and tools, let’s make these Thanksgiving Deviled Eggs. Each step is designed for ease and precision, ensuring perfect results every time.
Step 1 – Boil the Eggs
- Place the 6 eggs in a pot and cover them with cold water — about an inch above the eggs.
- Bring the water to a rolling boil over medium-high heat.
- Once boiling, reduce the heat slightly and cook for 10 minutes.
- After boiling, immediately remove the eggs from the pot and transfer them into a bowl of ice water.
- Let them sit for 20 minutes to cool completely.
- This cooling step helps prevent overcooking and makes peeling much easier.
Pro Tip: For perfectly centered yolks, gently stir the water as the eggs begin to heat. This keeps the yolks from settling to one side.
Step 2 – Peel and Prepare the Egg Halves
Once the eggs are cooled, gently crack the shells and peel them under running water to remove any small bits of shell.
- Slice each egg in half lengthwise with a sharp knife.
- Carefully remove the yolks and transfer them to a small mixing bowl.
- Set the egg white halves on a serving platter.
Step 3 – Make the Filling
Add the following ingredients to the bowl with the egg yolks:
- ¼ cup mayonnaise
- ¼ teaspoon yellow mustard
- ¼ teaspoon paprika
- ¼ teaspoon dried thyme
- ¼ teaspoon dried sage
- ¼ teaspoon dried rosemary
Mash everything together with a fork until smooth and creamy.
- Adjust the texture to your liking — you can keep it slightly chunky for a rustic feel or blend it until velvety smooth.
- Season with salt and pepper to taste.
Optional Tip: For an ultra-smooth filling, use a small food processor or press the yolk mixture through a fine sieve before adding it to the piping bag.
Step 4 – Assemble the Deviled Eggs
- Spoon the yolk mixture into a piping bag fitted with a large round tip.
(If you don’t have one, use a resealable plastic bag and snip off a small corner.) - Pipe the yolk filling into each egg white half, swirling it in a circular motion to create a pumpkin-like mound.
- Chill the filled eggs in the refrigerator for 15–20 minutes before shaping.
- This makes the filling firmer and easier to work with.
Step 5 – Create the Pumpkin Design
Now comes the fun part — shaping your deviled eggs into tiny pumpkins!
- Using a damp chopstick or skewer, gently draw vertical lines from top to bottom across each yolk mound.
- These grooves mimic the ridges of a pumpkin.
- Wetting the chopstick helps it glide smoothly without sticking to the filling.
- Once the grooves are complete, insert a small piece of fresh chive into the top center of each “pumpkin” to form the stem.
The result? A platter of adorable, pumpkin-shaped deviled eggs that perfectly capture the spirit of Thanksgiving.
Step 6 – Chill and Serve
- Place your finished deviled eggs in an airtight container and refrigerate until ready to serve.
- These eggs can be made up to a day in advance — just add the chive stems before serving to keep them fresh.
- Serve cold and enjoy as part of your Thanksgiving appetizer spread.
Expert Tips for the Perfect Deviled Eggs
- Use older eggs:
Slightly older eggs (7–10 days old) are easier to peel than very fresh ones. - Avoid green yolks:
Overcooking causes the yolks to turn greenish-gray. Sticking to the 10-minute cook time and cooling them quickly prevents this. - Make them ahead:
You can prepare the filling a day early and store it separately. Fill the egg whites just before serving. - Customize the flavor:
If you’d like a tangier flavor, add a teaspoon of pickle relish or a splash of apple cider vinegar. - For extra color:
Mix a pinch of turmeric or a few drops of orange food coloring into the yolk mixture to enhance the pumpkin hue naturally.
How to Store Thanksgiving Deviled Eggs
Proper storage ensures your deviled eggs stay safe and delicious:
- Store them in a single layer in an airtight container.
- Keep refrigerated at all times.
- Consume within 2 days for best flavor and freshness.
Avoid freezing deviled eggs — the filling can separate and become watery when thawed.
Nutritional Information (Per Serving)
- Calories: 63 kcal
- Carbohydrates: 0.2 g
- Protein: 3 g
- Fat: 6 g
- Saturated Fat: 1 g
- Polyunsaturated Fat: 3 g
- Monounsaturated Fat: 2 g
- Cholesterol: 84 mg
- Sodium: 62 mg
- Potassium: 33 mg
- Fiber: 0.03 g
- Sugar: 0.1 g
- Vitamin A: 143 IU
- Vitamin C: 0.01 mg
- Calcium: 13 mg
- Iron: 0.4 mg
These numbers make Thanksgiving Deviled Eggs a light and nutritious choice for your appetizer table.
Serving Ideas and Variations
While these deviled eggs are stunning on their own, here are a few creative ways to serve or modify them:
- Smoky Pumpkin Deviled Eggs:
Substitute half of the paprika with smoked paprika for a deeper, smoky aroma. - Bacon & Herb Deviled Eggs:
Sprinkle crispy bacon bits on top of each egg for a salty crunch. - Spicy Kick:
Add a few drops of hot sauce or a pinch of cayenne to the yolk mixture. - Avocado Deviled Eggs:
Replace half of the mayonnaise with mashed avocado for a fresh, creamy twist. - Stuffing-Inspired Flavor:
Mix in a teaspoon of finely chopped celery or onion powder for that savory Thanksgiving stuffing flavor. - Garnish with Microgreens:
For a gourmet touch, top with microgreens or a tiny sprinkle of extra herbs.
Perfect Pairings
These deviled eggs pair wonderfully with a range of Thanksgiving dishes:
- Roast turkey and cranberry sauce – The eggs offer a cool, creamy contrast.
- Charcuterie or appetizer platters – Serve alongside cheese cubes, crackers, and olives.
- Stuffing or roasted vegetables – Their herby filling ties all the flavors together.
They also make a wonderful snack before the main meal, balancing richness with lightness.
Troubleshooting Common Mistakes
1. The yolk filling is too dry.
Add a small splash of milk, cream, or extra mayonnaise to loosen the texture.
2. The filling is too runny.
Stir in a little extra yolk or refrigerate for 10 minutes to firm it up.
3. The egg whites tore while peeling.
No worries! You can still fill them — just position them carefully on the platter, and no one will notice.
4. My yolks turned green.
This happens when eggs are overcooked or cooled too slowly. Next time, try the 10-minute cook followed by an ice bath.
Conclusion
Thanksgiving Deviled Eggs are proof that the simplest dishes can be the most delightful. They combine nostalgic comfort with seasonal flair, offering a balance of creamy, herby, and subtly tangy flavors that fit perfectly with any holiday spread. The charming pumpkin presentation brings joy to the table, making them as fun to look at as they are to eat.
Whether you’re celebrating with family or friends, these deviled eggs bring warmth, creativity, and a touch of sophistication to your Thanksgiving feast.
Frequently Asked Questions (FAQs)
Q1: Can I make these Thanksgiving Deviled Eggs ahead of time?
Yes! You can prepare the yolk mixture and boil the eggs up to a day in advance. Store them separately and assemble shortly before serving to keep them fresh.
Q2: How do I prevent the yolk mixture from being lumpy?
Mash the yolks thoroughly while still slightly warm, or use a food processor for a silky-smooth texture.
Q3: Can I use fresh herbs instead of dried ones?
Absolutely. Substitute one tablespoon of fresh herbs for every teaspoon of dried. The fresh herbs will add vibrant flavor and color.
Q4: How can I make these deviled eggs more colorful?
Add a pinch of turmeric or smoked paprika for a deeper orange hue, or stir in a drop of natural food coloring for a vivid pumpkin effect.
Q5: Are Thanksgiving Deviled Eggs gluten-free?
Yes, all ingredients in this recipe are naturally gluten-free, making them suitable for guests with dietary restrictions.
Q6: What’s the best way to transport deviled eggs to a party?
Use a specialized deviled egg carrier or place them snugly in a container lined with lettuce leaves or paper towels to prevent sliding.
Q7: Can I double the recipe?
Definitely. Simply double or triple all ingredients — this recipe scales perfectly for larger gatherings.
Q8: How long can deviled eggs sit out?
For food safety, don’t leave deviled eggs at room temperature for more than two hours.
Q9: Can I use an alternative to mayonnaise?
Yes — Greek yogurt or mashed avocado both work as lighter, healthier substitutes.
Q10: What can I do with leftover filling?
Use it as a spread for sandwiches, crackers, or celery sticks. It also makes a delicious dip for veggies.
Final Thoughts
These Thanksgiving Deviled Eggs beautifully merge tradition with creativity. With their creamy herb-infused filling and charming pumpkin design, they’re guaranteed to impress your guests and bring a festive touch to your table. Simple, flavorful, and fun to make — this is one appetizer you’ll return to year after year.
So this Thanksgiving, give your deviled eggs a seasonal makeover and let these little “pumpkins” steal the spotlight!
Print
Thanksgiving Deviled Eggs – A Festive Holiday Appetizer
- Total Time: 33 minutes
- Yield: 8 mini pizzas
Description
These Mini Skull Pizzas are a spooky and delicious twist on classic pizza — perfect for Halloween parties, movie nights, or a fun family dinner! Baked in a skull-shaped mold, they’re crispy on the outside, cheesy inside, and frightfully fun to eat.
Ingredients
- 1 can (13.8 oz) refrigerated pizza dough (or homemade dough)
- ½ cup pizza sauce
- 1 cup shredded mozzarella cheese
- ½ cup mini pepperoni or chopped regular pepperoni
- ½ tsp Italian seasoning
- Olive oil (for brushing)
- Skull-shaped silicone or metal baking mold
- Optional: cooked sausage, diced bell peppers, or olives for spooky details
Instructions
- Preheat oven to 375°F (190°C). Lightly grease the skull mold with olive oil or nonstick spray.
- Cut pizza dough into small pieces to fit each mold cavity. Press dough into the bottom and sides of each skull shape.
- Spoon about 1 tablespoon of pizza sauce into each cavity. Add mozzarella, pepperoni, and any desired toppings. Sprinkle with Italian seasoning.
- Place another small piece of dough over each filled mold. Press edges together to seal. Brush the tops lightly with olive oil.
- Bake for 15–18 minutes, or until golden brown and crisp.
- Let cool for a few minutes, then carefully pop out the mini skull pizzas.
- Serve warm with extra pizza sauce for dipping.
Notes
- For extra flavor, sprinkle parmesan on top before baking.
- These can be made ahead and reheated in the oven for 5 minutes before serving.
- Prep Time: 15 minutes
- Cook Time: 18 minutes
- Category: Appetizer, Snack
- Method: Baked
- Cuisine: American, Italian